4
It is important to read the safety precautions to ensure user’s safety
and to prevent potential damage to property. Please read this
information carefully for the proper use of the product.
Warning
Convenient Door Locking
Using cards and passwords for entry without keys
Easy Installation
Applying automatic switch key pad for both
left/light-Handed
One Touch Authentication
Automatic card reading function when touched
with a card
Safety Mode Function
Hacking prevention with safety button
Chime Function
Playing melodies during access
Double Authentication Function
Two factor authentication feature with a card
and password
Away Intrusion Prevention Function
Detecting illegal entries while away
SHS-G517
www.sds.samsung.com
2
Safety Precautions
• Do not install or repair the product on your
own.
• Do not install the product in a place
where the gap between the door and the
doorframe is 5mm or more.
• Please change your password periodically
and be careful that others do not have
access to your password.
• Do not operate the product with wet hands
and do not allow liquids such as water or
drinks to get inside the product.
• Do not use excessive force or sharp
objects to press the buttons on the Door
Lock.
• Please make sure to lock the door when
leaving.
• Insert batteries correctly in the appropriate
direction matching the poles (+/-) of the
product. If the batteries are inserted in
the reverse direction, it may cause liquid
leakage or product damage.
• Replace all batteries at the same time
when the battery life has ended. Do not
use new batteries and used ones together.
• Do not use water, benzene or alcohol when
cleaning the product. Please use a soft,
dry cloth.
• Replace the batteries within one week after
the battery replacement melody sounds.
●
Password must be entered after the number pad lights up. If the pad is off,
please touch the [Number Pad] again and re-enter the password.
●
To cancel a wrong password you have entered, press the [ ] button
and try again.
●
If you fail to enter the correct password 5 consecutive times, a warning
alarm will beep 20 times and the Door Lock will stop working for about 3
minutes. When the Door Lock system stops working, “Ding” sounds will
occur every 10 seconds for 3 consecutive minutes, after which Stop Mode
is released automatically.
Note
Touch the [Number
Pad] to light it up.
When two randomly chosen
buttons light up, press the
buttons in the order they
appeared.
When the number pad lights
up, enter the password and
press the [
] button.
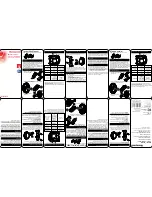
The product components may vary depending on the installation
environment.
Outer Body
Strike for Both Door Opening Type
(Sold Separately)
Inner Body
Key Tag (2 pieces)
User Guide
AA Battery (LR6)
Magnet Housing
Installation Paper Plan
GC68-02003B ED:02
Number Pad
Number Pad Off
Number Pad On
Touching
the number pad
Away Intrusion
Prevention Setup
Card Reader Part
Reset
Button
External
Power Port
Input Complete
Button
Low
battery
indicator
Open/Close
Button
Safety
Button
Registration
Button
Battery Cover
Manual knob
Deadbolt
Door Opening
Sensor
1.5V AA Battery
Battery Cover
Fixing Screw
New products have been set to the Double Security Mode.
Refer to ‘Double Security Mode On/Off’ to set the Normal Mode.
How to Open the Door from the Outside
(with a Password)
1. Double Security Mode
New products have been set to the Automatic Reading Mode. Refer to ‘How
to Set Automatic/Manual Card Reading’ to set the Manual Reading Mode.
How to Open the Door from the Outside
(with a Card or Key Tag)
2. Normal Mode
Touch the [Number
Pad] to light it up.
When the number pad lights up, enter the
password and press the [
] button.
●
When the card reader does not recognize the card or key tag, touch the
number pad and put the card or key tag on the card reader to open the
door.
Note
1. Automatic Reading
Mode (RF Auto Polling)
2. Manual Reading Mode
The door opens one second
after touching a registered card
or key tag on the card reader.
CARD
CARD
Touch the [Number
Pad].
After [Number Pad] light is on, touch
a registered card or key tag on the
[Card Reader Part]. The door opens
within a second.
Success:
DING DONG
DENG DONG
Fail:
DING-DONG
DING-DONG
Success:
DING DONG
DENG DONG
Fail:
DING-DONG
DING-DONG
All registration and settings operate only when the door opens.
All registered data (Master password, password, card, key tag) are deleted.
After initialization, the master password is set to ‘1234’, and the registered
password, card, key tag data are erased.
Initialization (Master Password, Password, Card,
Key Tag)
1. Pressing [Registration] Button
2. Entering the Master Password
Open the battery cover and press and
hold the [Registration] button for
10 seconds.
Enter the master password and press the
[
] button.
Success:
DING DONG
DENG DONG
Fail:
DING-DONG
DING-DONG
Success:
DING DONG DENG DONG
Fail:
DING-DONG DING-DONG
●
Manage your password with care so that unauthorized people will not have
access to it. Using the same password for an extensive period may raise the
risk of exposure. Regularly changing your password can reduce such risk.
●
To make sure the new password, card and key tag has been properly
registered, and close the door.
●
Can not choose a user number that has already been used. Refer to the ‘How
to Delete Password, Card and Key Tag’ to delete the user number.
●
Only the cards, key tags that meet the ISO 14443 Type A standard and are
approved by “Samsung SDS Door Lock” can be registered and used.
Caution
DING DONG
DING DING
DING DING
DING DING
DING DONG
DENG
5
5. Registration Done
To register consecutive, repeat 3~4 step.
To terminate registration, press the
[Registration] button.
DING DONG DENG
6
Product Components
Names and Functions (Outer Body)
Names and Functions (Inner Body)
3
The master password can be 4~12 digits number. Only one password can be
registered.
Master Password Change
1. Pressing [Registration] Button
2. Entering the Current Master Password
Open the battery cover and press the
[Registration] button briefly.
Enter the master password (default is ‘1234’)
and press the [
] button.
DING DONG
DING DONG
3. Entering the New Master Password
Enter the new master password and press
the [
] button.
DING DONG
DENG
●
A registered master
password cannot be
deleted. Change the
master password to a
new one.
Note
The password can be 4~12 digits number. Up to 70, including the password,
card and key tag, can be registered. (Only ISO14443 A Type is available.)
How to Register Password , Card and Key Tag
1. Pressing [Registration] Button
Open the battery cover and press
the [Registration] button briefly.
CARD
DING DONG
2. Entering the Master Password
Enter the master password (default is ‘1234’)
and press the [
] button.
DING DONG
3. Entering the User Number
Enter the user number(1~70) to register the
password or card and press the [
] button.
DING DONG
4. Entering the New Password or
Touching the New Card
Register Password : Enter the new password
and press the [
] button.
Register Card/Key tag : Touch the new card or
key tag on the [Card
Reader Part].
DING
DONG
DENG
Or
Registered passwords, cards and key tags can be individually deleted.
How to Delete Password , Card and Key Tag
2. Entering the Master Password
Enter the master password and press the
[
] button.
DING DONG
1. Pressing [Registration] Button
Open the battery cover and press and
hold the [Registration] button for
5 seconds.
DING DONG
DING DING
DING DING
3. Entering the User Number to be deleted
Enter the user number (1~70) of the password, card
or key tag to be deleted and press the [
] button.
DING DONG
DENG
●
Double authorization mode will automatically be turned off when the
password and card has not been registered each more one.
Note