Roto 100125440, Manual
The Roto 100125440 user manual is available for free download on our website. This comprehensive manual provides detailed instructions and guidance on how to operate and optimize the performance of your Roto 100125440. Enhance your product experience by accessing the manual today at manualshive.com.
Share
Download


Reviews:
No comments
Related manuals for 100125440

TM/R-AF1-1
Brand: Skytech Pages: 4

VS-66WH
Brand: NuTone Pages: 2

PC 506 Series
Brand: Rain Bird Pages: 41

46-1022
Brand: BRINKS Pages: 2

DMT1
Brand: Draper Pages: 4

EMT707PA
Brand: SMJ Pages: 6

TreeSonic
Brand: Fakopp Pages: 6
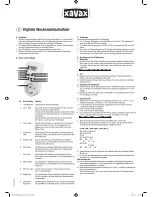
Digital weekly timer switch
Brand: Xavax Pages: 10

QTW-01
Brand: Qotom Pages: 8

852.108
Brand: Bachmann Pages: 2

Polaris
Brand: FarmTek Pages: 4

TNINL2412
Brand: Prime Wire & Cable Pages: 2

5842AW
Brand: RaceAmerica Pages: 8

DIGITAL:TIMER 44-1031
Brand: BRINKS Pages: 2

EVOKOND
Brand: Tracon Electric Pages: 4

NK ZSU 1
Brand: Goobay Pages: 6

Mini Timer MT20
Brand: Marmitek Pages: 112

T106-C
Brand: KingShield Pages: 2


