background image


800 size EC-145 T1


 including 

S M 2.0 mecha nics


Manual 


CCPM SCALE RC HELICOPTER 


Summary of Contents for EC-145 T1

Page 1: ...800 size EC 145 T1 including SM2 0 mechanics Manual CCPM SCALE RC HELICOPTER ...

Page 2: ...yright 2019 Roban Model Limited All rights reserved Super Scale 800 Manual EC 145 T1 Version 1 0 August 2019 Roban Model Limited No 28 Liuchongwei 2nd Industrial Zone Wanjiang 523046 Dongguan County GD PRC ...

Page 3: ...able Flight time 5 minutes Takeoff weight 8500g Flight Stabilization 3 axis flybarless gyro Radio Control min 6 channel with pitch and throttle curves Optionally available equipment The Super Scale EC145T1 is a high performance radio controlled scale helicopter Our goal was to create a simple high performance helicopter with a minimum of mechanical components and simple maintenance Please read thi...

Page 4: ...ced back to the manufacturer You hereby agree to release Roban Limited from any responsibility or liability arising from the use of this product SAFETY GUIDELINES Fly only in areas dedicated to the use of model helicopters Follow all control procedures for the radio frequency system It is necessary that you know your radio system well Check all functions of the transmitter before every flight The ...

Page 5: ...12 Tail rotor blade x2 13 Long Tail pushrod 14 Short tail boom 15 Torque tube 203mm 16 Torque tube 869mm 17 Tail boom support x2 18 Landing gear 19 Landing gear steps x2 20 Screw M3x16 x4 21 Screw M2 5x20 x3 22 Screw M2 5x12 x2 23 L holder x4 24 Washer M3 x8 25 Washer M4 x4 26 Screw M4x10 x4 27 Screw M3x10 x6 28 Ball link x4 29 Nut M2 x4 30 Nut M3 x4 31 Screw M3x16 x4 32 Screw A2x8 x4 33 Screw A3x...

Page 6: ... D x2 48 Step holder x4 49 Scale Part E 50 Scale Part F 51 Scale Part G 52 Scale Part H 53 Scale Part I 54 Scale Part J 55 Scale Part K x2 56 Scale Part L x8 57 Red LED 58 Green LED 59 White LED 60 Prolonging wire 60cm 61 Prolonging wire 90cm x3 62 Light cap white 63 LED Controler 64 Instrument panel 65 center console 66 Front seat x2 67 Middle seat 68 Back seat 69 Headrest x8 70 Cyclic control x2...

Page 7: ...Copyright 2019 Roban Model Limited All rights reserved 73 Pedal right x2 74 Decal Set ...

Page 8: ...ANTS ADHESIVES Generic pliers Hexagonal driver size 1 5 2 2 5 3 4mm 4mm T Wrench 5 5mm Socket wrench for M3 nuts 8mm Hex fork wrench for M5 nuts Medium threadlocker eg Loctite 243 Strong retaining compound eg Loctite 648 Spray lubricant eg Try Flow Oil Synthetic grease eg Tri Flow Synthetic Grease Cyanoacrylate adhesive Pitch Gauge for set up Soldering equipment for motor wiring KIT contents Insid...

Page 9: ...ease prepare the fuselage according to the following steps Installation into the fuselage most of the helicopter mechanic become inaccessible The landing gear has to be installed first As you will have to turn the mechanics over please make sure that you are not scratching the paint by using a old blanket or a rig while working on it ...

Page 10: ...Copyright 2019 Roban Model Limited All rights reserved Then install the footrests 22 with help of the holders 48 with glue onto the landing gear as shown ...

Page 11: ...tall the LED 57 and the prolonging wire 60 into the tail fin Secure the LED with glue then attach thelight cap 62 with glue as well Install the LEDs 57 and 58 into the horizontal wings with glue as shown Right hand side LED is red left if green if viewn from behind ...

Page 12: ...mited All rights reserved Attach the prolonging wires to the LED wires 61 and route them forward towards the main fuselage as shown Then install the tail wings with glue into the tail boom Make sure to align the tail wings properly ...

Page 13: ...Copyright 2019 Roban Model Limited All rights reserved Install the mid 67 as well as the aft seat row 68 into the fuselage and secure with glue as shown ...

Page 14: ...Copyright 2019 Roban Model Limited All rights reserved Connect the instrument panesl 64 connector to the center panel 65 Glue bloth parts together after checking for functionality ...

Page 15: ...Copyright 2019 Roban Model Limited All rights reserved Then install all remaining cockpit parts 66 69 73 as shown and secure with glue ...

Page 16: ...ly snap on the ball links 70 00025 on the swashplate s upper disc uni links 70 00030 Step 2 Tail boom First of all install the center bearings 70 00100 with the holders 02 02006 into the tail boom 70 00095 Distribute the bearings evenly in the tail boom It is recommended to apply a bit of lubrificant onto the tubes inner surface elsewise the bearing is likely to get stuck before the correct positi...

Page 17: ...nestron frame onto the tail boom Lock it with the three screws as shown but do not use thread lock yet as it has got to be uninstalled again Snap the servo control rod onto the ball link Step 4 Cyclic Servo Installation Install the three cyclic servos onto the servo tray as shown Depending on your servos you may have to use washers to adjust the servo to the proper installation height It is strong...

Page 18: ...or you have to add a flat to the motor shaft in order to secure the pulley with the set screws 70 Mount the motor as shown using washers and screws onto the motor mount 70 00066 Make sure to have the motor wire outlet facing into the right direction for connecting them to the ESC Then insert the belt pulley into the belt and slide it onto the motor shaft Before you tighten the set screws make sure...

Page 19: ...Motor Support Certain motors with 25mm mounts and long output shafts can be outfitted with a secondary motor shaft bearing Route both the ESC power wire and the BEC wire from the battery compartment along the side wall as shown towards the side frame of the mechancis ...

Page 20: ... the gyro and the transmitter mixer functions you have programmed Collective pitch travel linear travel 2 3 to 9 10 The blade grips are 14mm the supplied rotor blades are 12mm thick We supplied PC washer please install one washer on top and on the bottom of the rotor blade when installing it to the blade grip ATTENTION When using the a pitch gauge to adjust correct CP travels make sure that the ga...

Page 21: ...Copyright 2019 Roban Model Limited All rights reserved Step 8 Installation of mechanics Attach the tail boom as shown onto the fuselage ...

Page 22: ...Copyright 2019 Roban Model Limited All rights reserved ...

Page 23: ...Copyright 2019 Roban Model Limited All rights reserved Now install the short tail boom shaft and tail rotor as shown Connect the tail pushrods to the lever and install the hatch as shown ...

Page 24: ...Copyright 2019 Roban Model Limited All rights reserved Then secure the mechanic inside the main body using screw 20 and washer 24 as shown ...

Page 25: ...Copyright 2019 Roban Model Limited All rights reserved ...

Page 26: ...Copyright 2019 Roban Model Limited All rights reserved ...

Page 27: ... you can save your model through autorotation If one particular technical fault keeps recurring in your model replacing the component concerned will not solve the problem unless you change some other aspect of the operating conditions It is as hard to fly nice and smooth scale maneuvers as flying F3C or exact 3D figures And one final request Please be realistic when assessing your piloting skills ...

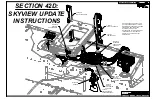
Page 28: ...Copyright 2019 Roban Model Limited All rights reserved Appendix A Explosionszeichnungen ...

Page 29: ...Copyright 2019 Roban Model Limited All rights reserved ...

Page 30: ...Copyright 2019 Roban Model Limited All rights reserved ...

Page 31: ...Copyright 2019 Roban Model Limited All rights reserved ...

Page 32: ...Copyright 2019 Roban Model Limited All rights reserved ...

Page 33: ...Copyright 2019 Roban Model Limited All rights reserved ...

Page 34: ...Copyright 2019 Roban Model Limited All rights reserved ...

Page 35: ...Copyright 2019 Roban Model Limited All rights reserved ...

Page 36: ...Copyright 2019 Roban Model Limited All rights reserved ...

Page 37: ...Copyright 2019 Roban Model Limited All rights reserved Appendix B Ersatzteile ...

Page 38: ...Copyright 2019 Roban Model Limited All rights reserved ...

Page 39: ...Copyright 2019 Roban Model Limited All rights reserved ...

Page 40: ...Copyright 2019 Roban Model Limited All rights reserved ...

Page 41: ...Copyright 2019 Roban Model Limited All rights reserved ...

Page 42: ... 1 JJ 70 00078 Belt pulley 78T Riemenrad 78T 1 JJ 70 00079 Beilagscheibe 10x12x1 Beilagscheibe 10x12x1 RCH 70 012 1 JJ 70 00080 Gear 1M 36T Zahnrad 1M 36T RCH 70 013 1 JJ 70 00082 Gear hub 36T Zahnradaufnahme 36T RCH 70 014 1 JJ 70 00083 Gear holder 30T Zahnradaufname 30T RCH 70 015 1 JJ 70 00073 Belt pinion 22T Riemenscheibe 22T RCH 70 016 1 JJ 70 00037 Ball link 5mm Kugelkopfrahmen 5mm 1 JJ 70 0...

Page 43: ...RCH 70 032 1 JJ 70 00041 Lever 2 Hebel 2 RCH 70 033 1 JJ 70 00042 Lever 3 Hebel 3 RCH 70 034 1 JJ 70 00044 Bushing 5x7x7 Buchse 5x7x7 1 JJ 70 00049 Beilagscheibe 5x7x1 5 Beilagschreibe 5x7x1 5 1 JJ 70 00051 Shaft 5x62 Welle 5x62 RCH 70 035 1 JJ 70 00064 Servo holder fwd Servohalter vorne 1 JJ 70 00065 Servo holder aft Servohalter hinten RCH 70 036 1 JJ 70 00068 Uniball 5mm Uniball 5mm RCH 70 037 1...

Page 44: ...0 00117 Tail frame 1 Heckrahmen 1 RCH 70 056 1 JJ 70 00120 Tail frame 2 Heckrahmen 2 RCH 70 057 1 JJ 70 00118 Tail rotor hub Heckhalter RCH 70 058 1 JJ 70 00136 Tail blade Heckrotorblatt 1 JJ 70 00154 Tail blade Heckrotor RCH 70 059 1 JJ 70 00151 Main Blade Hauptrotorblatt RCH 70 060 1 JJ 70 00146 Main Belt Zahnriemen RCH 70 061 1 JJ 70 00002 Schraube M3x18 Schraube M3x18 RCH 70 062 1 JJ 70 00005 ...

Page 45: ... 091 1 JJ 70 00140 Schraube M2x14 Schraube M2x14 RCH 70 092 RCH 70 093 1 JJ 70 00142 Uniball 5mm Uniball 5mm RCH 70 094 1 JJ 70 00143 Pitch lever 4 blade Pitchhebel 4 Blatt RCH 70 095 1 JJ 70 00144 Pitch lever 3 blade Pitchhebel 3 Blatt RCH 70 096 1 JJ 70 00145 Tail shaft 3 4 blade Heckwelle 3 4 Blatt RCH 70 097 1 60 WJ 00015 Beilagscheibe 12x18x0 1 Beilagscheibe 12x18x0 1 RCH 70 098 1 JJ 70 00043...

Page 46: ...Copyright 2019 Roban Model Limited All rights reserved NOTIZEN ...

Page 47: ...Copyright 2019 Roban Model Limited All rights reserved www robanmodel com ...

Reviews: