Rider Concept KINGTOYS moto 1000GS, Owner'S Manual
Introducing the sleek and powerful Rider Concept KINGTOYS moto 1000GS. Explore the excitement of this cutting-edge motorcycle with confidence, as you'll find all the essential information you need in our comprehensive Owner's Manual. Download it for free from our website and unleash the full potential of your new ride.
Share
Download


Reviews:
No comments
Related manuals for KINGTOYS moto 1000GS
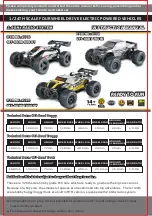
2118
Brand: Haiboxing Pages: 12

Rolly Trac Lader
Brand: Rolly Toys Pages: 5

BULLET FLUX
Brand: HPI Racing Pages: 48

SHELBY COBRA 427 S/C
Brand: Agora Models Pages: 35

A023
Brand: Lean Pages: 12

LabC03evo
Brand: Capricorn RC Pages: 57

1/8 Luxury racing truggy
Brand: Xray Pages: 44

120021
Brand: Flux Pages: 12

24V UTV
Brand: Dynacraft Pages: 18

Lighting McQueen
Brand: Rovo Kids Pages: 13

Electric Ride-On Toy ATV
Brand: Rovo Kids Pages: 13

Nissan GT-R R35
Brand: Rovo Kids Pages: 16

BMW S1000RR
Brand: Rovo Kids Pages: 21

460239
Brand: Jamara Pages: 12

The Scopion King Ford Monster Truck
Brand: REVELL Pages: 4

SnapTite SCOOBY-DOO! The Mystery Machine
Brand: REVELL Pages: 4

23 73 00
Brand: Reely Pages: 120

27 51 16
Brand: Reely ROAD Pages: 104


