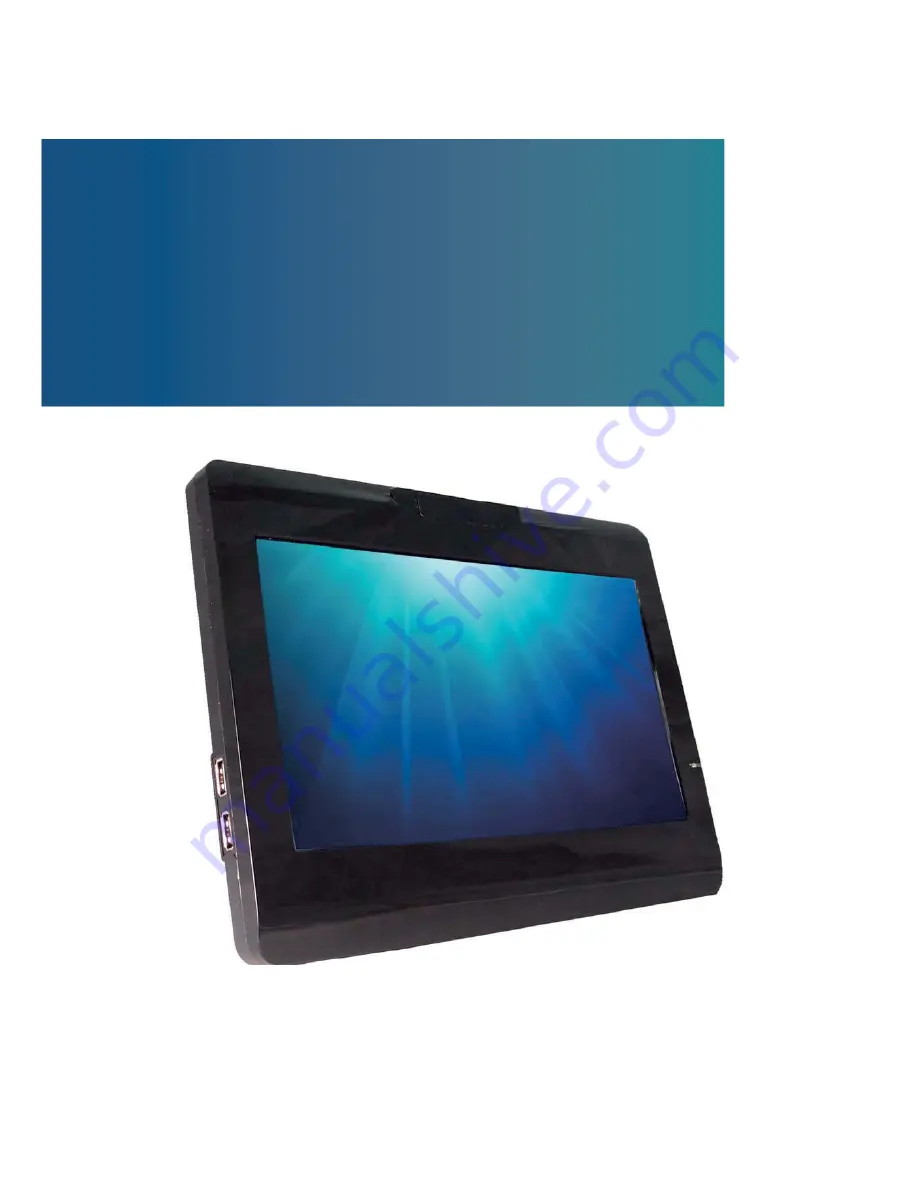
background image

I

HPC-1050/1051 User’s Manual

HPC-1050/1051

10.1" Fanless Panel PC w/ Intel® BayTrail Processors

User’s Guide

Summary of Contents for HPC-1050

Page 1: ...I HPC 1050 1051 User s Manual HPC 1050 1051 10 1 Fanless Panel PC w Intel BayTrail Processors User s Guide...

Page 2: ...iance Statements 7 Maintaining Your Computer 8 Chapter 1 Introduction 10 Overview 10 Product Specifications 11 System tour 12 Mechanical Dimensions 14 Chapter 2 Getting Started 15 Setting up your PC 1...

Page 3: ...t specifications 11 Table 2 BIOS Main Menu 24 Table 3 Advanced Menu 25 Table 4 Advanced Menu Display Configuration 26 Table 5 Advanced Menu Super IO Configuration 27 Table 6 Advanced Menu Super IO Con...

Page 4: ...he installation instructions in this user s guide for precautions and procedures If you have any questions please contact our Post Sales Technical Support Access can only be gained by service persons...

Page 5: ...ly aligned to avoid bending any connector pins Also before connecting a cable make sure both connectors are correctly oriented and aligned CAUTION Do not attempt to service the system yourself except...

Page 6: ...not handle or store system boards near strong electrostatic electromagnetic magnetic or radioactive fields Instructions for Lithium Battery WARNING Danger of explosion when battery is replaced with i...

Page 7: ...evices FCC Compliance Statement This equipment has been tested and found to comply with limits for a Class A digital device pursuant to Part 15 of the FCC rules These limits are designed to provide re...

Page 8: ...omised Consideration should be given to the maximum rated ambient temperature Overheating can cause a variety of problems including premature aging and failure of chips or mechanical failure of device...

Page 9: ...ine conditioners keep a system s AC power source voltage at a fairly constant level and therefore can handle brownouts Because of this added protection line conditioners cost more than surge protector...

Page 10: ...thus easily meeting a broad range of customer requirements The HPC series provide a compact high performance human machine interface for home automation demands Checklist HPC 1050 Power Adapter Power...

Page 11: ...dec w 2W Audio Amplifier Line In Line Out and Mic In Supported Storage 1x 2 5 SATA HDD or SSD space USB 4x USB 2 0 1x USB 3 0 COM 2x COM port with RS 232 422 485 selection supported Expansion slot 1x...

Page 12: ...ously on a single computer with some peripheral acting as additional plug in sites or hubs Power Switch The power switch allows powering ON and OFF the system Ethernet The eight pin RJ 45 LAN port sup...

Page 13: ...Chapter 1 13 HPC 1050 1051 User s Manual COM D Sub 9 pin connector for RS 232 422 485 connection VGA D Sub 15 pin VGA connector for display output...

Page 14: ...Chapter 1 14 HPC 1050 1051 User s Manual Mechanical Dimensions 262 x 200 x 61 mm W x D x H Figure 2 Mechanical Dimensions...

Page 15: ...hapter 2 15 HPC 1050 1051 User s Manual Chapter 2 Getting Started Setting up your PC Connecting the monitor Connect the HDMI VGA cable from your display to the HDMI VGA port Figure 3 VGA HDMI VGA HDMI...

Page 16: ...your computer Figure 4 Connect USB mouse keyboard NOTE Using a third party USB mouse or keyboard may require software drivers Check the manufacturer s website for the latest software drivers Connecti...

Page 17: ...efinitions COM1 COM2 RS 232 422 485 Port DB 9 Pin RS 232 RS 422 Half Duplex RS 485 Full Duplex RS 485 1 DCD TX DATA TX 2 RXD RX N A RX 3 TXD TX DATA TX 4 DTR RX N A RX 5 GND GND GND GND 6 DSR N A N A...

Page 18: ...1 Connect the power adapter cable to the DC jack DC IN of the HPC 1050 2 Connect the power cable to the power adapter 3 Connect the power cable to a power outlet 4 Press the power switch on the front...

Page 19: ...with VESA FDMI 75 standard mounting holes as shown below Use 4 screws with the appropriate length for your mounting bracket Figure 8 VESA Mounting Hole Locations NOTE To fasten the metal shelf your mo...

Page 20: ...the panel PC using the 4 screws M4x5L flat head Step2 Install the wall mount kit to the proper place of the wall by using the 6 screws Step3 Attach the panel PC to the wall mount kit which has been we...

Page 21: ...sktop Stand Step1 Assembling the desktop stand Step2 Secure the VESA kit to the desktop stand using the 4 screws M4x5L round head Step3 Secure the panel PC to the desktop stand using the 4 screws M4x5...

Page 22: ...VGA driver please double click Setup exe which is under below folder Intel VGA Utilities 2 If your system goes into suspend mode please push the power button for 2 seconds to wake up the system Mainte...

Page 23: ...lease contact us AMI s ROM BIOS provides a built in Setup program which allows the user to modify the basic system configuration and hardware parameters The modified data will be stored in a battery b...

Page 24: ...IOS Main Menu BIOS SETUP UTILITY M a i n A d v a n c e d P o w e r S e c u r i t y B o o t S a v e E x i t Product Information Select Screen 6HOHFW WHP Enter Select Change Opt F1 General Help F2 Previ...

Page 25: ...Exit Onboard LAN1 Boot Disabled Onboard LAN2 Controller Enabled Onboard LAN2 Boot Disabled Audio Controller Enabled Display Configuration Super IO Configuration CPU Chipset Configuration SATA Configu...

Page 26: ...al Gfx Mem 256 M Primary IGFX Boot Display Active LVDS LVDS Panel Type LVDS Backlight Control Mode LVDS Backlight Control Voltage VBIOS Default Enabled 1024x600 18Bit 1CH Valtage 2 5 V Version 2 16 12...

Page 27: ...Serial Port 1 Configuration BIOS SETUP UTILITY M a i n A d v a n c e d P o w e r S e c u r i t y B o o t S a v e E x i t Serial Port 1 Configuration Serial Port Enabled Device Settings IO 3F8h IRQ 4 C...

Page 28: ...ge Settings Auto Serial Port 2 Type RS485 Select Screen Select Item Enter Select Change Opt F1 General Help F2 Previous Values F3 Optimized Defaults F4 Save and Exit ESC Exit Version 2 16 1242 Copyrig...

Page 29: ...elp F2 Previous Values F3 Optimized Defaults F4 Save Exit ESC Exit EIST Enabled Turbo Mode Enabled Limit CPUID Maximum Disabled Execute Disabled Bit Enabled Intel Virtualization Technology Disabled Ve...

Page 30: ...ge Opt F1 General Help F2 Previous Values F3 Optimized Defaults F4 Save Exit ESC Exit Serial ATA SATA Enabled SATA Mode AHCI Mode Serial ATA Port 1 Empty Port 1 Enabled mSATA Port 1 Empty Port 1 Enabl...

Page 31: ...ss Storage Driver Support Enabled Select Screen 6HOHFW WHP Enter Select Change Opt F1 General Help F2 Previous Values F3 Optimized Defaults F4 Save Exit ESC Exit XHCI Mode Smart Auto Version 2 16 1242...

Page 32: ...atus CPU Warning Temperature Disabled CPU Temperature 43 C System Temperature 39 C VCORE 0 853 V VIN 12 164 V 5V 5 066 V VMEN 1 349 V Select Screen 6HOHFW WHP Enter Select Change Opt F1 General Help F...

Page 33: ...y PS 2 Mouse Disabled Resume By PCIE Device Disabled Resume By Ring Device Disabled Resume By RTC Alarm Disabled WatchDog Timer Configuration Version 2 16 1242 Copyright C 2013 American Megatrends Inc...

Page 34: ...or when entering Setup If ONLY the User s password is set then this is a power on password and must be entered to boot or enter Setup In Setup the User will have Administrator rights The password leng...

Page 35: ...Exit ESC Exit Full Screen LOGO Display Disabled Setup Prompt Timeout 1 Bootup NumLock State Keyboard Detect Warning On Enabled CSM Support Boot Option Filter Enabled Legacy Only Boot Option Priorities...

Page 36: ...is turned off When you select this option a confirmation window appears Select Yes to save changes and exit Discard Changes and Exit Exit system setup without saving any changes Select this option onl...

Page 37: ...safe Defaults Load Optimal Default values for all the setup values This option allows you to load failsafe default values for each of the parameters on the Setup menus which will provide the most stab...

Page 38: ...an operating system and the necessary drivers to operate it After you have finished assembling your system and connected the appropriate power source power it up using the power supply and install the...

Reviews: