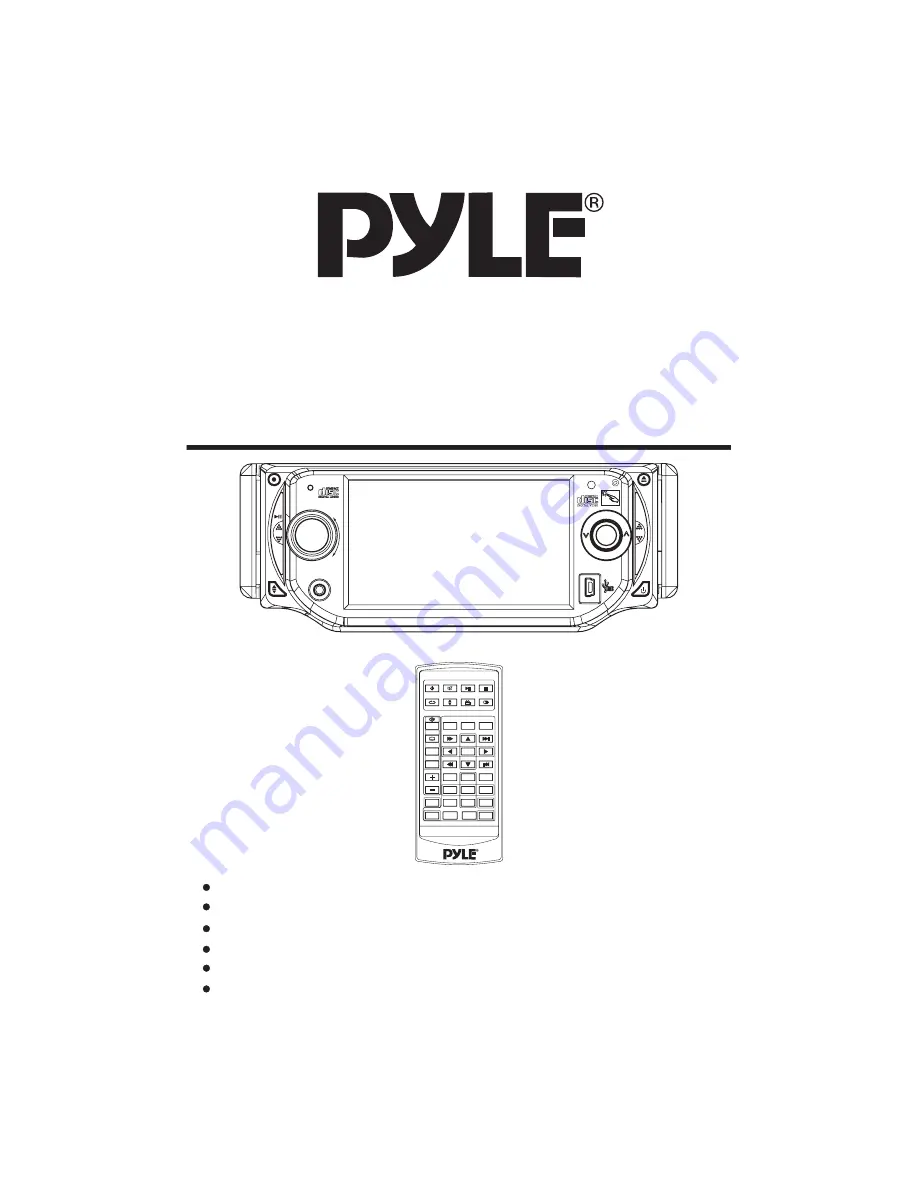
background image

OWNER's MANUAL

Mobile Video System

Detachable Panel

Motorized Slide Down And
4.3 Inch Wide Color Touch Screen Monitor
CAR DVD/VCD/CD/MP3 Player
AM/FM Digital PLL Tuning Radio
MPEG4 Player
USB Connect

TOUCH SCREEN

REL

RESET

VOL-

VOL+

AUX IN

IR

EQ

SEL

BND

CAR DVD/VCD/CD/MP3 PLAYER WITH MPEG4

APS DIS P

I

MU

CH

1-6

MOD

PLD43MU

MENU

DVD/RECEIVER CONTROL

DVD/RECEIVER CONTROL

SETUP

ENTER

1

2

3

4

5

6

7

8

9

0

VOL

SEL

A/PS

MUTE

STOP

MO/ST

REPEAT

POWER

CLK

PLAY/PAUSE

EQ

ANGLE

MODE

BAND

VOL

OSD

TITLE/PBC

LO/DX

GOTO

+10

TOP

INT

RDM

Summary of Contents for PLD43MU

Page 1: ...L Tuning Radio MPEG4 Player USB Connect TOUCH SCREEN REL RESET VOL VOL AUX IN IR EQ SEL BND CAR DVD VCD CD MP3 PLAYER WITH MPEG4 APS DIS P I MU C H 1 6 MOD PLD43MU MENU DVD RECEIVER CONTROL DVD RECEIVER CONTROL SETUP ENTER 1 2 3 4 5 6 7 8 9 0 VOL SEL A PS MUTE STOP MO ST REPEAT POWER CLK PLAY PAUSE EQ ANGLE MODE BAND VOL OSD TITLE PBC LO DX GOTO 10 TOP INT RDM ...

Page 2: ...ic Operations Select Playback Mode On Screen Disc Operations Selecting audio languages Selecting Subtitles Selecting multi angle views Title menu function Adjustment Rear View Camera Setting Audio Mode Scroll Caption Adjustments Alternate Audio video Source 26 28 28 29 30 31 31 32 32 26 31 33 34 7 8 12 12 13 17 17 17 18 18 18 1 1 21 2 2 25 25 25 25 2 3 4 5 9 10 16 19 2 9 9 20 21 2 4 5 Setup Other ...

Page 3: ...e clear the temper ature in your car becomes normal DO NOT install any receiver in locations where it may obstruct the steering wheel and gearshift lever operations as this may result in a traffic accident it may obstruct the operation of safety devices such as air bags as this may result in a fatal accident it may obstruct visibility DO NOT operate any receiver while manipulating the steering whe...

Page 4: ... AND ANNOYING INTERFERENCE USE ONLY THE RECOMMENDED ACCESSORIES THIS DEVICE IS INTENDED FOR CONTINUOUS OPERATION This product incorporates copyright protection technology that is protected by method claims of certain U S Patents and other intellectual property rights owned by Macrovision Corporation and other rights owners Use of this copyright protection technology must be authorized by Macro vis...

Page 5: ...ing alcohol Never use solvents such as benzine thinner or conventional record cleaners as they may mar the surface of the disc Handling and Cleaning Dirt dust scratches and warping disc will cause misoperation Do not place stickers or make scratches on discs Do not warp discs A disc should always be kept in its case when not in use to prevent from damaging Do not place discs in the following place...

Page 6: ...does not get in the driver s way and cannot injure the passenger if there is a sudden stop like an emergency stop If installation angle exceeds 30 from horizontal the unit might not give its performance Avoid installing the unit where it would be subject to high temperature such direct sunlight or from hot air from the heater or where it would be dirt or excessive vibration This unit can be proper...

Page 7: ...ove the PLASTIC COVER of the both sides away then insert the two KEY PLATE into left and right side of chassis as above illustration DASH BOARD METAL MOUNTING STRAP HEX NUT SPRING WASHER PLAIN WASHER TAPPING SCREW CONSOLE SLIDE BRACKET HOUSING HEX BOLT KEY PLATE KEY PLATE PLASTIC COVER ...

Page 8: ...t Panel Before detaching the control panel be sure to turn off the power 1 Press the release button and the left hand side of the front panel will release FIG 1 2 Pull off the front panel FIG 2 and keep the front panel into the case FIG 3 Attaching The Front Panel 1 First insert the right hand side of the front panel into the hollow of the unit 2 Gently push the left hand side of the front panel u...

Page 9: ...ol panel Angle 3 Angle 4 Angle 1 Angle 2 When you want to change the viewing angle of the operating unit to play you can touch the section on touch screen or press the button on the front panel repeatedly to select the desired angle as follows CHANGING THE CONTROL PANEL ANGLE ...

Page 10: ...YELLOW COAXIAL OUT BROWN WHITE B 12V REAR CAMERA SWITCH GREEN YELLOW AUX optional RCA CABLE REAR CAMERA INPUT B PARKING BRAKE FRONT RCA WHITE L RCH RED LCH WHITE FRONT RCA RED R VIDEO OUT 1 YELLOW REAR RCA OUTPUT CABLE optional FRONT RCA OUTPUT CABLE FOR RCA LINE OUT VERSION ONLY GREY GREY BLACK FRONT Rch SPK VIOLET VIOLET BLACK WHITE WHITE BLACK GREEN GREEN BLACK REAR Lch SPK AUTO ANTENNA BLUE FU...

Page 11: ...s it to adjust volume level In case of the SETUP MENU mode buttons served as cursor buttons to select item left right ahead back Press it briefly to display the main menu of the DVD VCD Press it long to switch the SUBWOOFER ON and OFF Display statistical disc information during playback To change the band in radio stations Press it to turn on the unit press it again to turn off In DISC mode starti...

Page 12: ...e as the direction indicated by the arrow See And then Remove the battery holder as the direction indicated by the arrow See 2 Replace the battery Set a new battery property with side up as illustrated See 3 Insert the battery holder Push in the holder to the original position See 1 2 3 4 Installing The Lithium Coin Battery Warning Do not install any battery other than CR2025 or its equivalent oth...

Page 13: ...rol Panel Touch Panel Key Functions 12 SWF LUD DSP CLK MOD VOLUME SEL VOLUME Touch Screen Key 1 SWF 2 LUD 3 DSP 4 CLK 5 6 MOD 7 VOLUME 8 SEL 9 VOLUME 10 subwoofer function loud function EQ function pop classic jazz rock flat clock function mute function select input mode volume adjustment select the menu of the Sound Picture volume adjustment panel angle adjustment ...

Page 14: ...r audio and video press this knob repeatedly to cycle through and select them Tint Contrast Bright Color BG Color Volume Bass Treble Balance Fader 5 BAND BUTTON In Radio mode press this button repeatedly or the BAND button on the remote control to cycle through and select the desired radio band FM MW LW For 3 Bands Europe FM MW For 2 Bands Europe FM AM For 2 Bands USA Control Panel 6 EQ BUTTON Swi...

Page 15: ...utton briefly to turn off the audio Press again to restore the volume to prior level You can also disable the MUTE function by turning the VOL knob 9 ANGLE Screen position This button allows you to change the angle of the screen module in four steps Press this button repeatedly to cycle through the different positions Control Panel 10 CH 1 6 BUTTON RADIO PRESET a In Disc Playback Mode Press this b...

Page 16: ...ts presence and draws the disc in The panel will automatically return to its previous position 16 AUX INPUT JACK For information about connecting a AUX device please see page 31 17 USB PORT For information about connecting a USB device please see page 31 18 TFT Display liquid crystal display The operation of the TFT please see page 17 Control Panel DVD VCD CD MP3 Normal Playback 2x 4x 8x 16x the s...

Page 17: ... disc or eject the disc You can also press the button on the front panel to eject the disc or insert the disc to start play Select Sources Touch the MOD section on screen the signals will display in the screen as follow repeatedly MOD DISC TUNER AUX IN Touch the screen the VOLUME section to decrease volume level VOLUME Mute Function Use your finger touch the section it will mute the sound but the ...

Page 18: ...iew camera is automatically displayed on the monitor when you change the gear to the back position The monitor on the unit only COLOR 16 SWF LUD DSP CLK MOD VOLUME SEL VOLUME touch to select touch to adjust Basic Operation Volume Bass Treble Balance Contrast Bright Color Tint Fade Buzzer Audio Quality Adjustment SEL During DISC playback use your finger touch briefly the SEL section on the screen o...

Page 19: ...ETUP button for about 2 seconds on the remote control the adjustment scroll bar will display on the screen b Use the VOL to select among of the A B C X Y Z and blank and use the button on the Scroll Caption Adjustment front panel to ahead back proceed cancel and then press the SETUP button briefly to confirm Press it button longer again to renew Following the diagram below to connect analogue repl...

Page 20: ...Switching To Radio Mode MOD the following information will appears on the monitor 1 2 3 MOD 6 4 5 BND FM1 87 5 MHZ ST DX DISC IN CH 6 SWF POP 11 08 AM Listening to the Radio Storing Stations In Memory Retrieve a preset station Touch the 1 6 sections briefly or press the CH1 6 button repeatedly to retrieve a station which had been stored in the memory in advance the chose number is shown on display...

Page 21: ...on APS 1 2 3 MOD 6 4 5 BND ST DX DISC IN CH 6 SWF POP 11 08 AM FM1 98 10 MHZ SWF LUD DSP CLK APS VOLUME SEL VOLUME Rock 03 ST Mute Function Use your finger touch the section it will mute the sound but the disc continues playing Touch it again to resume In Radio Mode Touch the APS section and keep on the touch screen or swing the SEL knob in direction of the APS DISP for Automatic Preset Setup APS ...

Page 22: ...witching the DVD mode Touch the MOD section on the touch screen or press MOD button to select the DISC mode it display like following MOD Function setup different the source the display is different Pause still picture Touch the section on touch screen during playback will stop play temporary touch it again to return the normal playback Skipping Track During DISC playback Touch the section on the ...

Page 23: ...apter track when selected REP ONE mode 2 Select REP ALL mode to continuously repeat all chapter track on the current disc 22 SWF LUD DSP CLK RPT ZOOM RDM INT OSD DISC IN SWF POP 11 08 AM DVD 11 0 44 36 MOD VOL SEL VOL DISC IN SWF POP 11 08 AM DVD 11 0 44 36 DISC Operation DISC IN SWF POP 11 08 AM DVD 11 0 44 36 SUBTITLE SET AUDIO GOTO TITLE Mute Function Touch the section on touch screen or press ...

Page 24: ...DVD 11 0 44 36 SUBTITLE SET AUDIO GOTO TITLE FOR CD Touch the screen the INT section or long press the 3 INT button on the remote to play the previous 6 seconds part of each track chapter on disc INT 3 INT Function FOR VCD INT Touch the screen the INT section or long press the 3 INT button on the remote it display will following menu as below SELECT DIGEST TYPE TRACK DIGEST DISC INTERVAL TRACK INT...

Page 25: ...0 00 56 SINGLE REMAIN TRACK 01 16 0 05 20 TOTAL ELAPSED TRACK 01 16 0 31 32 TOTAL REMAIN TRACK 01 16 0 36 26 ON SCREEN DISPLAY FUNCTION During playback touch the screen the OSD section or press the OSD on the remote it will display the following as below 1 DVD A Touch or Press for first time OSD Title Number Total Title Number Chapter Number Total Chapter Number of this Title of the disc currently...

Page 26: ...o the disc Some disc only contain one language soundtrack When no different language soundtrack are recorded will be display at screen left top corner For DVD If the DVD has multiple titles recorded on the disc It can select preferred title from the title menu to start playback For VCD TITLE PBC Press button on the remote control while the disc is playing you can switch between PBC on and PBC off ...

Page 27: ... 4 3 Letter Box 4 3 Pan Scan TV Display Angle Mark OSD Lang Spdif Output Captions Screen Saver Last Memory LB ON ENG SPDIF RAW ON ON ON DOLBY GENERAL SETUP PAGE Go To General Setup Page Overview Of The Main Menu DOLBY 1 2 3 4 1 General Settings 2 Speaker Settings 3 DOLBY Digital Settings 4 Preference Settings ENT Enter Up Down Left Right Previous Touch to select The Following Buttons For Entering ...

Page 28: ...rk OSD Lang TV Display Angle Mark OSD Lang Spdif Output Captions Screen Saver Last Memory DOLBY GENERAL SETUP PAGE Set OSD language English French German Spanish Italian Portuguese OSD Lang English OSD Lang TV Display Angle Mark OSD Lang Spdif Output Captions Screen Saver Last Memory DOLBY GENERAL SETUP PAGE Setup SPDIF SPDIF OFF SPDIF RAW SPDIF PCM Spdif Output SPDIF OFF TV Display Angle Mark OSD...

Page 29: ...ANGE CONTROL Select DRC and adjust the dynamic range of a Doby Digital encoded program There are 8 steps between full compression and off compression GENERAL SETUP TV Display Angle Mark OSD Lang Spdif Output Captions Screen Saver Last Memory DOLBY GENERAL SETUP PAGE Screen Saver Screen Saver ON OFF ON TV Display Angle Mark OSD Lang Spdif Output Captions Screen Saver Last Memory DOLBY GENERAL SETUP...

Page 30: ...rack by using the cursor buttons 3 SUBTITLE LANGUAGE SETUP Select the preferred SUBTITLE language by using the cursor buttons 4 DISC MENU LANGUAGE SETUP Select the preferred DISC MENU language by using the cursor buttons OSD Lang Preferred Subtitle Language English French German Spanish Italian Portuguese Off TV Type Audio Subtitle Disc Menu Parental Password Default DOLBY Preference Page Subtitle...

Page 31: ...K SPDIF OUPUT OSD LANGUAGE CAPTIONS LAST MEMORY DOWNMIX DYNAMIC TV TYPE AUDIO SUBTITLE DISC MENU PARENTAL PASSWORD NORMAL LB ON ON ENGLISH ON STEREO AUTO ENGLISH OFF ENGLISH 8 ADULT 1379 ON OFF SCR SAVER SPDIF RAM OSD Lang TV Type Audio Subtitle Disc Menu Parental Password Default DOLBY Preference Page Set Parental Control 4PG13 5PGR 6R 7NC 17 8ADULT OFF 8ADULT Parental PREFERENCES PAGE OSD Lang C...

Page 32: ...yback of a disc already in the player touch the range on the touch screen or press the STOP on the remote once Then touch GOTO range on the screen or press the GOTO on the remote and the player will switch to DVD VCD CD MP3 Playback mode Changing From DISC to USB Playback Modes If the disc present in the player is an MP3 disc touch section on screen or press the STOP on remote once then touch or p...

Page 33: ...is applied MP3 01 0 44 36 ENT Touch to select MOD VOL SEL VOL DISC IN SWF POP 11 08 AM MP3 01 0 44 36 Touch the RPT on the touch screen or Pressing REPEAT button on the remote repeatedly can select two kinds of repeat play mode Touch the sections on touch screen or Use on remote control to select the item or folder then touch the ENT section or press ENTER button on remote to confirm MP3 WMA JPEG ...

Page 34: ... Bands Europe Europe U S A FM FM FM Frequency Coverage 87 5 to108 MHz 87 5 to108 MHz 87 5 to107 9 MHz IF 10 7 MHz 10 7 M z 10 7 MHz Sensitivity S N 30 dB 15 MW MW AM Frequency Coverage 522 to1620 KHz 522 to1620 KHz 530 to1710 KHz IF 450 K z 450 KHz 450 KHz Sensitivity S N 20 dB 40 dBu 40 dBu 40 dBu LW Optional Frequency Coverage 144 to290 KHz IF 450 KHz Sensitivity S N 20 dB 45 dBu H dBu 15 dBu 15...

Page 35: ...noise The antenna cable is not connected Insert the antenna cable firmly The signals are too weak Select a station manually SYMPTOM CAUSE SOLUTION Television video imageappears black white The color system is set incorrectly Please switch to correct color system from menu No television video image appears The unit is not connected to the parking brake detection switch Make proper connection accord...

Reviews: