background image

TO TV

CHANNEL

VIDEO IN

AUDIO IN

R

L

3

4

ANT IN

AC 120V

STEREO AUDIO/VIDEO 
RF Modulator

(commercially available)

(Back of TV)

Antenna in jack

(commercially available)

ANTENNA AUDIO IN

VIDEO IN

L

R

AUDIO OUT

VIDEO OUT

(E1)

IN

IN

OUT

OUT

S-VIDEO

COMPONENT

VIDEO OUTPUT

L

Y

PB/CB

PR/CR

R

(Back of This Unit)

Audio/Video cables
(supplied)

RF cable

RF cable

(supplied) 

Antenna

Cable

TV signal

3

4

6

5

2

1

Set channel 3 or 4. 

Turn on your TV 
and select channel 
3 or 4.

or

Note

• The quality of 

picture may 
become poor if this 
unit is connected to 

an RF modulator.

Recording

Playing discs

Editing

Before you start

Connections

Getting started

Changing the 

Setup menu

Others

Español

Please read before using this equipment.

If you need additional operating assistance after reading this owner’s manual or 

to order replacement accessories, please call


TOLL FREE : 1-800-789-4230

or visit our web site at http://www.funai-corp.com

INSTRUCCIONES EN ESPAÑOL INCLUIDAS

Owner’s Manual

PY90DG

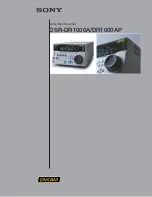
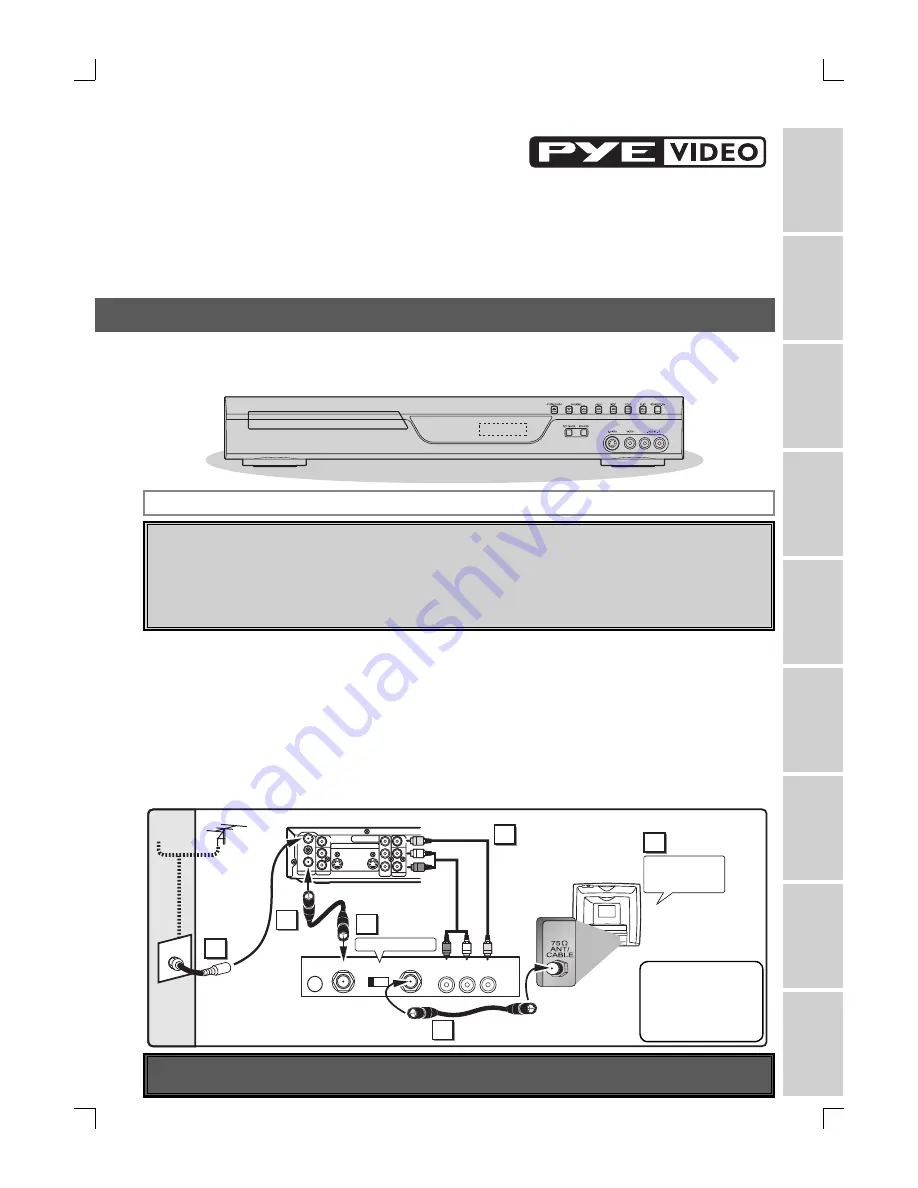
Connection to a TV (Before you use this unit, you need to complete connections.)

If your TV has AUDIO/VIDEO input jacks, see the section “Connections” on pages 13–15. If not, it is still possible to connect this unit to 
your TV by using a STEREO AUDIO/VIDEO RF modulator (commercially available). In this case, follow the instructions below.
1) The antenna input jack of your TV may have been already occupied. If so, disconnect the RF cable from your TV, and then 

connect the RF cable to the ANTENNA IN jack of this unit.

2) Connect the ANTENNA OUT jack of this unit to your RF modulator (usually marked “ANT IN”) by the RF cable.
3) Connect your RF modulator to your TV by another RF cable.
4) Connect the AUDIO/VIDEO output jacks of this unit to the AUDIO/VIDEO input jacks of your RF modulator by audio and video cables.
5) Set your RF modulator’s channel 3/4 switch to either 3 or 4, whichever the TV channel is least used in your area. If your 

RF modulator has a Modulator/Antenna switch, set it according to your RF modulator’s manual.

6) Turn on your TV and choose the same channel as you set the RF modulator’s channel 3/4 switch to.
  For more details, follow the instructions supplied with the RF modulator.
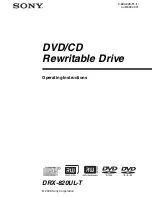
 DVD 

Recorder

To record a program easily, refer to “Easy DVD recording” on pages 16-17 after connections are completed.
(You CANNOT record on any copyright protected DVD disc with this unit.)

Recordable disc

•  We strongly recommend for good recording quality:

TDK DVD+R 4x/8x/16x, SONY DVD+R 4x/8x/16x, MAXELL DVD+R 4x/8x/16x, SONY DVD+RW 4x,
MAXELL DVD-R 8x/16x, MAXELL DVD-RW 4x 

•  Discs that have been tested and are proven to be compatible with this recorder:

  VERBATIM DVD+R 8x

VERBATIM DVD+RW 4x

VERBATIM DVD-R 8x

VERBATIM DVD-RW 2x

MAXELL DVD-R 16x

JVC DVD-RW 4

x

E7A02UD_PY90DG_p1-37.indd.indd   1

E7A02UD_PY90DG_p1-37.indd.indd   1

2006/04/24   18:43:43

2006/04/24   18:43:43

Summary of Contents for PY90DG

Page 1: ...a input jack of your TV may have been already occupied If so disconnect the RF cable from your TV and then connect the RF cable to the ANTENNA IN jack of this unit 2 Connect the ANTENNA OUT jack of this unit to your RF modulator usually marked ANT IN by the RF cable 3 Connect your RF modulator to your TV by another RF cable 4 Connect the AUDIO VIDEO output jacks of this unit to the AUDIO VIDEO inp...

Page 2: ... which can be determined by turning the equipment off and on the user is encouraged to try to correct the interference by one or more of the following measures 1 Reorient or relocate the receiving antenna 2 Increase the separation between the equipment and receiver 3 Connect the equipment into an outlet on a circuit different from that to which the receiver is connected 4 Consult the dealer or an ...

Page 3: ...om the appliance 13 Outdoor Antenna Grounding If an outside antenna or cable system is connected to the product be sure the antenna or cable system is grounded so as to provide some protection against voltage surges and built up static charges Article 810 of the National Electrical Code ANSI NFPA No 70 provides information with regard to proper grounding of the mast and supporting structure ground...

Page 4: ...output If there are questions regarding your TV set compatibility with this 525p DVD recorder please contact our customer service center Installation Location For safety and optimum performance of this unit Install the unit in a horizontal and stable position Do not place anything directly on top of the unit Do not place the unit directly on top of the TV Shield it from direct sunlight and keep it...

Page 5: ...Center for inspection and cleaning of the laser optical pickup unit DISC HANDLING Handle the discs so that fingerprints and dust do not adhere to the surfaces of the discs Always store the disc in its protective case when it is not used IR SIGNAL CHECK If the remote control does not work properly you can test if the remote control sends out the infrared signal with AM radio or a digital camera inc...

Page 6: ...Precautions 2 Important Safeguards 3 Table of contents 6 Features 7 Symbols used in this Owner s Manual 7 Functional overview 8 Installing batteries in the remote control 11 Using a remote control 11 DISPLAY menu 11 Setup menus 12 Connections 13 Connection to a TV 13 Connection to a cable box or satellite box 14 Connection to an Audio System 15 Getting started 16 Easy DVD recording 16 Initial sett...

Page 7: ...u do not need any more Putting names on titles You can put your favorite names on titles Setting Clearing chapter marks You can set clear chapter marks on titles Hiding unwanted chapters To keep others from playing back some chapters without permission you can hide chapters Setting pictures for thumbnails You can change pictures for thumbnails Dividing titles DVD RW DVD RW only You can divide a ti...

Page 8: ...control so that you can control the unit from a distance 5 6 1110 9 7 8 14 12 13 1 2 3 4 Rear Panel ANTENNA AUDIO IN VIDEO IN L R AUDIO OUT VIDEO OUT E1 IN IN OUT OUT S VIDEO COMPONENT VIDEO OUTPUT L Y PB CB PR CR R DIGITAL AUDIO OUTPUT PCM BITSTREAM COAXIAL 1 2 3 4 5 6 7 8 9 10 11 1 ANTENNA IN jack Use to connect an antenna 2 VIDEO IN jack EXT1 Use to connect external equipment with a stand ard v...

Page 9: ...ring recording process Appears during repeat play 2 Disc type Appears when an Audio CD MP3 WMA is inserted in the disc tray Appears when a Video CD is inserted in the disc tray Appears when a DVD disc is inserted in the disc tray Appears when a DVD R DVD R disc is inserted in the disc tray Appears when a DVD RW DVD RW disc is inserted in the disc tray 3 Title Track and Chapter mark Appears when in...

Page 10: ...ast reverse Or when playback is paused press to play slow reverse 9 REC MODE button Press to switch the recording mode 10 RAPID PLAY button During playback press to playback in a slightly faster slower mode with keeping the audio quality 11 REC button Press once to start a recording Press repeatedly to start the One Touch Timer Recording 12 PREV H button During playback press to return to the begi...

Page 11: ...m Either side of the center approx 16 feet 5m within 30 Above approx 16 feet 5m within 15 Below approx 10 feet 3m within 30 Installing batteries in the remote control Install two AA size batteries supplied matching the polarity indicated inside battery compartment of the remote control Note Incorrect use of batteries can result in hazards such as leakage and bursting Please observe the following D...

Page 12: ...c DVD RW DVD RW only Allows you to erase all contents in the disc and format it 4 Make Edits Compatible DVD RW only Allows you to make edits possible to play discs in other units after editing titles Finalize DVD R DVD R DVD RW only Allows you to finalize a disc containing recorded titles 5 Random Play Allows you to activate the random playback feature 6 Program Play Audio CD Video CD only Allows ...

Page 13: ...ord of this unit 6 Note Connect this unit directly to the TV If the A V cables are connected to a VCR pictures may be distorted due to the copy protection system When Progressive Scan mode is selected no video signal will be output from the VIDEO OUT or S VIDEO OUT jack After you have completed connections Switch the input selector on your TV to an appropriate external input channel usually near c...

Page 14: ...hannel by selecting the channel on the cable box or satellite box Be sure that the cable box or satellite box is turned on You cannot record one channel while watching another channel ANTENNA AUDIO IN VIDEO IN L R AUDIO OUT VIDEO OUT E1 IN IN OUT OUT S VIDEO COMPONENT VIDEO OUTPUT L Y PB CB PR CR R DIGITAL AUDIO OUTPUT PCM BITSTREAM COAXIAL AUDIO IN VIDEO RF cable supplied Video cable supplied Aud...

Page 15: ...igital Multi channel surround format cannot be recorded as digital sound by an MD or DAT deck By hooking this unit up to a Multi channel Dolby Digital decoder you can enjoy high quality Dolby Digital Multi channel surround sound as heard in the movie theaters Playing a DVD using incorrect settings may generate noise distortion and may also damage the speakers If output is Dolby Digital encoded aud...

Page 16: ...DVD R can be your choice Step 3 Insert a blank disc STANDBY ON ABC DEF GHI OPEN CLOSE ZOOM TIMER PROG 1 PQRS 4 7 JKL 2 TUV 5 8 MNO 3 WXYZ 6 9 CH REPEAT STANDBY ON ABC DEF GHI OPEN CLOSE ZOOM TIMER PROG 1 PQRS 4 7 JKL 2 TUV 5 8 MNO 3 WXYZ 6 9 CH REPEAT To open To close 2 Loading This operation may take a while to be recognized 3 1 Step 2 Turn on the unit STANDBY ON ABC DEF GHI OPEN CLOSE ZOOM TIMER...

Page 17: ...functions to discs formatted with DVD VR mode You can edit the following from a title list or setup menu Deleting titles Putting names on titles Setting clearing chapter marks Hiding chapters Setting pictures for thumbnails Dividing a title DVD RW DVD RW only Putting name on disc Finalizing a Disc This will allow DVD R DVD RW DVD R discs recorded on this unit to be played back on a different DVD p...

Page 18: ...blic Broadcasting Station PBS is available in your area follow Auto Clock Setting on page 21 Channel setting 2 Using K L select Channel Press OK Channel menu will appear 3 Using K L select Auto Channel Preset Press OK The unit will start getting channels available in your area 4 Press SETUP to exit You can select only the channels memorized in this unit by using CH K L or the Number buttons TV VID...

Page 19: ...o move to a lower channel number Press B or CH K to move to a higher channel number Press the Number buttons to select a channel number directly 5 Using K L select Add or Delete Press OK The channel number will be added or deleted from the channel memory Then the next channel number will appear so that you can continue adding or deleting channels 6 Press SETUP to exit Adding deleting channels The ...

Page 20: ...dio SAP Secondary Audio Program Outputs sub audio 5 Press SETUP to exit Notes on TV channel audio When you record a TV program available in second audio or stereo you have to select either Stereo or SAP in the Channel Preset screen beforehand Refer to the following table to check an appropriate setting You can only play the disc in second audio if a TV program is available in second audio and you ...

Page 21: ...ect Manual Press OK Using the Number buttons or K L enter your PBS channel number Press OK The setting will be activated If you want to set the clock manually and cancel the Auto Clock Setting function Using K L select OFF in Auto Clock Setting Press OK The Auto Clock Setting function will be canceled 5 Press SETUP to exit 6 Press STANDBY ON to turn off the unit This unit will search for the time ...

Page 22: ...u will appear then the settings will be activated Although seconds are not dis played they begin counting from zero 7 Press SETUP to exit if Clock menu appears Note Your clock setting will be lost if either there is a power failure or this unit has been unplugged for more than 30 seconds when you set the clock manually Setting the clock cont d STANDBY ON ABC DEF GHI OPEN CLOSE ZOOM TIMER PROG 1 PQ...

Page 23: ...andard TV Select 4 3 Letter Box so that black bars appear on the top and bottom of the screen when playing wide screen picture and all that Select 4 3 Pan Scan for a full height picture with both sides trimmed when playing wide screen picture and all that If you have a widescreen TV Select 16 9 Wide Selecting the TV aspect ratio Setting the Daylight Saving Time When Daylight Saving Time is ON the ...

Page 24: ...8cm Disc 60 min 120 min 150 min 180 min 240 min 360 min 12cm Disc poor poor good good HQ 1Hr SP 2Hr SPP 2 5Hr LP 3Hr EP 4Hr SLP 6Hr 18 min 36 min 45 min 54 min 72 min 108 min HQ 1Hr SP 2Hr SPP 2 5Hr LP 3Hr EP 4Hr SLP 6Hr The recording time are estimates and actual recording time may differ The audio and video quality is getting poorer as the Recording time becomes longer Each time REC MODE is pres...

Page 25: ...editing This Unit DVD player Not Playable Playable DVD RW DVD R DVD R DVD RW Not finalized Not performing Make Edits Compatible after editing titles Finalizing Finalizing Make Edits Compatible Make Edits Compatible You cannot finalize or Make Edits Compatible in other DVD recorders Editing titles Once DVD R DVD R DVD RW discs are finalized you cannot record additionally or edit You cannot record a...

Page 26: ...ed time for chapter marks 1 Press SETUP 2 Using K L select Recording Press OK 3 Using K L select Auto Chapter Press OK Option window will appear 4 Using K L select a desired time option Press OK 5 Press SETUP to exit Option window will appear 4 Using K L select ON or OFF Press OK ON Replacing the title list OFF Prohibiting additional record 5 Press SETUP to exit DVD DVD RW DVD RW DVD R DVD R DVD R...

Page 27: ... the unit automatically starts to format If titles have been recorded on the disc the title list is displayed Press STOP C to exit the title list 5 Using REC MODE select a recording mode Refer to Recording mode on page 24 6 Using CH K L or the Number buttons select a desired chan nel to record CH 12 HQ 1Hr 0 58 I This operation may take a while to be completed Basic recording DVD DVD RW DVD RW DVD...

Page 28: ...L or the Number buttons select a desired chan nel to record 4 Press REC repeatedly to select desired recording time Recording times appear on the TV screen 30 minutes to 6 hours Recording will start When the unit reaches the specified time it will be turned off automatically To change the recording length during the One touch Timer Recording press REC repeatedly until the desired length appear To ...

Page 29: ...fter step 8 the recording will start immediately after the recording time you set Timer Programming 2 3 1 JAN 01 12 57AM E1 Date Start End CH Mode Timer Programming 2 3 1 JAN 01 E1 Date Start End CH Mode Timer Programming 2 3 1 Date Start End CH Mode When pressing L at the current date the Date will change as follows Daily MON SAT JAN 01 JAN 31 MON FRI SAT FRI SUN Timer Programming 2 1 JAN 01 12 5...

Page 30: ... Programming list Timer Programming 2 3 4 5 6 7 8 JAN 01 12 57AM 1 57AM CH 8 E22 Date Start End CH Mode A program with the error number is grayed and asterisked in the Timer Programming list Once the Timer Programming list with error line s is displayed or after canceling and setting again the timer standby mode the program line s with error will be cleared Timer Recording cont d E1 22 E37 39 Reco...

Page 31: ...me is entirely overlapped PROG A will not be recorded If there is a power failure or this unit has been unplugged for more than 30 seconds the clock setting and all timer programming will be lost If a disc is not on the tray the indicator flashes and Timer Recording cannot be performed In some cases the indicator will be on momentarily around the start point as the unit attempts to record Please i...

Page 32: ...s REC F mark Display menu CH and the time lapse will be displayed as stated above Channel can be changed 6 Press REC again Overwriting recording starts 7 Press STOP C to stop recording Title name is not overwritten Overwriting in the middle of the title Note Recording mode of the overwriting title is the same as that of the original overwritten title when overwriting in the middle of the title 1 S...

Page 33: ...ning of the title Title name A Title name B Title name A Title name B 30 180 seconds will be cut off Overwriting Title A Existing Title B After overwriting PROG A When overwriting title is longer than the existing title Overwriting from the beginning of the title Title name A Title name B Title name A Overwriting Title A Existing Title B After overwriting When overwriting in the middle of the titl...

Page 34: ...k select Video In If you want to use S VIDEO IN jack select S Video In 6 Press SETUP to exit 1 Press SETUP 2 Using K L select Required Settings Press OK 3 Using K L select Video Input Press OK Front of this unit Rear of this unit ANTENNA AUDIO IN VIDEO IN L R AUDIO OUT VIDEO OUT E1 IN IN OUT OUT S VIDEO COMPONENT VIDEO OUTPUT L Y PB CB PR CR R DIGITAL AUDIO OUTPUT PCM BITSTREAM COAXIAL To EXT 2 IN...

Page 35: ...f this unit select E2 Front position by pressing 0 0 2 with the Number buttons on the remote control 5 Select a recording mode by pressing REC MODE Refer to Recording mode on page 24 6 Press RECORD on the unit to start recording 7 Press Play on the external source to record from 8 Press STOP C on the unit to stop recording Setting a disc to protect Note To cancel the disc protect When you insert a...

Page 36: ... L select Yes Press OK Finalizing will start 5 Finalizing is completed Finalizing 100 Finalizing 90 Finalize No Yes To cancel finalizing DVD RW only To cancel finalizing at step 4 press STOP C select Yes with B then press OK Finalizing is cancelled and the unit will be in stop mode If appears when pressing STOP C you cannot cancel finalizing because the finalizing has been in certain progress When...

Page 37: ...e menu will appear 4 Using K L select Disc Full or End of Timer Rec Press OK Option window will appear 5 Using K L select ON Press OK Your setting will be activated 6 Press SETUP to exit Auto finalizing Auto Finalize End of Timer Rec OFF ON Auto Finalize End of Timer Rec OFF Disc Full OFF Auto Finalize Disc Full OFF ON Playing the discs in other DVD players cont d STANDBY ON ABC DEF GHI OPEN CLOSE...

Page 38: ...PBC function some operations e g track search and repeat tracks cannot be performed Cancel PBC function temporarily to perform those operations refer to page 70 Windows Media and the Windows logo are trademarks or registered trademarks of Microsoft Corporation in the United States and or other countries Hint for DVD playback The contents of DVD disc are generally divided into titles Titles may be ...

Page 39: ...he Setup menu Others Español Connections Getting started Recording Playing discs Playing discs Basic playback Playback This operation may take a while to be recognized disc tray guide 1 SP 2Hr 2 3 NOV 21 06 11 00AM CH12 SP NOV 21 06 0 20 44 NOV 22 06 11 35AM CH13 EP NOV 22 06 0 10 33 EMPTY TITLE 1 37 52 SP 2Hr Edit Overwrite Play 1 SP 2Hr 2 3 NOV 21 06 11 00AM CH12 SP NOV 21 06 0 20 44 NOV 22 06 1...

Page 40: ...up Align the disc to the disc tray guide 4 Press PLAY B to start play back Playback will start If you are playing a DVD Video disc or Video CD with PBC function a menu may appear Refer to page 41 for details about a disc menu If you are playing a finalized DVD R DVD RW disc a title list will appear 5 Press STOP C to stop play back Note Some discs may start playback automatically You can select ima...

Page 41: ...TLE to exit the title menu For Video CDs When PBC Video CD only in the CD Playback Mode menu is ON and the display menu is not displayed the Video CD main menu will appear when inserting a disc or press RETURN during playback Playing discs Note Menus vary among discs Refer to the information accompanying the disc for details Playing discs using the disc menu Note TITLE will not always be active wi...

Page 42: ... at which playback was stopped Some Video CDs with the PBC function resume playback from the beginning of the track Skipping TV commercials during play Resume ON x20 Normal speed playback x2 x20 x5 x40 x40 Note Forward reverse speed will be indicated with icons as follows Forward Approx Speed x2 x20 x40 Reverse Approx Speed x5 x20 x40 Special playback DVD V DVD V DVD V DVD V DVD V DVD V DVD DVD RW...

Page 43: ...play will advance one frame or step at a time when you press NEXT G with the sound muted To play step by step backward Press PREV H repeatedly Every time you press the button the play will go backward by one frame Press and hold PREV H NEXT G to reverse advance continuously 3 Press PLAY B to continue the normal playback F DVD V DVD V DVD V DVD V DVD V DVD V DVD DVD RW DVD RW DVD R DVD R DVD R DVD ...

Page 44: ...cleared then press CLEAR All markers will be erased when you operate these operations listed below Opening the disc tray Turning off the power Recording to a recordable disc You can mark up to 6 points Marker Setup is not available when you play the Video CD with PBC function 1 2 3 4 5 6 DVD Video 1 1 0 00 00 Audio CD 1 0 00 00 1 2 3 4 5 6 DVD Video 1 1 0 00 00 1 2 1 5 2 0 DVD Video 1 1 0 00 00 Sp...

Page 45: ...er next to for chapter Using K L or the Number buttons enter a desired chapter number to search Press OK Chapter search will start Note In search mode display total numbers of each search contents title chapter time are shown as a denominator 001 028 00 00 00 02 18 33 01 01 Total number of titles Total number of chapters Total time of the disc DVD Video 1 1 0 00 00 Search DVD V DVD V DVD V DVD V D...

Page 46: ...revious track The track will move backward one at a time Time search Note Time search function is available only in the same track or title Time search is not available when you play the Video CD with PBC function Note During CD playback you can enter a track number directly using the Number buttons for track search without displaying the menu Track search is not available when you play the Video ...

Page 47: ...ting point A to select the ending point B Track The current track will be played repeatedly CD MP3 WMA Video CD Group The current group will be played repeatedly MP3 WMA only Note To cancel random playback press STOP C twice during random playback Play mode OFF appears on the TV screen For Video CDs with PBC function the PBC setting will be switched to off automatically when you start random playb...

Page 48: ... contents of the disc you are playing Note Some discs will only allow you to change the subtitle from the disc menu Press TITLE or DISC MENU to display the disc menu If a 4 digit language code appears in the subtitle menu at step 2 refer to the Language code on page 74 Switching subtitles Many DVD Video discs have subtitles in one or more languages the case usually tells you which subtitle languag...

Page 49: ...ystem 1 During playback press DISPLAY Display menu will appear 2 Using B select Press OK Virtual Surround menu will appear When inserting DVD Video disc When inserting DVD RW disc When inserting Audio CD MP3 WMA files 3 Using K L to select OFF Type 1 or Type 2 then press OK OFF no effect Type1 natural effect Type2 emphasized effect DVD Video 1 1 0 00 00 Note Select Virtual Surround to OFF in case ...

Page 50: ...OFF DVD Video 1 1 0 00 00 Type 1 Type 2 OFF DVD Video 1 1 0 00 00 DVD Video 1 1 0 00 00 Selecting the format of audio and video cont d DVD V DVD V DVD V DVD V DVD V DVD V DVD DVD RW DVD RW DVD R DVD R DVD R DVD R DVD R DVD R DL DVD DVD RW DVD RW VR DVD R DVD R DVD R VR DVD DVD RW DVD RW Video DVD R DVD R DVD R Video Video CD Video CD Video CD DVD V DVD V DVD V DVD V DVD V DVD V STANDBY ON ABC DEF ...

Page 51: ...t titles they will not remain as original Deleting titles Refer to page 52 Putting names on titles Refer to page 53 Setting chapter marks Refer to page 54 Clearing chapter marks Refer to pages 54 55 Hiding chapters Refer to page 56 Setting pictures for thumbnails Refer to page 57 Dividing a title DVD RW DVD RW only Refer to page 58 Editing discs Setup menu Putting name on disc Refer to page 59 Set...

Page 52: ...le Dividing Current Chapter NOV 22 05 11 00AM CH12 EP 0 00 59 1 1 2 3 NOV 21 06 11 00AM CH12 SP NOV 21 06 0 20 44 Overwrite NOV 22 06 11 35AM CH13 EP NOV 22 06 0 10 33 EMPTY TITLE 1 37 52 SP 2Hr SP 2Hr Edit Play Title Delete No Yes 0 00 59 1 NOV 22 05 11 00AM CH12 EP This operation may take a while to be completed Editing discs 1 2 3 EMPTY TITLE 0 20 44 SP 2Hr NOV 22 06 11 35AM CH13 EP NOV 22 06 0...

Page 53: ... GHI JKL MNO PQRS TUV WXYZ space abc def ghi jkl mno pqrs tuv wxyz space space _ 2 3 4 5 6 7 8 9 0 1 ABC abc Select 123 1 Press character set will be changed to the mode automatically 2 Press to character set will be changed to the previous input mode automatically Step1 Step2 Follow the list below press the Number buttons repeatedly until the desired letter appears Select a desired character set ...

Page 54: ...to add according to recorded time and number of chapters Remaining time of the disc may decrease when adding chapter marks or increase when clearing chapter marks depending on the recording time or edited contents This operation may take a while to be completed 1 Follow steps 1 to 3 on page 52 to display the Edit menu 2 Using K L select Chapter Mark Press OK Option window will appear 3 Using PREV ...

Page 55: ...ll No Yes Are you sure NOV 22 05 11 00AM CH12 EP 3 0 00 59 This operation may take a while to be completed Chapter Mark Delete All No Yes NOV 22 05 11 00AM CH12 EP 0 00 59 3 Chapter 2 2 F 6 Press RETURN twice to exit Data will be written onto the disc momentarily Note Remaining time of the disc may decrease when adding chapter marks or increase when clearing chapter marks depending on the recordin...

Page 56: ...lect Visible at the step 2 on this page Data will be written onto the disc momentarily After that title list is displayed Hiding chapters This operation may take a while to be completed Current Chapter Hidden Visible 0 00 59 1 NOV 22 05 11 00AM CH12 EP Chapter 2 2 Visible Editing discs cont d DVD DVD RW DVD RW DVD R DVD R DVD R DVD DVD RW DVD RW VR DVD R DVD R DVD R VR Note When you make all chapt...

Page 57: ...mbnail It is convenient to use PREV H NEXT G REV E and FWD D for finding the thumbnail picture Press OK Confirmation window will appear 4 Using K L select Yes Press OK A picture for thumbnail will be set 5 Press RETURN to exit Data will be written onto the disc momentarily This operation may take a while to be completed No Yes 1 Index Picture NOV 22 05 11 00AM CH12 EP 0 00 59 F Editing discs cont ...

Page 58: ...ures are reset to the first scene at this point Data will be written onto the disc momentarily Note You cannot divide a title of the disc on which the number of recording title comes up to the maximum 49 and the number of recording chapter comes up to the maximum 254 This operation may take a while to be completed No Yes 6 Title Dividing NOV 22 05 11 00AM CH12 EP 0 00 59 F DVD DVD RW DVD RW DVD DV...

Page 59: ...c momentarily Editing discs Setup menu DVD DVD RW DVD RW DVD R DVD R DVD R DVD DVD RW DVD RW VR DVD R DVD R DVD R VR Press STOP C if you are playing a disc Disc Edit Disc Protect OFF ON Erase Disc Make Edits Compatible Edit Disc Name Disc Edit Disc Protect OFF ON Finalize Edit Disc Name Edit Disc Name a b c A B C 1 2 3 0 00 00 No Disc Name Disc DVD RW Total Titles 3 Disc Space Used 0 30 48 Disc Pr...

Page 60: ...ect OFF ON No Yes Editing discs Setup menu cont d DVD DVD RW DVD RW DVD R DVD R DVD R DVD DVD RW DVD RW VR DVD R DVD R DVD R VR Disc Edit Disc Protect OFF ON Erase Disc Make Edits Compatible Edit Disc Name Disc Edit Disc Protect OFF ON Edit Disc Name Finalize Disc Edit Disc Protect OFF ON Edit Disc Name Erase Disc Finalize Instructions continue on the next page STANDBY ON ABC DEF GHI OPEN CLOSE ZO...

Page 61: ...Setting or releasing disc protect cont d Editing discs Setup menu cont d Disc Edit Disc Protect ON OFF Erase Disc Make Edits Compatible Edit Disc Name Disc Edit Disc Protect ON OFF Edit Disc Name Finalize This operation may take a while to be completed Disc Protect ON OFF No Yes Disc Edit Disc Protect ON OFF Edit Disc Name Erase Disc Finalize STANDBY ON ABC DEF GHI OPEN CLOSE ZOOM TIMER PROG 1 PQR...

Page 62: ... edits compatible You will need to select Make Edits Compatible to play in other DVD players 1 Follow steps 1 to 2 on page 59 to display the Disc Edit menu 2 Using K L select Make Edits Compatible Press OK Confirmation window will appear 3 Using K L select Yes Press OK Data will be written onto the disc momentarily This operation may take a while to be completed DVD DVD RW DVD RW Press STOP C if y...

Page 63: ...ndisplay multi angle icon if DVD in playback mode contains multi angle scenes Screen Saver OFF 5 minutes 10 minutes Set the time to work the screen saver on the screen FL Dimmer Auto Bright Dark Set the brightness of the front panel display 3 Audio setting Pages 66 67 Digital Out PCM 48kHz 96kHz Set whether the sound recorded in 96kHz will be down sampled in 48kHz Dolby Digital PCM Stream Set the ...

Page 64: ...Press SETUP 2 Using K L select Playback Press OK Playback menu will appear 3 Using K L select Language Press OK Language menu will appear 4 Using K L desired item Press OK Press STOP C if you are playing a disc Language setting Language Audio Original Disc Menu English Subtitle OFF Language Subtitle OFF French Spanish Other English Using K L select a setting Press OK Your setting will be activated...

Page 65: ...STOP C if you are playing a disc Language setting cont d Display Angle Icon ON Screen Saver FL Dimmer 10 minutes Bright OSD Language English OSD Language Français Español English Using K L select a setting Press OK Your setting will be activated OSD Language Default English Set the language for the On Screen display Display Angle Icon ON Screen Saver FL Dimmer 10 minutes Bright OSD Language Englis...

Page 66: ...will appear Proceed to step A or B Note Dynamic Range Control function is available only on the discs which are recorded in the Dolby Digital format Disc Audio Dynamic Range Control ON Digital Out Digital Out Dolby Digital Stream PCM 48kHz PQRS DISPLAY 7 TITLE TUV SPACE 8 DISC MENU 0 WXYZ CLEAR 9 RETURN REPEAT SETUP OK 4 GHI PQRS 4 DISPLAY 7 TITLE REC MODE REV PLAY FWD JKL TUV 5 SPACE 8 DISC MENU ...

Page 67: ...our setting will be activated 48kHz If your amplifier decoder is NOT compatible with 96kHz PCM select 48kHz 96kHz sound will be output in 48kHz 96kHz If your amplifier decoder is compatible with 96kHz PCM select 96kHz 96kHz sound will be output B A Note When playing disc with copyright protection Even if you select 96kHz the sound will be down sampled at 48kHz Audio setting cont d Using K L select...

Page 68: ...able commercially available to connect this unit to the TV See Method 2 on page 13 If not use the video cable and set the Progressive Scan to OFF or press and hold SETUP for more than 3 seconds during DVD playback When selecting No or not pressing any keys on the unit or remote control within 15 seconds at step 7 Progressive Scan remains to be OFF interlace scan Video Progressive Scan Activating p...

Page 69: ...re you to enter a password before the disc will playback This feature prevents your children from viewing inappropriate material Changing the Setup menu Parental Lock Default All Set the Parental Lock level Using K L change the parental level Press OK Option window will appear Proceed to step A or B Using the Number buttons enter a new password Press OK Your setting will be activated Using K L sel...

Page 70: ...ck menu will appear 3 Using K L select PBC Video CD only Press OK 4 Using K L select ON or OFF Press OK Your setting will be activated Press STOP C if you are playing a disc PBC Video CD only Default ON You can select images or information on the menu screen by activating PBC Playback Control function of Video CD CD Playback Mode Program Play Random Play PBC Video CD only ON PBC Video CD only OFF ...

Page 71: ...s with Auto Channel Preset or Manual Channel Preset in the Setup menu pages 18 19 Select a channel of any TV program using CH K L The playback picture or TV program from the equipment connected through the unit is distorted If the playback picture output from a DVD player VCR or tuner goes through the unit before reaching your TV the copy protection signal applied to some programs could affect pic...

Page 72: ...ns copy protection signals that restricts copying The timer setting overlapped with another setting that has priority The subtitle language cannot be changed or turned off Multilingual subtitle are not recorded on the DVD Video The DVD Video prohibits changing of the subtitles Try changing the subtitle using the DVD Video s menu The disc does not start playback from the beginning Resume play was a...

Page 73: ...the marks on page 38 Insert the disc with the labeled side facing up Recording Error Can not record on this disc Cause Error message Solution Playback is not authorized in the region of the DVD Video disc which you inserted in the unit The current selected parental level in the SETUP Menu prohibits playback The recording function encountered the copy prohibited program You are trying to record the...

Page 74: ...an 6467 Samoan 6559 Sangho 6553 Sanskrit 6547 Scots Gaelic 5350 Serbian 6564 Serbo Croatian 6554 Sesotho 6566 Setswana 6660 Shona 6560 Recording Error Recording Error You cannot record more than 254 chapters on one disc Recording Error You cannot record on this disc as Control Information is full Recording Error You cannot record on this disc as Power Calibration Area is full Recording Error This ...

Page 75: ...n CDs and DAT Excellent quality but requires a lot of data compared to formats such as Dolby Digital and MPEG audio For compatibility with digital audio recorders CD MD and DAT and AV amplifiers with digital inputs this unit can convert Dolby Digital and MPEG audio to PCM See also Digital audio Progressive Scan 525p 480p A type of display that does not split each frame into fields and instead scan...

Page 76: ...onent video output Output level Jacks S Video input Y Iuminance Input level C color Input level Jacks Audio input During audio input Jacks Audio output During audio output Jacks S Video output Y Iuminance Output level C color Output level Jack VHF UHF antenna input output terminal Input 1 rear 2 front 1 Vp p 75Ω RCA jack Output 1 rear 1 Vp p 75Ω RCA jack Output 1 rear Y 1 0 Vp p 75Ω PB CB PR CR 0 ...

Page 77: ... DVD RW DVD RW Cuando desea guardar grabaciones sin alterarlos un DVD no regrabable DVD R DVD R puede ser más conveniente Paso 3 Coloque un disco en blanco STANDBY ON ABC DEF GHI OPEN CLOSE ZOOM TIMER PROG 1 PQRS 4 7 JKL 2 TUV 5 8 MNO 3 WXYZ 6 9 CH REPEAT STANDBY ON ABC DEF GHI OPEN CLOSE ZOOM TIMER PROG 1 PQRS 4 7 JKL 2 TUV 5 8 MNO 3 WXYZ 6 9 CH REPEAT Para abrir Para cerrar 2 Cargando Esta opera...

Page 78: ... un disco DVD R DVD RW DVD R que se grabe en nuestra unidad pueda ser reproducido en un reproductor DVD diferente Un disco sin finalizar no se podrá reproducir en otro reproductor Después de finalizar un disco no puede editar los contenidos en ese disco Los discos DVD RW no requieren finalización pero sí Compatibilizar edic para reproducirse en otras unidades después de ediciones Puede editar el d...

Page 79: ...79 EN MEMO E7A02UD_PY90DG_p38 80 indd Sec2 79 E7A02UD_PY90DG_p38 80 indd Sec2 79 2006 04 24 18 45 06 2006 04 24 18 45 06 ...

Page 80: ...ING MATERIALS ANY ACCESSORIES EXCEPT REMOTE CONTROL ANY COSMETIC PARTS COMPLETE ASSEMBLY PARTS DEMO OR FLOOR MODELS FUNAI CORP AND ITS REPRESENTATIVES OR AGENTS SHALL IN NO EVENT BE LIABLE FOR ANY GENERAL INDIRECT OR CONSEQUENTIAL DAMAGES ARISING OUT OF OR OCCASIONED BY THE USE OF OR THE INABILITY TO USE THIS PRODUCT THIS WARRANTY IS MADE IN LIEU OF ALL OTHER WARRANTIES EX OR IMPLIED AND OF ALL OT...

Page 81: ...e TV s original remote control see the table below to select an external input channel until the DVD recorder s picture appears Admiral Curtis Mathis GE Hitachi JVC Kenwood LXI Series Magnavox AUX LINE1 LINE2 00 90 91 92 93 INPUT TV VCR 00 90 91 92 93 INPUT AUX VIDEO VIDEO1 VIDEO2 VIDEO3 AUX 00 AUX CHANNEL Input Mode Names for Common TV Brands Panasonic RCA Samsung Sanyo Sharp Sony Toshiba Zenith ...

Page 82: ...ording REC MODE RAPID PLAY REC REV PREV PLAY PAUSE STOP FWD NEXT CM SKIP 0 30 Normal Recording 6 00 5 30 1 00 I 0 30 This Unit DVD player Not Playable Playable DVD RW DVD R DVD R DVD RW Finalizing Finalizing Make Edits Compatible Make Edits Compatible You cannot finalize or Make Edits Compatible in other DVD recorders Editing titles Not finalized Not performing Make Edits Compatible after editing ...

Reviews: