www.pulseworx.com
QS-KPC6-3.11
ABC’s of Manual Setup
Default:
Setup Mode:
Select a New Network ID (NID):
Teach New NID:
Adjusting Scene Lighting Levels:
Link Set:
Link a Device:
Unlink a Device:
To set the keypad back to factory defaults
- Press and hold the ON and the OFF buttons, all keypad LEDs will blink
- Press and hold the A and the D buttons until the LEDs stop blinking (ON and OFF buttons remain lit)
To place the keypad where setup can begin
- Press and hold the On and the Off buttons, the keypad LEDs will blink
- Setup mode times out after 5 minutes or by tapping the ON or OFF button at the same time
To keep a neighbors’ system from affecting your system
- Press and hold the On and the Off buttons, the keypad LEDs will blink
- Press and hold the A and B buttons until only these LEDs are blinking
- The A and B buttons will turn off automatically to indicate that a new NID has been selected
To teach other devices the new Network ID, this allows proper communication
- Press and hold the On and the Off buttons, the keypad LEDs will blink
- Place the other devices to be taught into setup mode (refer to the device QuickStart Guide)
Note: Teach all the devices at once by placing each of them in setup mode at the same time
- Press and hold the C and D buttons until only these LEDs are blinking
- The C and D buttons will turn off automatically to indicate that the new NID has been taught
To manually adjust a lighting scene activated by a button
- Tap the desired keypad button (IE: A button) ... that will activate the current scene you want to adjust
- Adjust the light levels to the new desired level, on all the devices, you want to change
- Tap the desired keypad button 5X’s (IE. A button) ... the button will blink, the lights will flash showing the
changes were stored
To set a keypad to control a different set of links, this allows isolated control in the same system
IE. Keypad A controls Link Set 1 which is Link 1-6, Keypad B controls Link 2 which is Link 9-14
- Press and hold the ON and the OFF buttons, the keypad LEDs will blink
- Tap the link button that corresponds to the link set 3X’s (view available link sets on the diagram to the left)
- Finally use the ‘Link a Device’ instructions to link the correct devices to the proper button
To add a device to a scene on a keypad button
- At the keypad, Tap the scene (button) you want to add the devices to (IE. A button)
- Place the devices to be added into setup mode (refer to the device QuickStart Guide)
- Tap the scene button (IE. A button) 5X’s ... lights will flash and the button will continue to blink
- Tap the blinking button 2X’s to accept
To remove a device from a scene on a keypad button
- At the keypad, Tap the scene (button) you want to remove the device from (IE. push A button)
- Place the devices to be removed into setup mode (See device QuickStart Guide)
- Tap the scene button (IE. A button) 10X’s ... lights will flash and the button will continue to blink
- Tap the blinking button 2X’s to accept
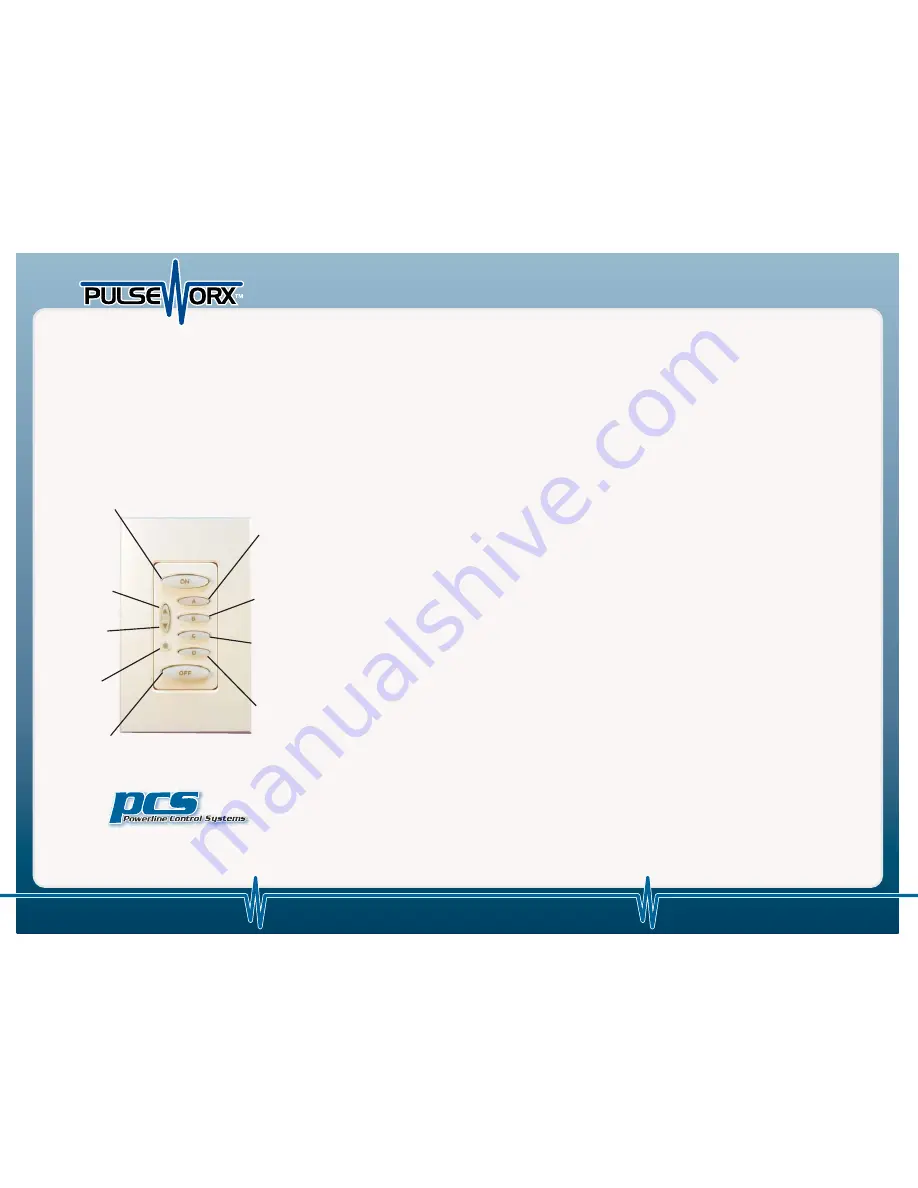
6 Button Keypad Controller
Lighting scenes are easily set and controlled anywhere
in the home with PulseWorx Keypad wall-mount and
desktop controllers.
A single touch of a button can adjust lights to a
preset scene: from a romantic, intimate dinner to a
cool party scene. The homeowners are in complete
control of their lighting.
ON
Link 1 = On Button
Set 1 = 1-6
A
Link 3 = Activator
Set 3 = 17-22
C
Link 5 = Activator
Set 5 = 33-38
D
Link 6 = Activator
Set 6 = 41-46
UP
Link 7 = Bright Up
Set 7 = 49-54
DN
Link 8 = Dim Down
Set 8 = 57-62
B
Link 4 = Activator
Set 4 = 25-30
OFF
Link 2 = Off Button
Set 2 = 9-14
IR Target
KPC6 Manual Setup QuickStart Guide
KPC6 Manual Setup QuickStart Guide
19201 Parthenia St. Suite J
Northridge, CA 91324
(888) 701-9831