background image


Operating Instructions and Parts Manual 

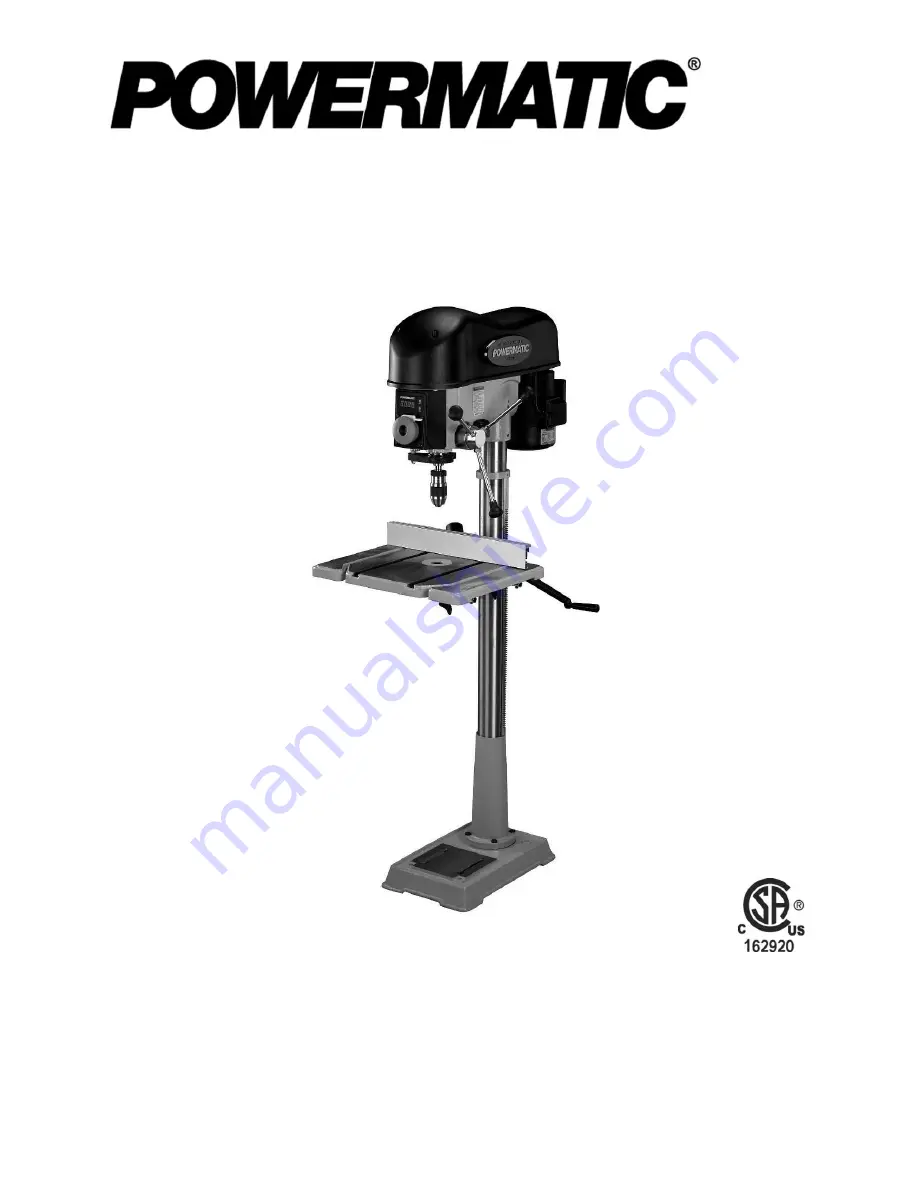
18-inch Variable Speed Drill Press 

Model 2800 


for serial # 7040001 and up 


WALTER MEIER (Manufacturing) Inc. 

427 New Sanford Road 

LaVergne, Tennessee 37086 

Part No. M-1792800


Ph.: 800-274-6848 

Revision C1  04/2010 

www.powermatic.com 

Copyright © 2010 Walter Meier (Manufacturing) Inc. 

Summary of Contents for 2800

Page 1: ...ble Speed Drill Press Model 2800 for serial 7040001 and up WALTER MEIER Manufacturing Inc 427 New Sanford Road LaVergne Tennessee 37086 Part No M 1792800 Ph 800 274 6848 Revision C1 04 2010 www powermatic com Copyright 2010 Walter Meier Manufacturing Inc ...

Page 2: ...mination postage prepaid to a location designated by us For the name of the location nearest you please call 1 800 274 6848 You must provide proof of initial purchase date and an explanation of the complaint must accompany the merchandise If our inspection discloses a defect wewill repair or replace the product or refund the purchase price at our option We will return the repaired product or repla...

Page 3: ...ck and Arbor Removal 10 Grounding Instructions 11 Extension Cords 12 Adjustments 13 Table Movement 13 Changing Spindle Speeds 13 Depth Stop 14 Return Spring 14 Start Stop 14 Laser Adjustment 15 Operation 17 Installing the Bit 17 Positioning the Workpiece 17 General Inspection 17 Setting Rotation Speed 17 Optional Accessories 19 Replacement Parts 19 Model 2800 Drill Press 20 Parts List Model 2800 D...

Page 4: ... products Arsenic and chromium from chemically treated lumber Your risk of exposure varies depending on how often you do this type of work To reduce your exposure to these chemicals work in a well ventilated area and work with approved safety equipment such as face or dust masks that are specifically designed to filter out microscopic particles 10 Do not operate this machine while tired or under t...

Page 5: ...ries 26 Whenever possible use the fence Also use jigs or fixtures where needed to secure the workpiece A drill bit can seize up causing the workpiece to rotate with the spindle and can cause injury 27 Turn off the machine and disconnect from power before cleaning Use a brush or compressed air to remove chips or debris do not use your hands 28 Do not stand on the machine Serious injury could occur ...

Page 6: ...group com Specifications Model Number 2800 Stock Number 1792800 Swing in 18 Maximum Drilling Capacity in 5 8 Chuck Size in 5 8 Spindle Travel in 4 3 8 Maximum Spindle to Table Distance in 26 1 2 Maximum Spindle to Base Distance in 47 Table Size LxW in 16 x 14 Table Size Fully Extended LxW in 16 x 26 Spindle Taper MT2 x JT3 Column Diameter in 3 1 8 Range of Spindle Speed RPM 400 to 3000 Base Size i...

Page 7: ...structions Contents of the Shipping Container 1 Column Assembly with Rack and Ring 1 Head Assembly 1 Base 1 Table Bracket and Table The smaller accessories are shown in Figure 1 3 Downfeed Handles A 1 Chuck B 1 Drift Key C 1 Arbor D 1 Shift Knob E 1 Locking Handle F 2 Lock Knobs G 2 T Nuts G 2 Flat Washers G 2 Socket Head Cap Screws M6x12 G 2 Hex Nuts M6 G 1 Worm H 1 Large Handle I 4 Hex Cap Screw...

Page 8: ...ded through the four holes in the base 2 If you do not wish to permanently secure the drill press to the floor it can be bolted to a plywood panel which will serve as its base and further stabilize it Use a high grade of plywood at least 3 4 thick It should be large enough to prevent vibration sliding or moving of the drill press during operation Do not use a mobile base with this machine 3 Attach...

Page 9: ... hex wrench Crank the handle counterclockwise to lower the table bracket down the column 7 Place the ring onto the column and slide it down over the top edge of the rack see Figure 4 Tighten the set screw on the ring 8 Screw the locking handle into the table bracket Figure 5 and tighten the locking handle to secure the table bracket s position on the column Head Assembly Referring to Figures 7 and...

Page 10: ... mineral spirits Any grease or residue in these areas can cause the pieces to separate and create a safety hazard as well as damage to the tool 3 Slide arbor up into the spindle 4 Firmly push the chuck by hand onto the taper of the arbor 5 Make sure the jaws of the chuck are opened all the way until they are inside the chuck body Use a single tap from a rubber mallet or a hammer and a block of woo...

Page 11: ...s green with or without yellow stripes is the equipment grounding connector If repair or replacement of the electric cord or plug is necessary do not connect the equipment grounding conductor to a live terminal Check with a qualified electrician or service personnel if the grounding instructions are not completely understood or if in doubt as to whether the tool is properly grounded Use only 3 wir...

Page 12: ...c Service Center or qualified electrician for proper procedures to install the plug 4 The drill press must comply with all local and national codes after the 230 volt plug is installed 5 The drill press with a 230 volt plug should only be connected to an outlet having the same configuration as shown in Figure 14 No adapter is available or should be used with the 230 volt plug Extension Cords If an...

Page 13: ...the column locking handle To tilt table Referring to Figures 16 and 17 1 To tilt the table loosen the bolt A slightly and pull out on the indicator pin B The indicator pin will engage at 0 45 and 90 degree positions of the table 2 Pivot the table to desired angle by aligning the scale in degrees on the table to the line on the table bracket Figure 17 3 Re tighten bolt A Figure 16 Table Extensions ...

Page 14: ...ould it become necessary proceed as follows Referring to Figure 20 1 Disconnect machine from power source 2 Pry off the cap A Figure 20 and remove the hex nut and two washers B Pull off the hub C 3 Loosen the two inner hex nuts D Do not remove 4 Pull out slightly the coil spring cover E while firmly holding it DO NOT allow the coil spring cover to turn freely in your hand or the spring will unwind...

Page 15: ...e switch in the off position slide out the switch safety key Figure 21 This piece must be re inserted before the drill press can operate Laser Adjustment Figures 22 through 25 Do not look directly into the laser beam or view it directly with optical instruments See Figure 22 The Laser Assembly has been installed and pre set at the factory It should however be checked and any adjustments made befor...

Page 16: ...air Alignment 7 Place board R flat on the table Do not allow the board to move from this position use clamps if needed Bring the bit down until it leaves a slight perforation in the board then raise it back up 8 Loosen one laser setscrew F Fig 23 and adjust G Fig 23 so the laser line crosses the perforation S Tighten setscrew F 9 Adjust the other laser assembly in the same manner until the laser l...

Page 17: ... feel of the drill press by practicing on scrap material For best results always use sharp bits and proper feed rates Setting Rotation Speed There are several factors which determine the best speed to use in any drill press operation such as kind of material being worked size of hole type of drill and quality of cut desired A general rule of thumb is the smaller the drill the greater the required ...

Page 18: ...t reaching running speed Repair or replace motor Motor is malfunctioning Have motor tested by a qualified service center Repair or replace as necessary Noisy Operation Noisy Operation cont Excessive vibration See Excessive Vibration above Incorrect belt tension Adjust belt tension Dry spindle Lubricate spindle Loose pulleys Make any needed corrections Noisy motor Check motor bearings or for loose ...

Page 19: ...n chuck jaws Improper belt tension Adjust belt tension Optional Accessories JW1000 Reducer 4 to 2 1 4 O D 2 I D Replacement Parts Replacement parts are listed on the following pages To order parts or reach our service department call 1 800 274 6848 Monday through Friday see our website for business hours www powermatic com Having the Model Number and Serial Number of your machine available when yo...

Page 20: ...20 Model 2800 Drill Press ...

Page 21: ...ulley 2 19 PM2800 019 Compression Spring 2 20 PM2800 020 Shaft Sleeve 1 21 PM2800 021 Key 5x5x35 mm 2 22 PM2800 022 C Ring A 30 2 23 PM2800 023 Set Bolt 2 24 PM2800 024 Center Pulley Assembly 1 25 PM2800 025 C Ring B 35 1 26 BB 6202ZZ Ball Bearing 6202ZZ 2 27 PM2800 027 Collar 1 28 PM2800 028 Center Shaft 1 29 PM2800 029 Center Pulley 1 30 PM2800 030 Post 1 31 TS 1524011 Set Screw M8x8 2 32 PM2800...

Page 22: ...0 085 Table Insert 1 86 PM2800 086 Fence Body 1 87 TS 1540041 Hex Nut M6 2 88 PM2800 088 Washer 8x15 1 mm 2 89 TS 1503031 Socket Head Cap Screw M6x12 2 PM2800 TBA Table and Bracket Assembly only serial 7040000 and previous 1 includes index 60 62 63 68 69 82 83 84 90 and 91 90 PM2800 090A Table 1 91 PM2800 091A Table Extension Wing 2 92 PM2800 092 T Nut 2 93 PM2800 093 Slide Tube 4 94 PM2800 094 Pa...

Page 23: ...ZZ Ball Bearing 6203ZZ 1 134 PM2800 134 Rubber Washer 1 135 PM2800 135 Quill 1 136 PM2800 136 Drift Key 1 137 BB 6205ZZ Ball Bearing 6205ZZ 1 138 PM2800 138 Spindle 1 139 PM2800 139 Spindle Assembly 1 140 PM2800 140 Arbor MT2xJT3 1 141 PM2800 141 Keyless Chuck RJ3 16L 1 142 PM2800 142 Slide Base Assembly 4 143 PM2800 143 Slide Base 1 144 PM2800 144 Clamp Handle 1 145 PM2800 145 Bolt 1 146 PM2800 1...

Page 24: ...ew M6x40 3 176 PM2800 176 POWERMATIC Name Plate 1 177 TS 152704 Hex Wrench 3 mm 1 178 TS 152706 Hex Wrench 5 mm 1 179 TS 152707 Hex Wrench 6 mm 1 180 PM2800 180 Power Cord 14AWGx3C 1 181 PM2800 181 Retaining Ring 2 182 PM2800 182 Cover 1 183 TS 1533042 Phillips Pan Head Machine Screw M5x12 2 184 PM2800L 02 Guard 2 185 PM2800L 03 Laser Assembly 2 186 PM2800L 04 Laser Module 2 187 TS 1523011 Socket ...

Page 25: ...25 Electrical Connections ...

Page 26: ...26 Electrical Connections ...

Page 27: ...27 ...

Page 28: ...28 WALTER MEIER Manufacturing Inc 427 New Sanford Road LaVergne Tennessee 37086 Phone 800 274 6848 www powermatic com www waltermeier com ...

Reviews: