Panasonic VDR-D310GN, Operating Instructions Manual
The Panasonic VDR-D310GN Operating Instructions Manual is available for free download on manualshive.com. This comprehensive manual provides users with detailed instructions on using the product, ensuring optimal performance and functionality. Get the most out of your Panasonic VDR-D310GN with this essential manual.
Share
Download


Reviews:
No comments
Related manuals for VDR-D310GN
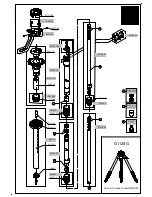
Mountaineer Mk2 Series 1 G1128G G1128G G1128G
Brand: Gitzo Pages: 1

PC-7110MHD
Brand: PRAXIS Pages: 2

G-SHOT DV511
Brand: Genius Pages: 74

DS-2CD802P (N)-IR5
Brand: HIKVISION Pages: 7

HVL-FH1100
Brand: Sony Pages: 2

EQH5000
Brand: EverFocus Pages: 28

Digital Media System 700 Series
Brand: 3M Pages: 4

AG-131 COOLAIR
Brand: Opticstar Pages: 32

VHR1661X
Brand: Kamera2000 Pages: 11

Palmcorder VM-11
Brand: Quasar Pages: 48
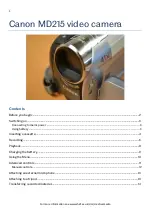
MD 215
Brand: Canon Pages: 14

Hi8 SCL870
Brand: Samsung Pages: 71

DZ-BD70A - Camcorder
Brand: Hitachi Pages: 139

D371W(i)
Brand: Samsung Pages: 114

D452N
Brand: Samsung Pages: 120

DC173(U)
Brand: Samsung Pages: 128

EX1
Brand: Samsung Pages: 129

ES80
Brand: Samsung Pages: 106


