background image

 [EB] 

RQTX0216-B

Operating Instructions

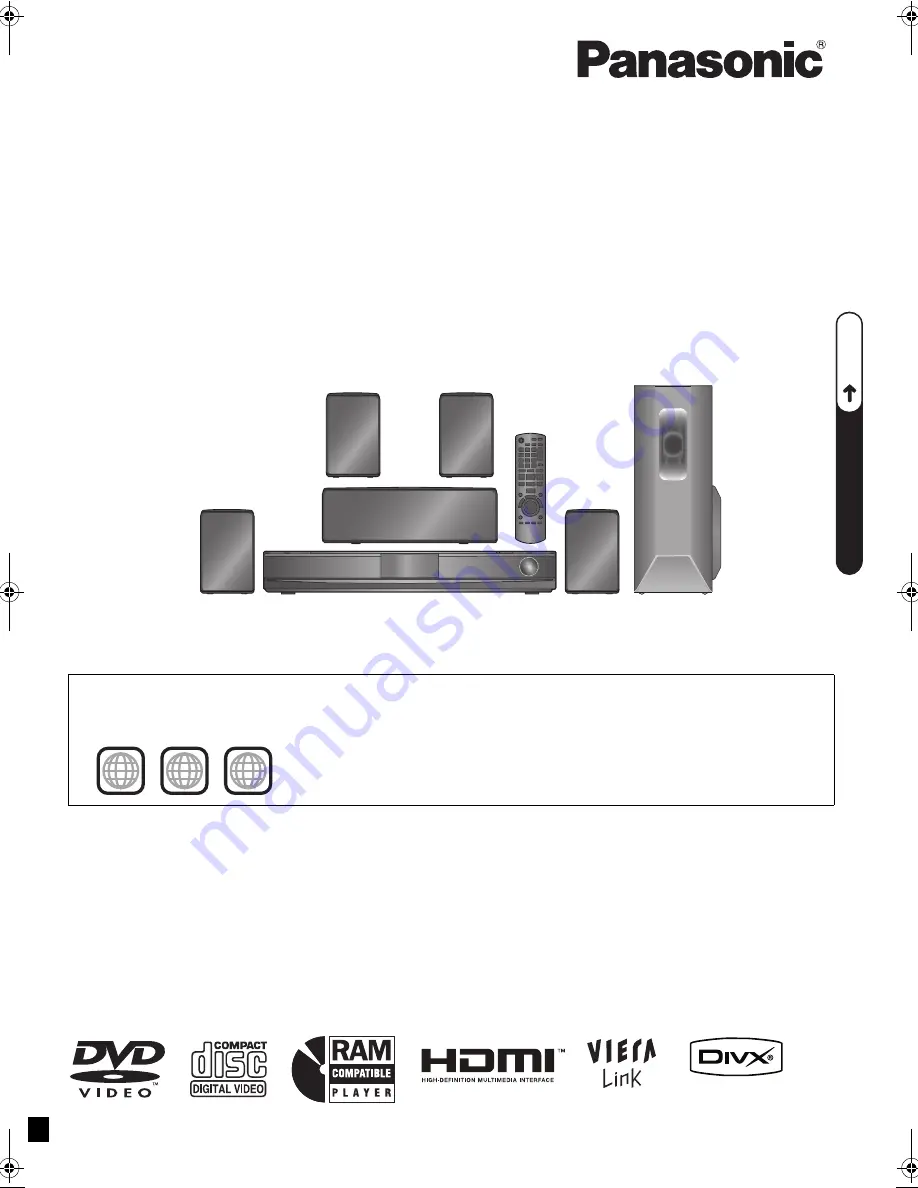
DVD Home Theater Sound System

Model No.

SC-PT470

until 
2008/12/23

P5–9

Q

UICK ST

AR

T GUIDE

Q

U

IC

K

 S

TA

R

T

 G

U

ID

E

Q

UICK ST

AR

T GUIDE

The illustrations shown may differ from your unit.

Dear customer

Thank you for purchasing this product. For optimum performance and safety, please read these instructions carefully.

Before connecting, operating or adjusting this product, please read the instructions completely.
Please keep this manual for future reference.

[Note[

“EB” on the packaging indicates the United Kingdom.

Region number

The player plays DVD-Video marked with labels containing the region number “

2

” or “

ALL

”.

Example:

2

ALL

3

5

2

SC-PT470EB-RQTX0216-B_eng.book  Page 1  Monday, December 22, 2008  3:28 PM

Summary of Contents for SC-PT470

Page 1: ...ou for purchasing this product For optimum performance and safety please read these instructions carefully Before connecting operating or adjusting this product please read the instructions completely Please keep this manual for future reference Note EB on the packaging indicates the United Kingdom Region number The player plays DVD Video marked with labels containing the region number 2 or ALL Ex...

Page 2: ...re described mainly with the remote control but you can perform the operations on this unit if the controls are the same System SC PT470 This unit SA PT470 Front speakers SB HF470 Center speaker SB HC470 Surround speakers SB HS470 Subwoofer SB HW460 CAUTION THIS PRODUCT UTILIZES A LASER USE OF CONTROLS OR ADJUSTMENTS OR PERFORMANCE OF PROCEDURES OTHER THAN THOSE SPECIFIED HEREIN MAY RESULT IN HAZA...

Page 3: ... and Random play 16 Using navigation menus 17 Playing data discs 17 Playing RAM and DVD R RW DVD VR discs 17 Using on screen menus 18 Other Operations Operating other devices 21 Playing from an USB device 21 Using the iPod 22 Speaker installation option 23 Using the VIERA Link HDAVI ControlTM 24 One touch play 24 Auto input switching 24 Power off link 24 Speaker control 25 VIERA Link Control only ...

Page 4: ... fitted in this plug Should the fuse need to be replaced please ensure that the replacement fuse has a rating of 5 ampere and that it is approved by ASTA or BSI to BS1362 Check for the ASTA mark Ï or the BSI mark Ì on the body of the fuse If the plug contains a removable fuse cover you must ensure that it is refitted when the fuse is replaced If you lose the fuse cover the plug must not be used un...

Page 5: ...the sound quality When turning the unit on or off If irregular colouring occurs on your TV The center speaker is designed to be used close to a TV but the picture may be affected with some TVs and setup combinations If this occurs turn the TV off for about 30 minutes The demagnetising function of the TV should correct the problem If it persists move the speakers further away from the TV Caution Do...

Page 6: ...NTER PURPLE SUBWOOFER Be careful not to cross short circuit or reverse the polarity of the speaker wires as doing so may damage the speakers Insert the wire fully taking care not to insert beyond the wire insulation White Blue Push DO NOT e g Surround speaker L Speaker cable sticker included 2 Radio antenna connections Using an indoor antenna FM ANT 75 Adhesive tape This unit FM indoor antenna inc...

Page 7: ...udio connection B below when you use VIERA Link HDAVI Control function Other audio connections TV or external equipment terminal Cable required not included This unit terminal Features Do not bend sharply when connecting OPTICAL IN This is the preferred connection for best sound and true surround sound This unit can decode the surround signals received from your TV cable or satellite STB Refer to ...

Page 8: ...rol is not going to be used for a long period of time Store in a cool dark place Aim at the remote control signal sensor B 39 avoiding obstacles at a maximum range of 7 m directly in front of the unit step 3 AC mains lead connection BE SURE TO READ THE CAUTION FOR THE AC MAINS LEAD ON PAGE 4 BEFORE CONNECTION AC IN This unit To household mains socket AC mains lead included step 4 Preparing the rem...

Page 9: ...up The speaker level settings can be optimized to accommodate your room s listening conditions so that you can enjoy the ideal surround sound experience Place the Auto speaker setup microphone at actual seating position At ear level when seated The test signal is output from each speaker Note Auto speaker setup can be activated through Smart setup only step 5 SMART SETUP Preparation Turn on your T...

Page 10: ...ceive into the channels in ascending order 1 2 3 4 5 6 7 8 0 9 SEARCH SKIP SKIP SEARCH OK EXT IN RADIO F U N C T I O N S 10 MENU SEARCH Numbered buttons FUNCTIONS RADIO OK PLAY MODE MENU PLAYMODE SELECTOR TUNE MEMORY TUNE MODE FM MODE EXT IN RADIO MENU PLAY LIST OK Confirming the preset channels 1 Select FM This unit Press SELECTOR 2 Select the channel To select a 2 digit number e g 12 S10 B 1 B 2...

Page 11: ...s from the START menu e g DVD V When the on screen control panel appears e g DVD V when Playback Disc is selected from the START menu You can operate the playback with the indicated controls Continued on next page Presetting stations manually 1 While listening to the radio broadcast Press OK 2 While the frequency is flashing on the display Press the numbered buttons to select a channel To select a...

Page 12: ...IN terminal B right TV will appear beside AUX or D IN indicating the TV audio setting for VIERA Link HDAVI Control B 24 USB B 21 iPod B 22 DVD iPod USB EXT IN RADIO START SETUP DVD USB iPod SETUP START RADIO EXT IN DVD EXT IN RADIO iPod USB Making settings for digital audio input 1 While in D IN mode Press SETUP to select MAIN SAP DRC or PCM FIX 2 While the selected mode is displayed Press 3 4 to ...

Page 13: ...e unit automatically selects the most suitable setting according to the type of playback source SUB W 1 SUB W 2 SUB W 3 SUB W 4 J The setting you make is retained and recalled every time you play the same type of source Center Focus Effective when playing audio containing center channel sound or when ÎPLII lights in this unit display You can make the sound of the center speaker seem like it is com...

Page 14: ...igital video format created by DivX Inc This is an official DivX Certified device that plays DivX video If you are experiencing problems refer to troubleshooting B 32 to 34 Using this unit VOLUME VOLUME TUNE SELECTOR 3 4 5 VOLUME OPEN CLOSE 2 1 SELECTOR TUNE MEMORY Stop Start play Turn s r VOLUME to adjust the volume Select DVD CD Turn on the unit Press to skip Press and hold to search during play...

Page 15: ...CH OK DVD T O P M E N U 10 4 6 0 8 6 1 4 PLAY LIST MENU FL DISPLAY 1 2 5 SLOW SEARCH SKIP PAUSE STOP OK RETURN MENU PLAY LIST FL DISPLAY TOP MENU DIRECT NAVIGATOR Numbered buttons VOL PLAY STOP PAUSE SKIP SKIP SEARCH SLOW SEARCH OK On screen item select Enter number DVD VR DVD V VCD CD e g To select 12 S10 B 1 B 2 VCD with playback control Press STOP to cancel the PBC function and then press the n...

Page 16: ...program Press 1 several times to select CLEAR ALL and then press OK The whole program is also cleared when the disc tray is opened the unit is turned off or another source is selected Repeat play During play Select an item to be repeated e g DVD V TITLE CHAP OFF b To cancel select OFF Program and Random play DVD V VCD CD WMA MP3 JPEG MPEG4 DivX While stopped Select the play mode Program and random...

Page 17: ...ress RETURN Maximum 28 characters for file folder name RETURN SKIP SKIP PLAY OK T O P M E N U 4 6 0 8 6 1 4 PLAY LIST MENU SKIP OK RETURN MENU PLAY LIST TOP MENU DIRECT NAVIGATOR PLAY OK PLAYBACK MENU WMA MP3 JPEG MPEG4 DivX AUDIO PICTURE VIDEO OK DATA DISC ROOT OK RETURN Perfume My favorite1 My favorite2 My favorite3 Underwater Fantasy planet Starpersons1 Starpersons2 Group Folder Content File WM...

Page 18: ...ect audio soundtrack DVD VR VCD To select L R L R or L R DVD V Karaoke disc To select ON or OFF for vocals To select OFF V1 V2 or V1 V2 for vocal selections Actual operations depend on the disc Read the disc s instructions for details Signal type data LPCM PPCM ÎD DTS MP3 MPEG Signal type kHz Sampling frequency bit ch Number of channels DivX It may take some time for play to start if you change th...

Page 19: ...FORMAT in Menu 4 HDMI select the method of conversion for progressive output to suit the type of material The setting will return to AUTO or AUTO1 when the disc tray is opened the unit is turned off or another source is selected When playing PAL discs AUTO VIDEO FILM Automatically detects the film and video content and appropriately converts it Select when using AUTO and the content is distorted S...

Page 20: ...menu set to ON To sharpen the 720p 1080i and 1080p picture quality OFF 1 weakest to 3 strongest VIDEO FORMAT This works when the HDMI connection is being used with VIDEO PRIORITY B 28 HDMI menu set to ON To select suitable picture quality with your TV Video recordings will be converted to and output as high definition video 480p 576p 720p 1080p progressive 480i 576i 1080i interlaced If the picture...

Page 21: ...nctions they are similar to those described in Playing Discs B 14 to 20 Supported Formats For Panasonic D Snap DIGA Note Maximum 255 folders excluding Root folder 4000 files 28 characters for file folder name Only one memory card will be selected when connecting a multiport USB card reader Typically the first memory card inserted Playing from an USB device RETURN OK iPod USB MENU MENU OK RETURN US...

Page 22: ...d menu Play starts from the selected song or video e g music playback screen These icons will only appear for music mode Using the iPod RETURN STOP PLAYMODE SKIP SKIP PLAY PAUSE OK iPod F U N C T I O N S FUNCTIONS REPEAT REPEAT STOP OK RETURN PLAY MODE iPod PLAY SKIP PAUSE iPod Dock for iPod This unit e g Pull out Dock adapter not included Select IPOD The iPod automatically switches to this unit s...

Page 23: ...o 4GB 8GB iPod classic 80GB 160GB iPod nano 2nd generation aluminum 2GB 4GB 8GB iPod 5th generation video 60GB 80GB iPod 5th generation video 30GB iPod nano 1st generation 1GB 2GB 4GB iPod 4th generation color display 40GB 60GB iPod 4th generation color display 20GB 30GB iPod 4th generation 40GB iPod 4th generation 20GB iPod mini 4GB 6GB Compatibility depends on the software version of your iPod S...

Page 24: ... turn on this unit and the TV and start playing the disc with a single press of a button Note Playback may not be immediately displayed on the TV If you miss the beginning portion of playback press or 6 to go back to where playback started When you switch the TV input to TV tuner mode this unit will automatically switch to AUX or D IN For IPOD mode this works only in iPod music mode or when iPod i...

Page 25: ...ing a button on the TV s remote control e g OPTION This works only during DVD CD or USB playback and resume modes or while iPod music playback screen is displayed on the TV If the TV has automatically switched to the HDMI input mode for this unit B 24 Auto input switching The TV will automatically switch to TV tuner mode when you press EXIT button on the TV s remote control you press EXIT or RETUR...

Page 26: ...e the audio language ENGLISH FRENCH SPANISH GERMAN ITALIAN SWEDISH DUTCH POLISH ORIGINAL 1 OTHER 2 SUBTITLE Choose the subtitle language AUTO 3 ENGLISH FRENCH SPANISH GERMAN ITALIAN SWEDISH DUTCH POLISH OTHER 2 RETURN OK SETUP RETURN SETUP OK CHSELECT SETUP SET MAIN DISC VIDEO AUDIO DISPLAY HDMI OTHERS EXIT SETUP RETURN Menu OK SET RETURN DISC EXIT SETUP SETTING STATE AUDIO SUBTITLE MENUS RATINGS ...

Page 27: ...e STILL MODE Specify the type of picture shown when paused AUTO FIELD The picture is not blurred but picture quality is lower FRAME Overall quality is high but the picture may appear blurred AUDIO menu DYNAMIC RANGE ON Adjusts for clarity even when the volume is low Convenient for late night viewing Only works with Dolby Digital OFF SPEAKER SETTINGS Select the delay time of the speakers Effective ...

Page 28: ...OLOUR SPACE in Menu 4 HDMI is set to RGB B 20 STANDARD ENHANCED When the black and white images are not distinct VIERA Link ON The VIERA Link HDAVI Control function is available B 24 OFF POWER OFF LINK Select the desired power off link setting of this unit for VIERA Link operation B 24 This works depending on the settings of the connected VIERA Link HDAVI Control compatible equipment VIDEO AUDIO W...

Page 29: ...splay subtitles text recorded onto the DivX video disc on this unit Depending on the methods used to create the file the following functions may not work or the subtitles may not be displayed correctly 1 During play select SUBTITLE in Menu 1 B 19 2 Press 3 4 to select TEXT ON and press OK DivX video files that do not display TEXT ON do not contain subtitles text Subtitles text cannot be displayed ...

Page 30: ... DVCD and SVCD that do not conform to IEC62107 This unit can play PAL and NTSC but your TV must match the system used on the disc PAL discs cannot be correctly viewed on an NTSC TV This unit can convert NTSC signals to PAL 60 for viewing on a PAL TV B 26 NTSC DISC OUT in VIDEO menu Do not attach labels or stickers to discs This may cause disc warping rendering it unusable Do not write on the label...

Page 31: ...ampling frequency and compression rate DVD RAM DVD R RW 11 02 12 22 05 24 kHz 8 to 160 kbps 44 1 and 48 kHz 32 to 320 kbps CD R RW 8 11 02 12 16 22 05 24 kHz 8 to 160 kbps 32 44 1 and 48 kHz 32 to 320 kbps JPEG DVD RAM DVD R RW CD R RW JPG jpg JPEG jpeg JPEG files taken on a digital camera that conform to DCF Standard Design rule for Camera File system Version 1 0 are displayed Files that have bee...

Page 32: ...on the number being displayed 1 or 2 press and hold OK and the corresponding numbered button 1 or 2 for at least 2 seconds B 38 LOADING The iPod is not ready Wait for this display to disappear Disconnect the iPod and then reconnect it firmly B 22 NO MIC The Auto speaker setup microphone is not inserted Check whether the Auto speaker setup microphone is plugged in properly into the SETUP MIC jack N...

Page 33: ...on ensure that AUDIO OUT in the HDMI menu is set to ON B 28 No sound from the TV Confirm the audio connection Press EXT IN to select the corresponding source B 7 12 No surround sound Press SURROUND to select MULTI CH B 12 The picture on the TV is not displayed correctly or disappears The unit and TV are using different video systems Use a multi system or PAL TV The system used on the disc does not...

Page 34: ...rom your iPod menu iPod operation HDMI or progressive video Radio USB TV displays Manufactured under license from Dolby Laboratories Dolby Pro Logic and the double D symbol are trademarks of Dolby Laboratories Manufactured under license under U S Patent s 5 451 942 5 956 674 5 974 380 5 978 762 6 487 535 other U S and worldwide patents issued pending DTS and DTS Digital Surround are registered tra...

Page 35: ...ntional connections it transmits uncompressed digital video and audio signals on a single cable This unit supports high definition video output 720p 1080i 1080p from the HDMI AV OUT terminal To enjoy high definition video a high definition compatible TV is required I P B MPEG 2 the video compression standard adopted for use with DVD Video codes frames using these 3 picture types I Intra coded pict...

Page 36: ...EG4 5 7 DivX 5 6 1 Conforming to IEC62107 2 MPEG 1 Layer 3 MPEG 2 Layer 3 3 Windows Media Audio Ver 9 0 L3 Not compatible with Multiple Bit Rate MBR 4 Exif Ver 2 1 JPEG Baseline files Picture resolution between 160k120 and 6144k4096 pixels Sub sampling is 4 0 0 4 2 0 4 2 2 or 4 4 4 Extremely long and narrow pictures may not be displayed 5 The total combined maximum number of recognizable audio pic...

Page 37: ...rox 0 2 W Information for Users on Collection and Disposal of Old Equipment and used Batteries These symbols on the products packaging and or accompanying documents mean that used electrical and electronic products and batteries should not be mixed with general household waste For proper treatment recovery and recycling of old products and used batteries please take them to applicable collection p...

Page 38: ... R PLAY LIST MENU SLEEP CHSELECT SETUP W SRD FLDISPLAY CANCEL REPEAT 7 8 10 11 12 18 9 20 21 23 13 15 19 1 4 5 17 2 22 14 16 3 6 Show setup menu or select speaker channel B 13 26 Turn Whisper mode Surround on off B 13 TV operations Aim the remote control at the Panasonic TV and press the button Í Turn the TV on off AV Change the TV s video input mode r s Adjust the TV volume This may not work prop...

Page 39: ... stations B 10 14 6 Connect iPod B 22 7 Connect Auto speaker setup microphone B 9 8 Connect USB device B 21 9 The indicator lights when there is surround sound effect B 12 Remote control signal sensor Select the source DVD CD USB FM AV AUX D IN IPOD TV will appear beside AUX or D IN indicating the TV audio setting for VIERA Link HDAVI Control B 24 Skip or slow search play Select the radio stations...

Page 40: ...rporation Web Site http panasonic net Pursuant to at the directive 2004 108 EC article 9 2 Panasonic Testing Centre Panasonic Marketing Europe GmbH Winsbergring 15 22525 Hamburg Germany RQTX0216 B F1208NP0 p EU Pb ...

Reviews: