background image

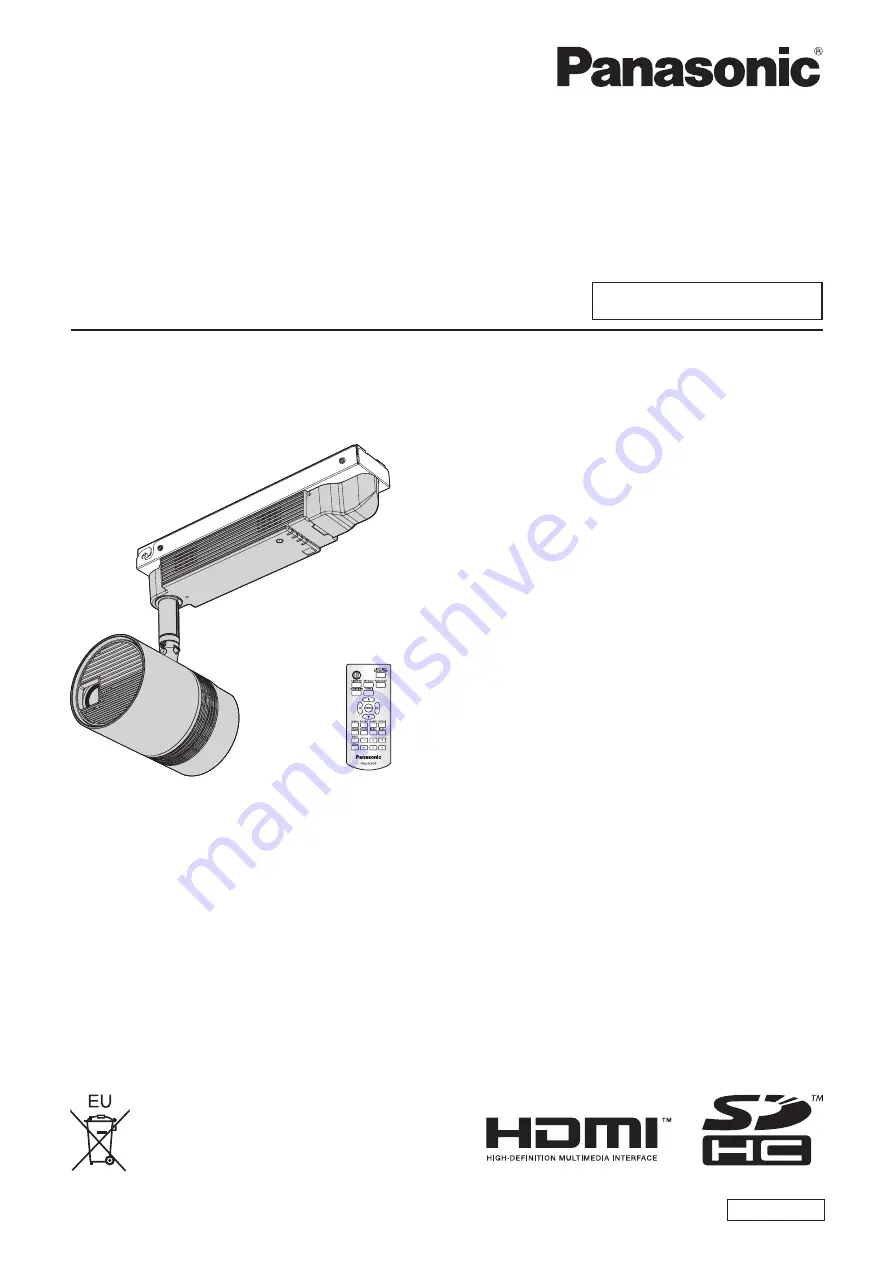
*  Above illustration is shown in combination of this product and optional Ceiling Kit.
Thank you for purchasing this Panasonic product.


This manual is intended for products manufactured from Sep. 2017 and beyond.


This product is used in combination with optional Ceiling Kit (Model No.: ET-JPC100BE/ 

ET-JPC100WE) or Floor Stand Kit (Model No.: ET-JPF100BE/ET-JPF100WE). This product 

cannot be used by itself.


Before operating this product, please read the instructions carefully and save this manual 

for future use.


Before using this product, be sure to read 

“Read this first!”

 (

x

 pages 4 to 12).

DPQP1090ZB

DLP™ Projector  

Commercial Use

Operating Instructions

Functional Manual

ENGLISH

Model No. 

PT-JW130FBE


PT-JW130FWE

Summary of Contents for PT-JW130FBE

Page 1: ...th optional Ceiling Kit Model No ET JPC100BE ET JPC100WE or Floor Stand Kit Model No ET JPF100BE ET JPF100WE This product cannot be used by itself Before operating this product please read the instructions carefully and save this manual for future use Before using this product be sure to read Read this first x pages 4 to 12 DPQP1090ZB DLP Projector Commercial Use Operating Instructions Functional ...

Page 2: ...ching the caps to the connecting terminals 39 Chapter 3 Basic Operations Turning on off the projector 41 Power indicator 41 Turning on the projector 42 When the initial setting screen is displayed 42 Making adjustments and selections 45 Turning off the projector 45 Projecting 47 Selecting the projection mode 47 Selecting the input for projector mode 47 Adjusting the projection 48 Using SD cards 49...

Page 3: ...g back movies 97 Direct playback 99 Memory Viewer screen descriptions 99 Network connection 101 When connecting via wired LAN 101 When connecting via wireless LAN 102 Web control function 105 Computer that can be used for setting 105 Accessing from the web browser 105 Miracast function 126 Content Manager 127 Files compatible with signage playback 127 Computers for the signage setting 128 Procedur...

Page 4: ... apparatus is equipped with a three prong earthing type mains plug This plug will only fit an earthing type mains socket This is a safety feature If you are unable to insert the plug into the mains socket contact an electrician Do not defeat the purpose of the earthing plug This is a device to project images onto a screen etc and is intended for use as indoor lighting Directive 2009 125 EC WARNING...

Page 5: ...nm MAXIMUM OUTPUT 53 0mW PULSE DURATION 1 2ms IEC EN 60825 1 2007 RAYONNEMENT LASER NE PAS REGARDER DANS LE FAISCEAU APPAREIL À LASER DE CALSSE2 LONGUEURS D ONDES 448 462nm MAXIMALE DU RAYONNEMENT 53 0mW DURÉE DE L IMPULSION 1 2ms TQFX514 TQFX513 Top of product Authorized Representative s name and address within the European Union Panasonic Marketing Europe GmbH Panasonic Testing Center Winsbergri...

Page 6: ...ry out any repairs to the power cord that might be necessary Do not use a power cord other than the one supplied with the optional accessories Using the power cord other than the one supplied with the optional Floor Stand Kit may cause shorting or overheating result in electric shocks or fire Also using the power cord supplied with the optional accessories without grounding at the outlet side may ...

Page 7: ...osure to dangerous laser radiation Please contact your dealer for repairs and do not attempt to repair the projector yourself Do not cover the air intake exhaust ports Doing so will cause the projector to overheat which can cause fire or damage to the projector f f Do not place the projector in narrow badly ventilated places f f Do not bring a cloth or papers close to the projector as these materi...

Page 8: ...advice immediately f f Battery fluid coming in contact with your eyes could result in loss of sight In this case do not rub your eyes Rinse with clean water and seek medical advice immediately Remove the depleted batteries from the remote control promptly f f Leaving them in the unit may result in fluid leakage overheating or explosion of the batteries Do not allow children to reach the batteries ...

Page 9: ...close to the air exhaust port Doing so will cause burns or damage your hands or other objects f f Heated air comes out of the air exhaust port Do not place your hands or face or objects which cannot withstand heat close to this port Do not stand in front of the lens while the projector is being used Doing so can cause damage and burns to clothing f f Extremely strong light is emitted from the proj...

Page 10: ...10 ENGLISH Read this first To remove the battery Remote Control Battery 1 Press the guide and lift the cover 2 Remove the batteries ...

Page 11: ...onic de Contacto en la U E Panasonic Marketing Europe GmbH Panasonic Testing Centre Winsbergring 15 22525 Hamburg Germany El uso de este dispositivo con la banda de frecuencias de 5 GHz está restringido a espacios interiores en los países siguientes Austria Bélgica Bulgaria Croacia Chipre República Checa Dinamarca Estonia Finlandia Francia Alemania Grecia Hungría Islandia Irlanda Italia Letonia Li...

Page 12: ...atkozó rendelkezéseket Malti Dan l apparat huwa konformi mal ħtiġiet essenzjali u l provedimenti l oħra rilevanti tad Direttiva 2014 53 UE Nederlands Dit apparaat voldoet aan de essentiele eisen en andere van toepassing zijnde bepalingen van de Richtlijn 2014 53 EU Norsk Dette utstyret er i samsvar med de grunnleggende krav og andre relevante bestemmelser i EU direktiv 2014 53 EU Polski Urządzenie...

Page 13: ...d by using this product Take caution not to infringe the right of the copyright owner and any other right holder when editing and using the contents to display f f This product is licensed under AVC Patent Portfolio License VC 1 Patent Portfolio License and MPEG 4 Visual Patent Portfolio License and following actions except for the personal or non profit use are not licensed g g Recording the imag...

Page 14: ...ce pages in this manual are indicated as x page 00 r rTerms f f In this manual the Wireless remote control unit accessory is referred to as Remote control f f In this manual the SD memory card and the SDHC memory card are referred to as SD card ...

Page 15: ...d with an electric 2 2x zoom electric focus lens 1 This product is used in combination with the optional Ceiling Kit or Floor Stand Kit This product cannot be used by itself A design fitting in to the space A spotlight type design is adopted to easily conform to a space requiring conformity to the design such as a store Quick Steps For details refer to the corresponding pages 1 Install the project...

Page 16: ...16 ENGLISH Chapter 1 Preparation This chapter describes things you need to know or check before using the projector ...

Page 17: ...of the main unit of the projector f f Places with sharp temperature fluctuations near lights such as studio lamps Doing so may result in deformation of the projector due to heat which may cause malfunctions The operating environment temperature of the projector should be between 0 C 32 F and 40 C 104 F when using it at elevations lower than 1 000 m 3 281 above sea level and between 0 C 32 F and 35...

Page 18: ...ling Cannot be installed Cannot be installed r rWhen installing the projector on a sloped ceiling install in a direction that the pole side of the power supply unit will be higher than the power v b button side Can be installed Power supply unit Power v b button side Pole side Ceiling Cannot be installed r rWhen using the projector in combination with the optional Floor Stand Kit install on a hori...

Page 19: ...urface which will cover the whole air intake port f f Do not install the projector in a confined space When installing the projector in a confined space provide air conditioning or ventilation separately Exhaust heat may accumulate when the ventilation is not enough triggering the protection circuit of the projector Cautions when transporting f f Before transporting tighten the rotating fixing scr...

Page 20: ...tion information leak g g Spread false information by impersonating a particular person spoofing g g Overwrite intercepted communications and issue false data tampering g g Spread harmful software such as a computer virus and crash your data and or system system crash Since most wireless LAN adapters or access points are equipped with security features to take care of these problems you can reduce...

Page 21: ...sed it so use it only in the country or region where you purchased it Also note that depending on countries or regions there are restrictions on the channels and frequencies at which you can use the wireless LAN r rAvailable wireless LAN channels The channels frequency range that can be used differ according to the country or region Please use the wireless LAN feature in compliance with the laws o...

Page 22: ... projection lens surface can damage the DLP chip r rLight source Laser is used as the light source of the projector and it has the following characteristics f f The luminance of the light source will decrease by duration of usage The time of usage for the luminance of the light source to become half is approximately 20 000 hours 20 000 hours is the estimated duration and it varies depending on ind...

Page 23: ...mall children Note f f The optional Connector secure lock is used together with the Ceiling Kit or the Floor Stand Kit Take care not to lose it f f The model numbers of accessories are subject to change without prior notice Contents of the supplied CD ROM The contents of the supplied CD ROM are as follows Instruction list PDF Operating Instructions Functional Manual Multi Projector Monitoring Cont...

Page 24: ...o a ceiling ET JPC100BE Black 2 Floor Stand Kit ET JPF100WE White 1 Dedicated fixture necessary to use the projector set on a floor or flat surface ET JPF100BE Black 2 1 Used in combination with PT JW130FWE 2 Used in combination with PT JW130FBE Attention f f Use the projector in combination with the optional Ceiling Kit or Floor Stand Kit Note f f The model numbers of optional accessories are sub...

Page 25: ...OCUS button Displays the lens menu and adjusts the projection lens x page 48 11 VOL VOL buttons Adjusts the volume of audio output x page 52 12 LIGHTING PROJECTOR button Switches the projection mode of the projector to lighting mode or projector mode x page 47 13 Panasonic APP button Switches the input to Panasonic APPLICATION x page 47 When you press this button during the lighting mode the mode ...

Page 26: ...dy 8 9 1 2 2 3 6 7 5 4 2 1 10 12 1 2 11 AUDIO OUT DC OUT 5V 16 17 15 14 13 Power supply unit Main unit 1 Air intake port 2 Air exhaust port 3 Projection lens 4 AC IN terminal Connects the power cord attached to the optional Ceiling Kit or the power cord supplied with the optional Floor Stand Kit 5 Indicators x pages 27 200 6 Remote control signal receiver 7 Power v b button Turns on off the power ...

Page 27: ...ys the internal temperature status x page 201 4 SD card indicator SD Blinks in green when accessing the SD card r r Connecting terminals 1 2 3 1 SD card slot Supports SD memory card and SDHC memory card x page 49 2 HDMI IN terminal This is the terminal to input HDMI signal x page 38 3 LAN terminal This is the terminal to connect to the network x page 38 Attention f f The LAN cable connecting to th...

Page 28: ...ique ID number is assigned to each projector When using the projectors by setting the ID numbers set the ID number of the projector body after initial settings have been completed Then set the ID number of the remote control For initial settings refer to When the initial setting screen is displayed x page 42 The factory default ID number of the projector projector body and remote control is set to...

Page 29: ... 6 7 Approx 2 m 6 7 Approx 7 m 22 11 Note f f Above illustration is an usage example when standing the projector on the floor It is not in accurate scale The operating range when installed in a ceiling is the same f f If there are any obstacles between the remote control and the remote control signal receiver including the main unit of the projector the remote control may not operate properly f f ...

Page 30: ...30 ENGLISH Chapter 2 Getting Started This chapter describes things you need to do before using the projector such as the setup and connections ...

Page 31: ...ination of the optional accessories Purchase the optional accessories depending on the installation method The Ceiling Kit Model No ET JPC100WE ET JPC100BE is required for ceiling mounting installation and the Floor Stand Kit Model No ET JPF100WE ET JPF100BE is required for floor standing installation Installation example when standing on the floor Installation example when installing on the ceili...

Page 32: ... B C Menu item Method Menu item Method PROJECTION METHOD FRONT PROJECTION METHOD REAR VERTICAL FLIP ON VERTICAL FLIP ON r r Installation form when standing on the floor To project forward To project from rear Using the translucent screen ABC ABC Menu item Setting value Menu item Setting value PROJECTION METHOD FRONT PROJECTION METHOD REAR VERTICAL FLIP ON VERTICAL FLIP ON To project forward To pro...

Page 33: ...When using the projector in the projector mode various expressions are possible by combination of adjustment of the direction of the main unit as described in Adjusting the projection position x page 36 and the settings of the SETUP menu PROJECTION METHOD x page 68 and the VERTICAL FLIP x page 68 The direction of irradiation can be adjusted freely in similar manner when using the projector in the ...

Page 34: ...tion surface 142 mm 5 19 32 300 8 mm 11 27 32 Ceiling Projection surface r r When standing on the floor SD L LW LT L LW LT SW SH SH SW Projected image Projection surface 269 6 mm 10 5 8 Floor Projection surface 142 mm 5 19 32 L LW LT 1 Projection distance distance from the projection lens surface to the projection surface m SH Image height m SW Image width m SD Image diagonal size m 1 LW Minimum p...

Page 35: ...2 93 6 36 2 54 100 1 346 2 154 3 26 7 07 3 05 120 1 615 2 585 3 92 8 50 3 81 150 2 019 3 231 4 91 10 63 5 08 200 2 692 4 308 6 55 14 19 Projection distance formula To use an image size not listed in this manual check the projected image size SD m and use the respective formula to calculate projection distance L The unit of the formula is all m Value obtained by the following calculation formula co...

Page 36: ...ng the projector to the ceiling r r When standing on the floor The optional Floor Stand Kit is required to use the projector set on the floor f f Be sure to use the Floor Stand Kit specified for this projector f f For installation of the Floor Stand Kit to the projector refer to the Operating Instructions of the Floor Stand Kit f f After installing the Floor Stand Kit install the projector referen...

Page 37: ...oximately 90 Main unit Rotating fixing screw 3 Tighten the fixing screws f f While supporting the main unit securely tighten the rotating fixing screw and ball joint fixing screws 2 locations using the supplied Allen wrench opposite side size 3 0 mm 1 8 Attention f f The main unit and the power supply unit are connected with cables etc Do not rotate or tilt the main unit more than necessary Note f...

Page 38: ... f Some computer models or graphics cards are not compatible with the projector f f Use a cable compensator when you connect devices to the projector using long cables Otherwise the image may not display properly f f Only HDMI signals can be input to the projector Refer to List of compatible signals x page 215 for the types of video signals that can be used with the projector Connecting example Ex...

Page 39: ...to attach LAN terminal cap HDMI terminal cap Card slot cap Note f f The card slot cap can be attached even when an SD card is inserted The direction of attaching the card slot cap will differ as shown below depending on the existence of the SD card Check the condition of the SD card slot and the direction of the card slot cap before attaching SD card Card slot cap f f Do not insert with excessive ...

Page 40: ...40 ENGLISH Chapter 3 Basic Operations This chapter describes basic operations to start with ...

Page 41: ... MODE in the SETUP menu ECO MANAGEMENT is set to NETWORK Projection will start when the power v b button is pressed f f The projector may not operate when the temperature indicator TEMP is blinking x page 200 Blinking 2 The power is switched off in standby mode STANDBY MODE in the SETUP menu ECO MANAGEMENT is set to NORMAL Projection will start when the power v b button is pressed f f The projecto...

Page 42: ...tly in front of the signal receiver For the range that can be operated with the remote control refer to Operating range of the remote control x page 29 f f It may take longer for the projection to start when the SETUP menu ECO MANAGEMENT STANDBY MODE is set to ECO or NETWORK when compared set to NORMAL f f When the power is turned on or an input signal is switched you may hear a high frequency dri...

Page 43: ...L FLIP depending on the installation conditions Refer to Installation form x page 31 for details Set HIGH ALTITUDE MODE to HIGH1 when using the projector at altitude between 1 000 m 3 281 and 2 000 m 6 562 above sea level and set HIGH ALTITUDE MODE to HIGH2 when using the projector at altitude between 2 000 m 6 562 and 2 700 m 8 858 Once the initial setting is completed the settings for each item ...

Page 44: ...n the projector is turned on for the first time after purchase When ALL USER DATA is executed from the SETUP menu INITIALIZE the STANDBY MODE setting before the execution is displayed Initial setting time zone Set TIME ZONE according to the country or region where the projector is used Once the initial setting is completed setting can be changed from the SETUP menu DATE AND TIME The current settin...

Page 45: ...emote control to select the input to project x page 47 5 Adjust the orientation of the main unit to adjust the projection position x page 36 6 Press the ZOOM button on the remote control to adjust the projection size x page 48 7 Press the FOCUS button on the remote control again to adjust the focus Note f f The initial setting screen is displayed when the projector is turned on for the first time ...

Page 46: ...d off by pressing the power v b button The power consumption during standby can be conserved when the SETUP menu STANDBY MODE is set to ECO f f The projector can be turned off by turning off the power supply of the interior wiring or disconnecting the plug of the power cord from the outlet during the projection but the settings and adjustments performed right before turning off the power may not b...

Page 47: ...ntrol button Input Usage HDMI HDMI Displays the image input to the HDMI IN terminal from the external device MEMORY VIEWER Memory Viewer Displays the still image or movie recorded in the SD card using the Memory Viewer function x page 93 Miracast Miracast Displays the image transmitted wirelessly from the Miracast compatible terminal x page 126 Panasonic APP Panasonic APPLICATION Displays the imag...

Page 48: ...When a projection position is required to be adjusted adjust according to the steps described in Adjusting the projection position x page 36 f f The operation can be sped up by pressing asqw for at least one second f f It is recommended to adjust the focus after 30 minutes have elapsed projecting f f Only FOCUS is shown in yellow so that the displayed menu item can be recognized by color even when...

Page 49: ...itch when saving or editing a file Write protect switch f f Use a felt tip pen oil based when writing a character in the memo space of the label Do not use pencil or ballpoint pen The card may get damaged or the data may be destroyed f f Manage the contents in the SD card under your responsibility It is recommended to take a backup of important data on other disc etc f f Panasonic assumes no respo...

Page 50: ...cting The projector requires approximately five seconds to recognize the insertion or ejection of the SD card Ejecting the SD card 1 Confirm that the SD card indicator SD is not blinking 2 Lightly press center of the SD card 3 Hold onto the slightly ejected SD card and pull it out f f Note that pulling out the card forcibly while it is inserted will cause a malfunction Attention f f Do not perform...

Page 51: ...n the projection screen when the switching takes time Switching the input The input for projection can be switched button 1 Press the HDMI MEMORY VIEWER Miracast Panasonic APP or SIGNAGE button HDMI Switches the input to HDMI MEMORY VIEWER Switches the input to Memory Viewer x page 66 Miracast Switches the input to Miracast x page 126 Panasonic APP Switches the input to Panasonic APPLICATION SIGNA...

Page 52: ... all the projectors simultaneously or each projector individually using single remote control if a unique ID number is assigned to each projector After setting the ID number of the projector set same ID number on the remote control The factory default ID number of the projector is set to ALL When using a single projector press the ID ALL button on the remote control Also you can control a projecto...

Page 53: ...Chapter 3 Basic Operations Operating with the remote control ENGLISH 53 Note f f Set the ID number of the projector from the SETUP menu PROJECTOR ID ...

Page 54: ...54 ENGLISH Chapter 4 Settings This chapter describes the settings and adjustments you can make using the on screen menu ...

Page 55: ...SETUP SECURITY NETWORK MENU SELECT SUB MENU DISPLAY LANGUAGE DISPLAY OPTION TEST PATTERN ENTER 2 Press as on the remote control to select a main menu item f f The selected item is highlighted by yellow cursor MAIN MENU PROJECTOR PICTURE MEMORY VIEWER SETUP SECURITY NETWORK MENU SELECT SUB MENU DISPLAY LANGUAGE DISPLAY OPTION TEST PATTERN ENTER 3 Press the ENTER button on the remote control f f The...

Page 56: ... are restored to the factory default settings button 1 Press the DEFAULT button on the remote control 0 CONTRAST ADJUST Note f f You cannot reset all the settings to the factory default at a time f f To reset all the adjusted sub menu items to the factory defaults at a time perform the SETUP menu INITIALIZE x page 76 f f Some items cannot be reset to the factory default settings even when the DEFA...

Page 57: ...ms displayed differ depending on the projection mode LIGHTING Only in the lighting mode Sub menu item Factory default Page PATTERN CIRCULAR LIGHT1 60 COLOR SETTING SUPER WHITE 60 DIMMER 100 62 PICTURE Only in the projector mode Sub menu item Factory default Page PICTURE MODE DYNAMIC 63 CONTRAST 0 63 BRIGHTNESS 0 64 COLOR 0 64 TINT 0 64 COLOR TEMPERATURE MIDDLE 64 DIMMER 100 65 MEMORY VIEWER Only i...

Page 58: ...D ALL USER DATA 75 INITIALIZE 76 SERVICE PASSWORD 76 1 Only in the projector mode NETWORK Sub menu item Factory default Page PROJECTOR NAME NAME1234 1 77 WIRED LAN 77 WIRELESS LAN M DIRECT 78 NETWORK CONTROL 81 Panasonic APPLICATION 2 81 NETWORK STATUS 83 Art Net OFF 83 1 Differs depending on the product 2 Only in the projector mode DISPLAY OPTION Only in the projector mode Sub menu item Factory d...

Page 59: ...Chapter 4 Settings Menu navigation ENGLISH 59 TEST PATTERN Only in the projector mode Details x page 91 ...

Page 60: ...age contents are not registered to the SD card or if an SD card is not inserted into the SD card slot COLOR SETTING Set the color for lighting 1 Press as to select COLOR SETTING 2 Press qw or the ENTER button f f The COLOR SETTING individual adjustment screen is displayed 3 Press qw to switch the item f f The items will switch each time you press the button SUPER WHITE Sets the brightness to maxim...

Page 61: ...LLOW Sets the base color to yellow CYAN Sets the base color to cyan MAGENTA Sets the base color to magenta 8 Press the RETURN or MENU button 9 Press as to select RED GREEN or BLUE 10 Press qw to adjust the level Item Operation Adjustment Range of adjustment RED Press w Deepens red 0 1024 Factory default differs depending on the BASE COLOR SETTING Press q Weakens red GREEN Press w Deepens green Pre...

Page 62: ...DIMMER individual adjustment screen is displayed 3 Press qw to adjust the level Operation Adjustment Range of adjustment Press w Makes brighter 0 100 Factory default is 100 Press q Makes darker Note f f Lighting color may appear reddish depending on the set value f f The set value for DIMMER is also reflected in DIMMER x page 65 in PICTURE ...

Page 63: ...ment screen is displayed 3 Press qw to switch the item f f The items will switch each time you press the button DYNAMIC The light output is maximized for use in bright areas NORMAL The image becomes suitable for movie type video contents in general Note f f The PICTURE MODE setting is also reflected in the menu screen CONTRAST Adjust the contrast of the colors 1 Press as to select CONTRAST 2 Press...

Page 64: ... colors TINT Adjust the skin tone in the projected image 1 Press as to select TINT 2 Press qw or the ENTER button f f The TINT individual adjustment screen is displayed 3 Press qw to adjust the level Operation Adjustment Range of adjustment Press w Adjusts skin tone toward greenish color 31 31 Press q Adjusts skin tone toward reddish purple COLOR TEMPERATURE Switch the color temperature if the whi...

Page 65: ...ue Press q Weakens blue Note f f Adjust COLOR TEMPERATURE correctly All colors will not be displayed properly unless adequate adjustment is made If the adjustment does not look suitable you can press the DEFAULT button on the remote control to return the setting for the selected item only to the factory default setting f f The setting of COLOR TEMPERATURE is not reflected in internal test patterns...

Page 66: ...he Memory Viewer screen 1 Press as to select SORT 2 Press qw to switch the item f f The items will switch each time you press the button NAME Displays the files in the ascending order by the file name TYPE Displays the files by the types of files TIME Displays the files in order from the file whose update time is the oldest AUTOPLAY Enable disable automatic playback 1 Press as to select AUTOPLAY 2...

Page 67: ...the next screen as if it slides in from the right to left SLIDE OUT Displays the next screen by removing the current screen as if it slides out from the right to left Note f f If you change the EFFECT setting during playback on the Memory Viewer the change will not be reflected on the projected image that is being played back Return to the Memory Viewer screen in the thumbnail view or list view an...

Page 68: ...set up side by side with IDs set to ALL they cannot be controlled separately from the projectors with other ID numbers f f Refer to Setting the remote control ID numbers x page 52 for how to set the ID number on the remote control PROJECTION METHOD Set the projection method in accordance with the installation condition of the projector Change the setting if the screen shows horizontally inverted i...

Page 69: ...nge the screen images may be an infringement of the rights of the original copyright owner for that program under copyright protection laws Be aware when you use the aspect ratio adjustment function of the projector f f FULL may not be allowed to select for some signals f f The setting of ASPECT is not reflected in internal test patterns x page 91 KEYSTONE Correct keystone distortion that occurs w...

Page 70: ...ting is not reflected in internal test patterns x page 91 SIGNAGE Set the playback method of contents using the signage playback function Setting PLAY MODE Set the mode for signage playback 1 Press as to select SIGNAGE 2 Press the ENTER button f f The SIGNAGE screen is displayed 3 Press as to select PLAY MODE 4 Press qw to switch the item f f The items will switch each time you press the button SC...

Page 71: ...1 Press as to select HIGH ALTITUDE MODE 2 Press the ENTER button f f The HIGH ALTITUDE MODE screen is displayed 3 Press as to select an item and press the ENTER button OFF Select this item when using the projector at a location lower than 1 000 m 3 281 above sea level HIGH1 Select this item when using the projector at a location between 1 000 m 3 281 and 2 000 m 6 562 above sea level HIGH2 Select ...

Page 72: ...Wake on LAN function NORMAL Select this item to use the network function during standby Or select this item to synchronize with the NTP server and adjust the date and time of the projector automatically Note f f When ECO is set network functions are not available during standby f f When ECO is set there may be a delay in displaying when the power is turned on compared to when NORMAL is set f f Whe...

Page 73: ...OWER of the restart option is enabled in Setting the restart option x page 70 which explains the SETUP menu SIGNAGE the input switches to signage regardless of the STARTUP INPUT SELECT setting as the signage playback schedule restarts at the same time when the power is turned on AUDIO SETTING Set detailed audio functions Adjusting the volume 1 Press as to select AUDIO SETTING 2 Press the ENTER but...

Page 74: ...irmware of the projector SUB VERSION Displays the sub version of the firmware of the projector NETWORK VERSION Displays the network version of the projector Note f f The content of status can be sent via E mail to E mail addresses up to two set in E mail set up page x page 116 by pressing the ENTER button while the STATUS screen is displayed DATE AND TIME Set the time zone date and time of the bui...

Page 75: ...tor is equipped with the NTP server function By using this projector as an NTP server you can synchronize the time of other projectors in the same network For example it is effective when you use multiple projectors of this model and play back the schedule of the Content Manager simultaneously under the environment where access to an external NTP server is not possible For the steps to play back a...

Page 76: ...ll setting items including SIGNAGE NETWORK and E mail set up to the factory default settings The projector enters the standby mode to reflect the setting values NETWORK E MAIL Returns SIGNAGE NETWORK and E mail set up to the factory default settings 5 Press the ENTER button 6 When the confirmation screen is displayed press qw to select OK and press the ENTER button f f PROGRESS is displayed while ...

Page 77: ...LAN screen is displayed 3 Press as to select an item and change the settings according to the operation instructions of the menu DHCP Set to ON when obtaining an IP address automatically using a DHCP server Set to OFF when not using a DHCP server IP ADDRESS Enter the IP address when not using a DHCP server SUBNET MASK Enter the subnet mask when not using a DHCP server DEFAULT GATEWAY Enter the def...

Page 78: ...up to 10 devices can be connected to the projector via wireless LAN f f Even when S DIRECT or M DIRECT is selected in WIRELESS LAN the setting will be disabled if the input is Miracast f f When WIRELESS LAN is selected in the NETWORK menu Art Net x page 83 this WIRELESS LAN setting is disabled f f When WIRELESS LAN is selected and the network setting is changed in the NETWORK menu Art Net x page 8...

Page 79: ... the primary DNS server address when not using a DHCP server DNS2 Enter the secondary DNS server address when not using a DHCP server Note f f When you use a DHCP server confirm that the DHCP server is running f f Consult your network administrator regarding the IP address subnet mask default gateway and DNS server address f f Wired LAN and wireless LAN cannot be used in the same segment 5 Press a...

Page 80: ... EAP TTLS MD5 EAP TTLS MS CHAPv2 EAP FAST MS CHAPv2 EAP FAST GTC USER NAME Enter the user name to be used for authentication in single byte alphanumeric characters space not included 64 characters at the maximum It can be selected when AUTHENTICATION is set to WPA EAP WPA2 EAP WPA EAP or WPA2 EAP PASSWORD Enter the password to be used for authentication in single byte alphanumeric characters 64 ch...

Page 81: ... 2 Press the ENTER button f f The NETWORK CONTROL screen is displayed 3 Press as to select an item and press qw to change the setting WEB CONTROL Set to ON to control with the web browser PJLink CONTROL Set to ON to control with the PJLink protocol COMMAND CONTROL Set to ON when you control the projector using control commands Refer to Control commands via LAN x page 207 COMMAND PORT Set the port ...

Page 82: ... net avc projector 1 Press as to select Panasonic APPLICATION 2 Press the ENTER button f f The Panasonic APPLICATION screen is displayed 3 Press as to select MULTI LIVE and press the ENTER button f f The projector is switched to multi live mode f f The items will switch each time you select MULTI LIVE f f The style switches to 4 screen multi 4 screen index and 16 screen index in order Setting PASS...

Page 83: ...isplays the status of use of DHCP server IP ADDRESS Displays the IP address SUBNET MASK Displays the subnet mask DEFAULT GATEWAY Displays the default gateway DNS1 Displays the address of the primary DNS server DNS2 Displays the address of the secondary DNS server MAC ADDRESS Displays the MAC address of wired LAN WIRELESS LAN Displays the network information of the wireless LAN set on the projector...

Page 84: ...s according to the operation instructions of the menu NET Enter the net setting of the control console to be connected to the projector SUB NET Enter the subnet setting of the control console to be connected to the projector UNIVERSE Enter the universe setting of the control console to be connected to the projector START ADDRESS Enter a start address where the projector processes Art Net f f When ...

Page 85: ...en not using a DHCP server IP ADDRESS Enter the IP address when not using a DHCP server SUBNET MASK Enter the subnet mask when not using a DHCP server DEFAULT GATEWAY Enter the default gateway address when not using a DHCP server DNS1 Enter the primary DNS server address when not using a DHCP server DNS2 Enter the secondary DNS server address when not using a DHCP server 8 Press as to select NEXT ...

Page 86: ...t can be selected when AUTHENTICATION is set to WPA PSK or WPA2 PSK Enter 8 to 63 alphanumeric characters or 64 digit hexadecimal EAP Select the EAP set for RADIUS server It can be selected when AUTHENTICATION is set to WPA EAP WPA2 EAP WPA EAP or WPA2 EAP The types of EAP that can be selected are as follows PEAP MS CHAPv2 PEAP GTC EAP TTLS MD5 EAP TTLS MS CHAPv2 EAP FAST MS CHAPv2 EAP FAST GTC US...

Page 87: ...ce is connected to the HDMI IN terminal Note f f The optimal setting varies depending on the output setting of the connected external device Refer to the operating instructions of the external device regarding the output of the external device f f The HDMI signal level is displayed for 30 bits of input ON SCREEN DISPLAY Set the on screen display Setting INPUT GUIDE Set whether to display the input...

Page 88: ...ill switch each time you press the button ON Displays the warning message OFF Hides the warning message AV MUTE Turn off lighting or projection and audio output temporarily when the projector is not used for a certain period of time 1 Press as to select AV MUTE 2 Press the ENTER button f f Press the RETURN button to release Note f f The power indicator ON G STANDBY R blinks slowly while in AV mute...

Page 89: ...he language of the on screen display DISPLAY LANGUAGE DISPLAY LANGUAGE f f Various menus settings adjustment screens control button names etc are displayed in the selected language f f The language can be changed to English German French Italian Spanish Portuguese Dutch Swedish Finnish Norwegian Danish Polish Hungarian Romanian Czech Russian Turkish Arabic Kazakh Vietnamese Chinese Korean Japanese...

Page 90: ...b button and the AV MUTE button become disabled 1 Press as to select SECURITY PASSWORD 2 Press qw to switch the item f f The items will switch each time you press the button OFF Disables the security password entry ON Enables the security password entry Note f f SECURITY PASSWORD is set to OFF at the time of purchase or when ALL USER DATA in INITIALIZE x page 76 has been performed f f Change the p...

Page 91: ... items will switch each time you press the button Menu screen All white Displays test patterns with the menu screen Select a test pattern so that it is easy to make various adjustments Menu screen All black Menu screen Color bar vertical Menu screen Cross hatch Menu screen Entry screen Displays the menu screen and input signal Built in test patterns are not displayed Note f f Pressing the MENU or ...

Page 92: ...92 ENGLISH Chapter 5 Operations This chapter describes how to use each function ...

Page 93: ...odec of WMV7 WMV8 DivX or Xvid f f Uncompressed video f f Multi angle video f f Files with the profile of Advanced Simple Profile Level 0 or Advanced Simple Profile Level 1 Note f f Some information for still image movie files can be viewed with a computer where relevant files are accessible Operation example g g For Windows computer 1 Right click a file and click Properties 2 Click the Details ta...

Page 94: ...the folder list on the upper left of the screen f f The selected folder cursor position is highlighted in orange background color 2 Press the RETURN button f f The cursor moves from the folder list on the left of the screen to the thumbnail view area on the right Background color yellow 3 Press asqw to select a file f f The information on the still image or movie file is displayed in the informati...

Page 95: ...er left of the screen to the list view area on the right Background color yellow 3 Press as to select a file f f The thumbnail of the selected still image or movie file is displayed in the area on the lower left of the screen 4 Press the ENTER button f f Playback starts in the full screen display f f Refer to Playing back still images x page 96 or Playing back movies x page 97 for detailed playbac...

Page 96: ... back and continues automatic playback from the next file f f Pressing q during playback returns playback to the previous file and continues automatic playback f f Pressing a during playback rotates the image 90 clockwise with the aspect ratio maintained f f Pressing s during playback rotates the image 90 counterclockwise with the aspect ratio maintained 2 Press the RETURN button f f Automatic pla...

Page 97: ...the ENTER button during playback pauses playback Pressing it again resumes playback from the position where the playback has been stopped f f After playback ends playback of the next file starts f f Pressing w during playback performs fast forward playback Every press of w increases the speed 3 levels f f Pressing q during playback performs rewind playback Every press of q increases the speed 3 le...

Page 98: ...is automatically saved at the time when playback is paused by pressing the ENTER button during playback or when full screen display is ended by pressing the RETURN button during playback f f Resume information information on the position when movie playback is stopped in the middle of 50 movie files can be saved After the 51st movie file is played back resume information will be deleted in order f...

Page 99: ... MEMORY VIEWER SORT x page 66 f f If the MEMORY VIEWER menu AUTOPLAY x page 66 is set to OFF among still image movie files in the folder corresponding to the number button the first file in the order set in MEMORY VIEWER SORT x page 66 is played back f f If the number 1 6 buttons on the remote control are pressed during playback in the full screen display current playback stops and the still image...

Page 100: ...formed in approximately x5 speed Indicates that fast forward playback is being performed in approximately x10 speed Indicates that playback is being paused Indicates that fast rewind playback is being performed in approximately x2 speed Indicates that fast rewind playback is being performed in approximately x5 speed Indicates that fast rewind playback is being performed in approximately x10 speed ...

Page 101: ...AN is also supported For details of Wireless Manager ME6 2 and Multi Projector Monitoring Control Software refer to the Operating Instructions of them included in the supplied CD ROM Refer to the following URL for image transfer application software that supports iPad iPhone iPod touch and Android terminals http panasonic net avc projector f f Signage playback You can configure the settings for Si...

Page 102: ... cable 2 Turn on the projector 3 Press the MENU button to open the NETWORK menu and configure settings for WIRED LAN f f Refer to WIRED LAN x page 77 for details Note f f Consult your network administrator before connecting to an existing network f f The following settings are configured as the factory defaults DHCP OFF IP ADDRESS 192 168 10 100 SUBNET MASK 255 255 255 0 DEFAULT GATEWAY 192 168 10...

Page 103: ...rojector 1 Turn on the projector 2 Press the MENU button to open the NETWORK menu and set WIRELESS LAN to either of M DIRECT USER1 USER2 or USER3 3 Configure the settings of the connection method selected in Step 2 f f Refer to WIRELESS LAN x page 78 for details Note f f Wireless LAN and wired LAN cannot be used in the same segment f f If multiple devices are to be connected set IP addresses that ...

Page 104: ...nnect the computer to the network set for the projector f f For Windows computers click in the task tray lower right of the computer screen If M DIRECT is set on the projector select the same name as SSID set for the projector If USER1 through USER3 are set on the projector select the same name as SSID of your access point For Mac click in the menu bar upper right of the computer screen If M DIREC...

Page 105: ...For details of Crestron ConnectedTM refer to the website of Crestron Electronics Inc English only URL http www crestron com To download RoomView Express go to the website of Crestron Electronics Inc English only URL http www crestron com getroomview Computer that can be used for setting A web browser is required to use the web control function Confirm that your web browser can be used beforehand O...

Page 106: ...are given in assumption that Windows 8 OS and the web browser Internet Explorer 10 are used The actual size or indications of the screens may differ from that of this manual depending on the OS or web browser you use Available functions per account With the administrator rights all functions can be used With the user rights available functions are restricted Select an account according to the purp...

Page 107: ...ector 2 PROJECTOR NAME Displays the projector name set for the projector 3 MAIN VERSION Display the firmware version of the projector 4 POWER Displays the status of the power 5 LIGHT POWER Displays the setting status of LIGHT POWER x page 71 6 SERIAL NUMBER Displays the serial number of the projector 7 NETWORK VERSION Displays the version of the firmware of the network 8 AV MUTE Displays the AV mu...

Page 108: ...iance LD MODULE TEMPERATURE The temperature of the light source is high The projector is possibly used in an environment where the temperature is high such as near a heating appliance LOW TEMPERATURE The internal temperature of the projector or ambient temperature is low Projection cannot be started until the internal temperature of the projector or ambient temperature becomes warm LD STATUS The l...

Page 109: ...tings of wireless LAN 2 WIRED LAN Displays the settings of wired LAN Access error log page Click Status Access error log The error log on the web server is displayed such as access to the pages that do not exist or access with unauthorized user names or passwords E mail error log page Click Status E mail error log E mail error information is displayed if periodic E mail sending fails ...

Page 110: ...he picture mode 6 AV MUTE Switches AV mute on off 7 POWER Switches on off the power Attention f f When you turn on the projector be careful so that the eyes of people around the projector are not exposed to the sudden light from the light source Or operate the projector only if the eyes of people around the projector are not exposed to the light from the light source even when projection starts su...

Page 111: ...o other than Miracast beforehand Advanced control page Click Projector control Advanced control If the projection mode is set to lighting mode switch to the projector mode in the Basic control page and click Projector control Advanced control 1 2 3 4 1 KEYSTONE Corrects horizontal vertical keystone distortion 2 PICTURE Switches the input 3 DIMMER Adjusts the brightness 4 LENS Adjusts the projectio...

Page 112: ...G 3 Back button Returns to the previous screen Note f f For details of settings refer to Setting a desired color x page 60 which explains the LIGHTING menu COLOR SETTING of the projector Network config page Click Detailed set up Network config 1 Click Network config f f The CAUTION screen is displayed 2 Select an item for which you want to change the setting and click the Next button f f The curre...

Page 113: ...e settings Click the Submit button to update the settings Note f f When you use the Forward or Back functions of your browser a warning message Page has Expired may appear In that case click Network config again as the subsequent operations will not be guaranteed f f Changing LAN settings while connected to the LAN may cause the connection to cut out Connecting with wireless LAN M DIRECT 6 5 4 3 1...

Page 114: ...d in the network to which the projector is connected 9 EAP Select the EAP set for RADIUS server 10 ENCRYPTION Select the encryption method used for the communication between the projector and the network Note f f The contents in the setting screen differ depending on the authentication method of the connected wireless LAN Adjust clock page Click Detailed set up Adjust clock 1 2 3 4 5 6 7 1 Time Zo...

Page 115: ...nection has succeeded 4 Example of display when the connection has failed ECO management set up page Settings related to the ECO management function of the projector can be made Click Detailed set up ECO management set up 1 2 3 1 LIGHT POWER Select the light source power setting 2 NO SIGNAL SHUT OFF When NO SIGNAL SHUT OFF is used select the time until the projector goes into the standby status 3 ...

Page 116: ...r the temperature warning E mail The default value is 60 minutes In this case another E mail will not be sent for 60 minutes after sending the temperature warning E mail even if it reaches the warning temperature 6 INTAKE AIR TEMPERATURE Change the temperature setting for the temperature warning mail A temperature warning E mail is sent when the temperature exceeds this value 8 7 7 E MAIL ADDRESS ...

Page 117: ...s to send E mails to the second E mail address MAIL CONTENTS Select either NORMAL or SIMPLE ERROR Sends an E mail when an error occurred in the self diagnosis INTAKE AIR TEMPERATURE Sends an E mail when the air intake temperature has reached the value set at the above field PERIODIC REPORT Place a check mark on this to send an E mail periodically to the second E mail address E mails will be sent a...

Page 118: ...Z a z 0 9 Minus sign and period 4 User name Enter the user name for the POP server or the SMTP server 5 Password Enter the password for the POP server or the SMTP server 6 SMTP server port Enter the port number of the SMTP server Normally 25 7 POP server port Enter the port number of the POP server Normally 110 8 Submit button Update the settings Port set up page Set the port number used for comma...

Page 119: ... 17 00 ON 18 00 ON 19 00 ON 20 00 ON 21 00 ON 22 00 ON 23 00 ON check system MAIN CPU BUS OK FAN OK INTAKE AIR TEMPERATURE OK OPTICS MODULE TEMPERATURE OK LD MODULE TEMPERATURE OK LOW TEMPERATURE OK LD STATUS OK INTAKE AIR TEMP SENSOR OK OPTICS MODULE TEMP SENSOR OK LD MODULE TEMP SENSOR OK BATTERY OK PHOSPHOR WHEEL OK COLOR WHEEL OK COVER OPEN OK Error code 00 00 00 00 00 00 00 00 00 00 00 00 01 ...

Page 120: ... SENSOR OK LD MODULE TEMP SENSOR OK BATTERY OK PHOSPHOR WHEEL OK COLOR WHEEL OK COVER OPEN OK Error code 00 00 00 00 00 00 00 00 00 00 00 00 01 00 00 89 Intake air temperature 158 degC 316 degF Optics module temperature 28 degC 82 degF PROJECTOR RUNTIME 30 H Current status MAIN VERSION 1 00 NETWORK VERSION 1 00 SUB VERSION 1 00 POWER STATUS POWER ON INPUT HDMI SIGNAL NAME SIGNAL FREQUENCY kHz H Wi...

Page 121: ...e password Administrator account 1 2 3 4 5 6 7 1 Account Displays the account to change 2 Current User name Enter the user name before the change 3 Current Password Enter the current password 4 New User name Enter the desired new user name Up to 16 characters in single byte 5 New Password Enter the desired new password Up to 16 characters in single byte 6 New Password Retype Enter the desired new ...

Page 122: ... Enter the desired new password again 5 OK button Determines the change of password Change password For user rights Only the change of password is enabled under the user rights 1 2 4 3 1 Old Password Enter the current password 2 New Password Enter the desired new password Up to 16 characters in single byte 3 Retype Enter the desired new password again 4 OK button Determines the change of password ...

Page 123: ...3 4 5 6 7 1 Tools Info Help tab Tabs for switching the setting information or help page of the projector 2 POWER button Switches off on the power 3 VOL DOWN AV MUTE VOL UP button Operates the volume AV mute These operations are not available when the projector is turned off 4 Input Select button Controls input selection The operation is not available when the projector is turned off 5 Menu screen ...

Page 124: ...Displays the current setting value IpAddress Displays the current setting value SubnetMask Displays the current setting value DefaultGateway Displays the current setting value DNSServer Displays the current setting value 5 Exit button Returns to the operation page Info page Click the Info tab on the operation page 4 5 6 7 1 2 3 8 1 Projector Name Displays the projector name 2 Mac Address Displays ...

Page 125: ...tions Web control function ENGLISH 125 Help page Click the Help tab on the operation page The Help Desk window is displayed 1 1 Help Desk Sends receives messages to from an administrator who uses Crestron ConnectedTM ...

Page 126: ...e operation of Miracast application refer to the operating instructions of your terminal f f The default projector name is NAMExxxx and the network ID is Projxxxx xxxx is a four digit number and differs depending on the product You can check the projector name network ID MAC address of wireless LAN from the NETWORK menu NETWORK STATUS x page 83 Terminating connection with the Miracast compatible t...

Page 127: ...playback The signage playback function schedule slideshow can use the following still image movie music files Still image Extension Format Restriction jpg jpeg JPEG Number of pixels Maximum 8 000 x 8 000 For progressive JPEG maximum 4 096 x 4 096 YUV format Only YUV444 YUV422 and YUV411 supported Color mode Only RGB supported bmp Windows Bitmap Number of pixels Maximum 2 000 x 2 000 1 bit 4 bit 8 ...

Page 128: ...yed back properly or it may take time to display a still image Speed class Class 10 recommended f f For SD cards compatible with the projector refer to Cards that can be used with the projector x page 49 Computers for the signage setting The signage setting is performed by connecting a client computer including iPad iPhone iPod touch or Android terminal to the projector A web browser is required f...

Page 129: ...d when logging in to the Content Manager the PRIVATE folder will be automatically created f f When the PRIVATE folder in the SD card is deleted on the computer data such as slideshow settings and contents registered using the Content Manager will be lost f f If the SETUP menu ECO MANAGEMENT STANDBY MODE x page 72 is set to ECO or NETWORK and the projector is in standby state you cannot log in to t...

Page 130: ...hange the password Changing login information x page 181 f f The user name password of the Content Manager are managed separately from the user name password of the web control function f f One person each can log in with administrator rights and with user rights Two people cannot log in with the same rights or more than three people cannot log in at the same time f f If you log in with the admini...

Page 131: ...net Explorer 10 as the web browser Depending on the type of the OS web browser or computer you use the screen size or display may differ from the ones shown in this manual In addition the file selection screen in the following operation procedures uses the OS standard functions Logging out from the Content Manager Terminate signage setting schedule slideshow and log out from the Content Manager 1 ...

Page 132: ... schedule x page 158 3 Timetable button Click this to display the timetable page Register the contents to be played in one day Creating a timetable x page 133 4 Projector name Displays the name of the connected projector 5 Login rights information Displays the logged in account rights 6 Calendar icon Click this to display the schedule confirmation screen Check the registered schedule Checking a sc...

Page 133: ... when selected and displays the registered brightness content in a timetable Click the icon again to cancel the selection then the icon color changes to white 8 Power supply content display icon This icon becomes yellow when selected and displays the registered power supply content in a timetable Click the icon again to cancel the selection then the icon color changes to white 9 Music content disp...

Page 134: ...ils on registration procedure refer to Registering content in a timetable x page 135 5 Check the timetable content f f Preview the timetable where the contents are registered Note f f After the timetable content played back in a day to be used by the specified date or by the day of the week set the schedule Refer to Setting a schedule x page 158 for details f f For operations of the timetable or c...

Page 135: ...2 3 4 6 9 8 1 2 3 4 8 2 3 4 7 8 2 3 4 8 When registering still image content When registering movie external input content When registering playlist When registering music content When registering brightness content When registering power supply content 1 Content name Displays the selected content name 2 Start Set the time to start playback of the content 3 End Select the radio button and set the ...

Page 136: ...g a playlist x page 151 r r Procedure 1 Click the tab of the content to register in the timetable from the Content selection tab f f Clicking the tab changes the Content list display 2 Register the content in the timetable f f Drag the content to be registered in the timetable from the Content list into the Timetable Content list Timetable f f To add and register new contents still image movie mus...

Page 137: ...om the light source will not enter the eyes of people around the projector even if it starts projection suddenly Note f f Up to 99 timetables can be registered f f Up to 100 contents can be registered in one timetable f f During playback of movie external input content music content is not played f f If you click the Save button without entering the timetable name the timetable name entry screen i...

Page 138: ... When the confirmation screen is displayed click the OK button f f The selected image content is deleted from the timetable f f Deleting content from the timetable will not delete the content from the SD card Deleting music content registered in a timetable Delete music content registered in a timetable 1 2 3 1 Music content display 2 Content in timetable deletion 3 Timetable 1 Click to select it ...

Page 139: ...s displayed click the OK button f f The selected music content is deleted from the timetable Deleting brightness content registered in a timetable Delete brightness content registered in a timetable 1 2 3 1 Brightness content display 2 Content in timetable deletion 3 Timetable 1 Click to select it f f When selected the icon color changes to yellow f f When the icon is displayed in white it is not ...

Page 140: ...isplayed click the OK button f f The selected brightness content is deleted from the timetable Deleting power supply content registered in a timetable Delete power supply content registered in a timetable 1 2 3 1 Power supply content display 2 Content in timetable deletion 3 Timetable 1 Click to select it f f When selected the icon color changes to yellow f f When the icon is displayed in white it...

Page 141: ... f f You can select multiple contents 4 Click the Delete button 5 When the confirmation screen is displayed click the OK button f f The selected power supply content is deleted from the timetable Changing the settings of content registered in a timetable Change the settings of content registered in a timetable r r Timetable page Timetable ...

Page 142: ...age content For details of the setting items refer to Effect x page 197 6 Color Select the color setting to be reflected when playing image content For details of the setting items refer to Color x page 198 7 Brightness Select the brightness to be reflected when playing image content 8 Enter button Click this to confirm the settings 9 Display button Click this to display the Playlist edit screen E...

Page 143: ...view mode selection screen is displayed 2 Select a preview mode and click the Start button f f When WEB browser is selected the image is displayed on the web browser f f When Projector is selected the image is displayed on the projection screen Note f f In the following cases the projector mode Projector is not available g g During signage playback schedule slideshow g g When the input is other th...

Page 144: ...on screen f f An operation screen is displayed on the web browser as follows Operation icon Performance Stops playback Starts or pauses playback The icon display changes depending on the playback state Note f f When there is a blank period between contents the period is handled as one content and displayed in preview f f Regardless of the content setting still image content is played for 10 second...

Page 145: ...Editing registration information of content x page 148 f f Creating a playlist x page 149 Registering content in a content list Register still image movie music files in the SD card as contents from the client computer Content selection tab Content list 1 In the timetable page click the tab of the content to register among the Content selection tab f f Clicking the tab changes the Content list dis...

Page 146: ...gistered in the Add content screen Content deletion f f To continue to add content go back to Step 3 or to delete content from the Add content screen go to Step 6 and to end adding content proceed to Step 10 f f Up to 10 contents can be registered in the Add content screen 6 To cancel addition of content click on the Add content screen f f The mode changes to deletion mode 7 Select the content for...

Page 147: ...d Deleting content registered in a content list Delete unnecessary content from the SD card Content selection tab Content list 1 In the timetable page click the tab of the content to delete among the Content selection tab f f Clicking the tab changes the Content list display Content deletion 2 Click in the Content list f f The mode changes to deletion mode 3 Select the content to delete f f You ca...

Page 148: ...able page click the tab of the content of which registration information you want to edit from the Content selection tab f f Clicking the tab changes the Content list display 2 In the Content list click the content of which registration information you want to change f f The Content edit screen is displayed 3 Change Content name and or Duration and click the Enter button f f You can change Content...

Page 149: ...f f Deleting content registered in a playlist x page 153 f f Changing the settings of content registered in a playlist x page 153 f f Duplicating a playlist x page 154 f f Displaying preview of playlist contents x page 155 Registering playlist Bundle multiple still image movie external input contents and register them as one content called playlist Content selection tab 1 In the timetable page cli...

Page 150: ... selection tab f f Clicking the tab changes the Content list display 4 Register the content in the playlist f f Drag and drop the content to be registered in the playlist from the Content list into the playlist Content list Playlist f f The Content registration screen is displayed 5 Input Duration and Effect and click the Enter button f f The content is registered in the playlist Total time f f Yo...

Page 151: ... input Playlist name 7 Click the Save button f f The created playlist is registered in the SD card Note f f Only image content still image movie external input can be registered in a playlist f f Up to 100 contents can be registered in one playlist f f Up to 500 playlists can be registered However it may not be possible to register 500 files depending on the capacity of the SD card f f If you clic...

Page 152: ... a playlist you want to edit and click the Execute button f f The Playlist edit screen is displayed Playlist 4 Editing a playlist f f To add content perform the procedure same as Registering playlist x page 149 f f To delete content refer to Deleting content registered in a playlist x page 153 f f To change content settings refer to Changing the settings of content registered in a playlist x page ...

Page 153: ...de 2 Select the content to delete f f You can select multiple contents 3 Click the Delete button 4 When the confirmation screen is displayed click the OK button f f The selected content is deleted from the playlist f f Return to the Playlist edit screen and click the Save button to register the edited playlist in the SD card Changing the settings of content registered in a playlist Change the sett...

Page 154: ...tings f f The settings of the content on the playlist will change f f You can set Effect only for still image content f f Return to the Playlist edit screen and click the Save button to register the edited playlist in the SD card Duplicating a playlist Duplicate a registered playlist Content selection tab 1 In the timetable page click the Playlist tab among the Content selection tab f f The Conten...

Page 155: ...ylist name entry screen is displayed 4 Enter any Playlist name and click the Enter button f f For Playlist name up to 24 characters in single byte can be input f f The duplicated playlist is displayed in the Content list and registered in the SD card Displaying preview of playlist contents Display the preview image of a playlist on the web browser of on the projection screen Content selection tab ...

Page 156: ... f The Content list shows the list of playlists Content list Playlist edit 2 Click in the Content list f f The mode changes to selection mode 3 Select a playlist you want to preview and click the Execute button f f The Playlist edit screen is displayed 4 Click the Preview button f f The preview mode selection screen is displayed ...

Page 157: ...y changes depending on the playback state Switches to the next content Note f f When there is a blank period between contents the period is handled as one content and displayed in preview f f Regardless of the content setting each content including blank periods is played for 10 seconds f f In the case of movie external input content only an icon is displayed on the preview screen instead of the a...

Page 158: ...e ID Content name Ascending Content name Descending Displays timetables in the order of timetable name 3 Timetable ID Displays the timetable ID 4 Timetable name Displays the timetable name 5 Display scale Sets the display scale for Timetable 6 Period setting Sets the period week to be displayed in a schedule When selected the calendar is displayed 7 Schedule Displays the schedule of the specified ...

Page 159: ...gister it in a schedule Refer to Registering a schedule x page 160 for details 5 Register the schedule f f Click the Save button to set the schedule Note f f Schedules can be set from the current week up to 12 weeks ahead as the different timetable on a daily basis The same content can also set on a weekly basis f f For operations for setting the schedule refer to the descriptions of the following...

Page 160: ...ar of the previous month 2 Move to the next month Displays the calendar of the next month 3 Calendar Click a date to display the schedule of the week 4 Every week button Click this to register a timetable for a certain day of the week r r Procedure 1 Click for the Period setting f f The calendar is displayed 2 On the calendar click the day in which you want to register a timetable f f The Period s...

Page 161: ...of the week on the Schedule Timetable ID Schedule f f When you finish registering the timetable in the schedule currently displayed proceed to Step 4 4 After the registration of the timetable is complete click the Save button f f The schedule is registered in the SD card Note f f When you use Internet Explorer as the web browser and drag the Timetable ID with the mouse pointer the ID sometimes doe...

Page 162: ... 2 Select a day or day of week to delete f f You can select multiple days or days of week 3 Click the Delete button 4 When the confirmation screen is displayed click the OK button f f The timetable assigned to the selected day or day of week is deleted from the schedule Note f f Deleting a timetable from the schedule will not delete the timetable from the SD card ...

Page 163: ...k sequence and playback time registered in a timetable Timetable edit 1 Click of the timetable to edit f f The timetable page is displayed 2 Edit the timetable f f Edit the timetable according to the procedure described in Creating a timetable x page 133 Duplicating a timetable Duplicate a registered timetable Timetable duplication ...

Page 164: ...g a timetable Delete a registered timetable Timetable deletion 1 Click f f The mode changes to deletion mode 2 Select the timetable to delete f f You can select multiple timetables 3 Click the Delete button 4 When the confirmation screen is displayed click the OK button f f The selected timetable is deleted from the SD card Note f f If the timetable to be deleted is registered in a schedule then t...

Page 165: ...content registered in a timetable 4 Timetable duplication icon Duplicates the timetable being displayed Duplicating a timetable x page 163 5 Timetable edit icon Edits the timetable being displayed Editing a timetable x page 163 r r Procedure 1 Click the day or day of week of which timetable you want to confirm the details f f The Assigned timetable screen is displayed Checking the operational info...

Page 166: ...tent is displayed as an icon 9 Playback information Displays the information of still image movie external input music content being played 10 Display scale Sets the display scale for Timetable 11 Interrupt button Click this to display the Interrupt list screen Setting interruption playback x page 167 12 Play Stop button Click this to start playing a schedule or to stop playing the schedule Starti...

Page 167: ...utton Click this to stop interruption playback Canceling the currently played interruption schedule x page 173 7 Interruption schedule registration icon Register a new interruption schedule Registering interruption playback x page 168 8 Registered interruption schedule deletion icon Deletes a registered interruption schedule Deleting a registered interruption schedule x page 171 9 Registered inter...

Page 168: ... a schedule x page 176 set in the System setting page has passed it is deleted from the interruption schedule f f For operations for interruption playback refer to the descriptions of the following items g g Registering interruption playback x page 168 g g Editing the information of registered interruption schedule x page 170 g g Duplicating a registered interruption schedule x page 171 g g Deleti...

Page 169: ...e time to start the interruption playback 5 Interrupted still image content being selected Displays the selected still image content 6 Return button Click this to return to the Interrupt list screen 7 Projector time Displays the time of the connected projector 8 Save button Click this to confirm the settings and register the interruption schedule in the SD card r r Procedure 1 Click f f The Interr...

Page 170: ...back time of a registered interruption schedule r r Interrupt list screen Registered interruption schedule edit r r Interrupt edit screen 7 8 1 6 2 3 4 5 1 Interrupted still image content name Displays the selected interrupted still image content name 2 Start Sets the time to start interruption playback 3 End Select the radio button and set the time to end the interruption playback 4 Duration Sele...

Page 171: ...red interruption schedule Registered interruption schedule duplication 1 Click of the registered interruption schedule to be duplicated f f The Interrupt edit screen is displayed 2 Edit Start and End or Duration 3 Click the Save button f f The interruption schedule is duplicated and registered in the SD card Note f f Interrupted still image content name cannot be edited f f If the playback time ov...

Page 172: ...click the OK button f f The selected interruption schedule is deleted Note f f Deleting the interruption schedule will not delete the still image content from the SD card Editing the information of currently played interruption schedule Edit the playback time of the currently played interruption schedule Currently played interruption schedule edit 1 Click f f The Interrupt edit screen is displayed...

Page 173: ...onger necessary in the middle of the interruption playback 1 Click the Stop button f f Interrupt the currently played interruption schedule and terminate the interruption playback Checking a schedule Check the currently registered schedule r r Schedule confirmation screen 3 2 1 1 Calendar Displays the ID of the assigned timetable for each date Click an ID to display the timetable of the day 2 Move...

Page 174: ...of the selected day 4 Display scale Sets the display scale for Timetable r r Procedure 1 On the start screen click Schedule f f The schedule screen is displayed 2 Click f f The schedule confirmation screen is displayed 3 Click the day of which schedule you want to check on the calendar f f The Timetable display is updated Check the timetable set for the day Checking the playback history Display th...

Page 175: ...e screen is displayed 2 Click f f The history screen is displayed Check the content already played back r r Display contents of the history Icon Details Played Playback failed Playback stopped Interruption occurred Interruption playback Interruption playback failed Brightness changed Power on Power off ...

Page 176: ...The setting screen is displayed Setting selection tabs 3 Select one of the setting selection tabs System setting Data management Login f f The page of the selected tab is displayed Change the setting as necessary For details refer to the descriptions of the following items g g Performing system settings x page 177 g g Obtaining a backup of a schedule x page 178 g g Uploading a schedule x page 180 ...

Page 177: ...ent is registered in the timetable 8 Restart option As a condition to resume the paused signage playback sets enable disable of Power Image content 9 Fixed loading time Select whether to fix the loading time after starting the scheduled movie content till displaying the image on the projection screen Enable Fixes the loading time after starting playback till displaying the image to three seconds D...

Page 178: ...rt option in the System setting page the setting is reflected in the menu setting of the projector Refer to Setting the restart option x page 70 which explains the SETUP menu SIGNAGE Obtaining a backup of a schedule Download a registered schedule into the client computer only Windows computer Mac are supported r r Data management page 1 3 2 5 4 1 Backup All schedule Sets the backup target to be al...

Page 179: ...displayed 4 Select the date or day of the week in which the target schedule is registered and click the Setting button f f In the Data management page the timetable ID and the timetable name are displayed 5 Click the Backup button f f The Backup file list screen is displayed f f If the size of the backup target data is large several backup files are created 6 Click the link to the backup file and ...

Page 180: ...ata addition progress Displays the progress by comparing the number of saved data items when backup was obtained with the number of added upload target data items 6 Upload button Writes upload target data in the SD card of the projector 7 Undo button Clears upload target data r r Procedure 1 Click the Data management tab f f The Data management page is displayed 2 Click the upload file Add button ...

Page 181: ...nation Changing login information Set the user name and password for logging in to the Content Manager for administrator rights user rights respectively r r Login page 1 2 3 4 5 1 2 3 4 5 6 7 7 6 1 Current User name Enter the current user name Up to 8 alphanumeric characters in single byte 2 Current Password Enter the current password Up to 16 alphanumeric characters in single byte 3 New User name...

Page 182: ...ring this period a time lag of more than one second may occur between the projectors in the starting or ending timing of content playback f f To perform simultaneous playback use the following movie file as a movie content If you use the movie files other than the following simultaneous playback function may not work properly g g Extension mp4 Video codec H 264 MPEG 4 AVC Audio codec AAC g g Exten...

Page 183: ... register the same schedules in other projectors while the SD card with the duplication source schedules is inserted in the SD card slot of the projector Operate the web browser on the client computer only Windows computer Mac supported Client computer Example Illustration of connecting via wired LAN Hub Download Upload Duplication source Duplication destination 1 Duplication destination 2 1 Log i...

Page 184: ...ng from the web browser x page 105 3 On the Adjust clock page of the web control screen select Time Zone f f The schedule is played back based on the local date and time set in the projector Set the same time zone for the projectors performing simultaneous playback 4 On the Adjust clock page of the web control screen set NTP SYNCHRONIZATION to ON 5 Enter the IP address or server name of the NTP se...

Page 185: ...slideshow screen 14 15 16 12 13 11 1 2 5 7 3 4 9 10 6 8 1 Playback status Displays the status of signage playback slideshow 2 Content selection tab Select the type of content still image or movie to register in a slideshow 3 Sort content Select the display order of the Content list Date Ascending Date Descending Displays contents in the order of registration date Content name Ascending Content nam...

Page 186: ... Content list display to still image or movie 2 Register a content in the content list f f To register still image movie contents in the slideshow register still image movie files in the content list in advance For details on registration procedure refer to Registering content x page 187 3 Register contents in the slideshow f f Drag and drop the content to be registered in the slideshow from the C...

Page 187: ...t or delete them from the content list Refer to the descriptions of the following items f f Registering content x page 187 f f Deleting content x page 189 Registering content Register still image movie files in the SD card as contents from the client computer Content selection tab Content list 1 Click the tab of the content to register from the Content selection tab Still or Video f f Clicking the...

Page 188: ...d content screen go to Step 6 and to end adding content proceed to Step 10 f f Up to 10 contents can be registered in the Add content screen 6 To cancel addition of content click on the Add content screen f f The mode changes to deletion mode 7 Select the content for which you want to cancel addition f f You can select multiple contents 8 Click the Delete button 9 When the confirmation screen is d...

Page 189: ... deleted from the Content selection tab Still or Video f f Clicking the tab changes the Content list display Content deletion 2 Click f f The mode changes to deletion mode 3 Select the content to delete f f You can select multiple contents 4 Click the Delete button 5 When the confirmation screen is displayed click the OK button f f The selected content is deleted from the SD card ...

Page 190: ...or setting to be reflected when playing a slideshow For details of the setting items refer to Color x page 198 3 Brightness Select the brightness to be reflected when playing a slideshow 4 Interval Sets the default playback time which is set when still image content is registered in a slideshow 5 Undo button Click this to undo the entered setting to the state before the setting screen was displaye...

Page 191: ...a slideshow Slideshow 1 Move the content of which order you want to change using a drag and drop operation in the Slideshow 2 Click the Save button f f The edited slideshow setting is registered in the SD card Deleting content from a slideshow Delete contents registered in a slideshow Slideshow Content registered in slideshow deletion ...

Page 192: ...ave button f f The edited slideshow setting is registered in the SD card Changing the still image content setting Change the setting of still image contents registered in a slideshow Slideshow 1 Click the still image content registered in the Slideshow f f The setting screen is displayed 2 Change Effect and Duration and click the Enter button f f Change the image effect and playback time settings ...

Page 193: ...m the beginning In the case of movie content the playback resumes from the paused part Registering a lighting pattern Register lighting patterns to be used in the settings SD1 to SD10 of the LIGHTING menu PATTERN x page 60 of the projector in the SD card as still image contents f f Refer to Cards that can be used with the projector x page 49 for SD cards that can be used with the projector 1 Save ...

Page 194: ...ager with administrator rights f f The start screen is displayed 3 Click Slideshow f f The slideshow screen is displayed Content selection tab 4 Click the Still tab among the Content selection tab Content addition 5 Click f f The Add content screen is displayed Content addition ...

Page 195: ...tep 6 or to delete content from the Add content screen go to Step 9 and to end adding content proceed to Step 13 9 To cancel addition of content click on the Add content screen f f The mode changes to deletion mode 10 Select the content for which you want to cancel addition f f You can select multiple contents 11 Click the Delete button 12 When the confirmation screen is displayed click the OK but...

Page 196: ...etion 1 Click f f The mode changes to deletion mode 2 Select the content you want to delete or replace f f You can select multiple contents 3 Click the Delete button 4 When the confirmation screen is displayed click the OK button f f The selected content is deleted from the SD card f f To replace it with another pattern proceed to Step 5 or to just delete the pattern proceed to Step 9 Content addi...

Page 197: ...nt cannot be deleted Effect The following table shows the special effects Effect which can be set to still image contents and used when changing the playback screen Off Does not apply image effects Random Applies image effects randomly Wipe left Displays the image gradually from the left like wiping Wipe right Displays the image gradually from the right like wiping Wipe down Displays the image gra...

Page 198: ...d in the LIGHTING menu COLOR SETTING User L2 Reflects the USER2 setting 2 adjusted in the LIGHTING menu COLOR SETTING User L3 Reflects the USER3 setting 2 adjusted in the LIGHTING menu COLOR SETTING User L4 Reflects the USER4 setting 2 adjusted in the LIGHTING menu COLOR SETTING User L5 Reflects the USER5 setting 2 adjusted in the LIGHTING menu COLOR SETTING 1 For the setting method refer to Adjus...

Page 199: ...ENGLISH 199 Chapter 6 Maintenance This chapter describes troubleshooting and maintenance methods ...

Page 200: ...ff the projector f f Check the status of the power supply with the power indicator ON G STANDBY R x page 41 ON G STANDBY R LIGHT TEMP SD Power indicator ON G STANDBY R Light source indicator LIGHT Temperature indicator TEMP Light source indicator LIGHT Indicator status Lighting in red projecting Blinking in red 2 times Blinking in red 3 times Status The light source may not light properly The ligh...

Page 201: ... the projector at altitude between 2 000 m 6 562 and 2 700 m 8 858 f f Do not use the projector at high altitudes of 2 700 m 8 858 or higher above sea level f f Turn off the power supply of the interior wiring or disconnect the plug of the power cord from the outlet and then consult your dealer 1 The operating environment temperature should be between 0 C 32 F and 35 C 95 F when using the projecto...

Page 202: ...front surface of the lens with a soft clean cloth f f Do not use a cloth that is fluffy dusty or soaked with oil water f f Since the lens is fragile do not use excessive force when wiping the lens Attention f f The lens is made of glass Hitting with a hard object or excessive force when wiping may scratch its surface Handle with care Cleaning inside the projector In certain environments such as in...

Page 203: ...propriate 35 f f Is the lens dirty 22 Color is pale or grayish f f Are COLOR and TINT adjusted correctly 64 f f Is the external device connected to the projector adjusted correctly 38 Remote control does not respond f f Are the batteries depleted f f Is the battery polarity correct 28 f f Is there any obstruction between the remote control and the remote control signal receiver of the projector po...

Page 204: ... or not being able to connect perform the following to restore g g Set STANDBY MODE in the SETUP menu ECO MANAGEMENT x page 72 to ECO and turn off on the projector If it is already set to ECO the changing operation of STANDBY MODE is not necessary g g Turn off the power and then turn on the power supply of the interior wiring again or reconnect the plug of the power cord to the outlet g g Turn the...

Page 205: ...ENGLISH 205 Chapter 7 Appendix This chapter describes specifications and after sales service for the projector ...

Page 206: ...y 51 Panasonic APPLICATION 52 Miracast 53 LIGHTING AVMT AV mute control 30 AV mute function off AVMT AV mute function query 31 AV mute function on ERST Error status query xxxxxx 1st byte Indicates fan errors and returns 0 2 f f 0 No error is detected f f 1 Warning f f 2 Error 2nd byte Indicates light source errors and returns 0 2 3rd byte Indicates temperature errors and returns 0 2 4th byte Indic...

Page 207: ...ast 0 31 Focus adjustment moderate 32 63 Focus adjustment slow 64 95 No operation 96 159 Focus adjustment slow 160 191 Focus adjustment moderate 192 223 Focus adjustment fast 224 255 7 Lens zoom Zoom adjustment fast 0 31 Zoom adjustment moderate 32 63 Zoom adjustment slow 64 95 No operation 96 159 Zoom adjustment slow 160 191 Zoom adjust moderate 192 223 Zoom adjustment fast 224 255 8 Power supply...

Page 208: ...owing data using MD5 algorithm f f xxxxxx yyyyy zzzzzzzz xxxxxx Administrator rights user name for the web control default user name is admin1 yyyyy Password of above administrator rights user default password is panasonic zzzzzzzz 8 byte random number obtained in Step 2 Command transmission method Transmit using the following command formats r r Transmitted data Header Data section Termination sy...

Page 209: ... ASCII string 0x20 0 0x30 CR 0x0d Data length 9 bytes 1 byte 1 byte 1 byte f f Mode 0 Non protect mode Command transmission method Transmit using the following command formats r r Transmitted data Header Data section Termination symbol Command example 0 0x30 0 0x30 Control command ASCII string CR 0x0d Data length 1 byte 1 byte Undefined length 1 byte r r Received data Header Data section Terminati...

Page 210: ...he power is on use the Power supply status query command POF Power standby QPW Power supply status query 000 001 STANDBY status Power on condition IIS Input mode selection HD1 HDMI MV1 MEMORY VIEWER MC1 Miracast PA1 Panasonic APPLICATION SI1 SIGNAGE LI1 LIGHTING OLP Light source power setting 0 NORMAL QLP Light source power setting query 1 ECO QST Runtime query 00000 99999 In hours OSH AV mute 0 A...

Page 211: ...ely small range such as inside a company MAC address An ID number unique to each network adapter A unique number is assigned to network adapters throughout the world and data is sent and received between the adapters based on this This ID number is a combination of the unique number for the manufacturer managed and assigned by IEEE and the number assigned by each manufacturer to their adapter MD5 ...

Page 212: ...and encryption is performed using an external server WPA PSK WPA2 PSK A standard of encryption method for wireless LAN This is advanced security than the WEP and it has functions such as user authentication function and TKIP encryption protocol that will automatically change the encryption key every specified time Also this authentication method does not need an authentication server ...

Page 213: ...104 F Humidity 10 to 80 no condensation Remote control Power supply DC 3 V AAA R03 or AAA LR03 battery x 2 Operating range Within approx 7 m 22 11 when operated directly in front of signal receiver Weight 63 2 2 ozs including batteries Dimensions Width 44 mm 1 23 32 Height 105 mm 4 1 8 Depth 20 5 mm 13 16 1 When the SETUP menu ECO MANAGEMENT STANDBY MODE is set to ECO the network function both wir...

Page 214: ...set RJ 45 for network connection PJLink compatible 10Base T 100Base TX DC OUT terminal USB connector type A x 1 for power supply DC 5 V maximum 900 mA Wireless LAN Compliance standards IEEE802 11b g n IEEE802 11a n wireless LAN standard protocol Used wireless channel Passive scanning 2 412 GHz 2 472 GHz 5 180 GHz 5 825 GHz Communication distance Approx 30 m 98 5 depends on the usage environment 1 ...

Page 215: ...68 48 4 60 0 65 0 l SXGA 1 280 x 1 024 64 0 60 0 108 0 l 1280 x 720 1 280 x 720 37 1 49 8 60 5 1 280 x 720 44 8 59 9 74 5 1280 x 768 1 280 x 768 39 6 49 9 65 3 1 280 x 768 47 8 59 9 79 5 1280 x 800 1 280 x 800 41 3 50 0 68 0 1 280 x 800 49 7 59 8 83 5 l 1600 x 900 1 600 x 900 46 4 49 9 96 5 1 600 x 900 56 0 59 9 118 3 1 Signals with a l in the Plug and play columns are signals described in EDID ex...

Page 216: ...LIVE MODE CUT IN 81 LOAD ALL USER DATA 75 M M DIRECT 78 Main menu 56 Maintenance 202 MEMORY VIEWER 57 66 MEMORY VIEWER button 25 51 Memory Viewer function 93 MENU button 25 Menu item 57 Miracast button 25 51 Miracast function 126 MULTI LIVE 82 N Navigating through the menu 55 NETWORK 58 77 Network config 112 NETWORK CONTROL 81 NETWORK ID 83 Network status 109 NETWORK STATUS 83 Number 1 6 buttons 2...

Page 217: ... them correctly you will help to save valuable resources and prevent any potential negative effects on human health and the environment For more information about collection and recycling please contact your local municipality Penalties may be applicable for incorrect disposal of this waste in accordance with national legislation Note for the battery symbol bottom symbol This symbol might be used ...

Reviews: