background image


1. Unpacking : 

Confirm that all accessories are included.

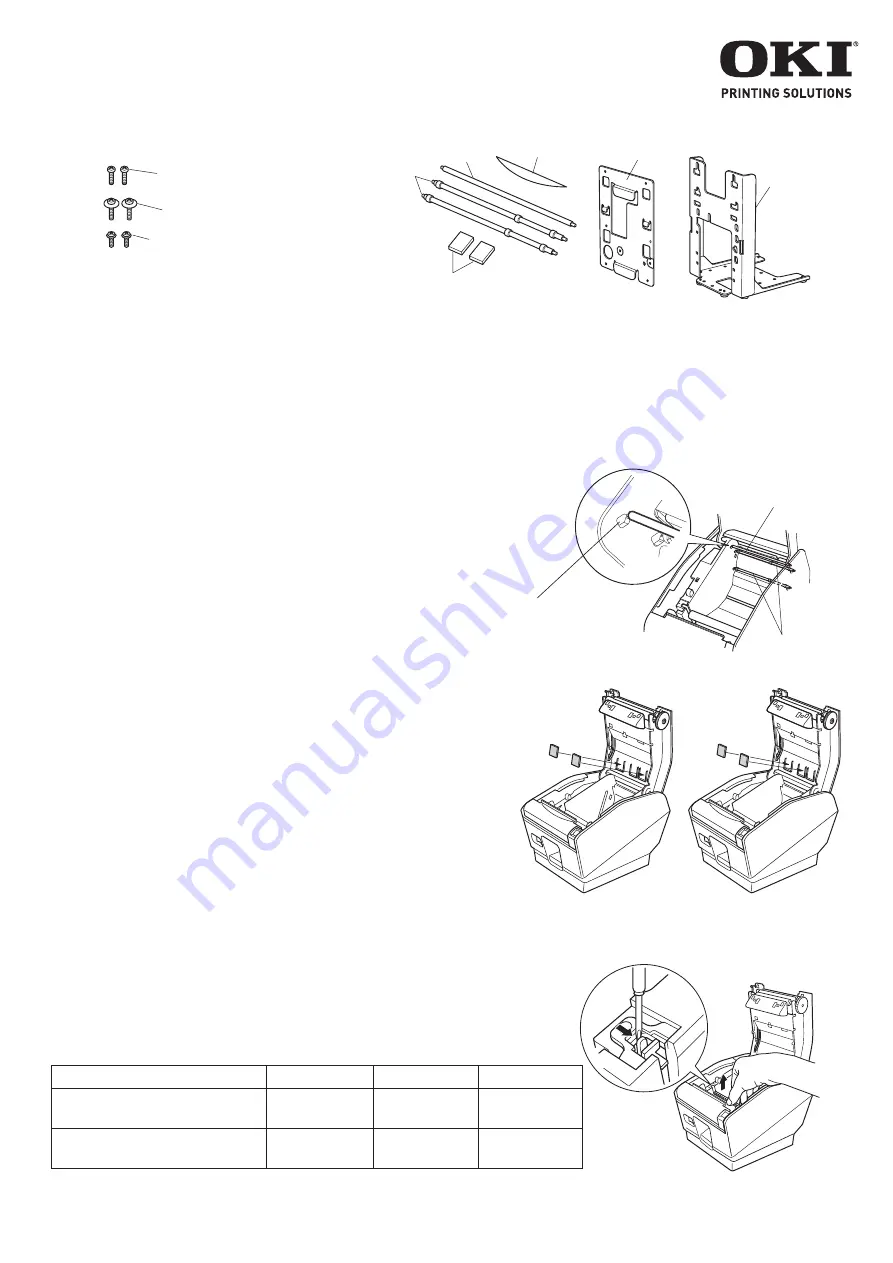
2. Attachment procedures : 

2-1. Attaching the shafts

1

  Attach the shaft (C) for 

OKIPOS 407

 / 

OKIPOS 407II

2

  Attach the two shafts (D) for 

OKIPOS 407

.


Note: For 

OKIPOS 407II

, two shafts (D) are already attached.

2-2. Attaching the roll stoppers


Wipe the area into which the rubber feet will be 

affixed in order to remove any grime; then, affix 

the roll stoppers. The positions for affixing them 

will vary depending on the paper width.

2-3. Removing the tension bar unit


When using thermal paper roll, the tension bar unit may or 

may not be necessary, depending on the paper thickness or 

the paper width. If the tension bar unit is unnecessary, remove 

it in accordance with the procedure indicated below. The 

tension bar unit is unnecessary when using full-face thermal 

label paper roll or thermal label paper roll (tack label paper).


Use a regular screwdriver to remove the clips at both ends of 

the bar to remove the tension bar unit.

fig.2  Attaching the roll stoppers

fig.3  Removing the tension bar unit

M4 

×

 8 screws (2)

(for attaching the stand)

M3 

×

12 screw with flat washer (2)

(for attaching the holder plate)

Roll stoppers

Shafts(D)

Shaft(C)

Brand seal

M3 

×

12 screws (2)

(for attaching the holder plate)

Holder plate

Stand

fig.1  Attaching the shafts

Shaft(C)

Shafts(D)

Push in the left and right 
ends of the shaft.

Note: Ensure that power that is supplied to the printer and that all devices connected to the printer have been switched 

OFF and that the cables have been unplugged before starting the modification. If the AC adapter is connected to 

the printer, unplug it from the main socket.


The base for setting the stand should be within a range of 

±2

°

 in reference to the horizontal direction.

82.5 or 79.5 mm width

57.5 mm width


Note: For 

OKIPOS 407I

I, two shafts (D) are already attached, so this cannot be used.

Paper width (mm)

82.5

79.5

57.5

Paper thickness

between 65 μm and 100 μm

Necessary

Necessary

Unnecessary

Paper thickness

between 101 μm and 150 μm

Unnecessary Unnecessary Unnecessary

Attaching the 

OKIPOS 407/OKIPOS 407II 

vertical stand 

©2009 OKI Data Americas, Inc.

58398903

Summary of Contents for OkiPos 407II

Page 1: ...tension bar unit fig 2 Attaching the roll stoppers fig 3 Removing the tension bar unit M4 8 screws 2 for attaching the stand M3 12 screw with flat washer 2 for attaching the holder plate Roll stoppers Shafts D Shaft C Brand seal M3 12 screws 2 for attaching the holder plate Holder plate Stand fig 1 Attaching the shafts Shaft C Shafts D Push in the left and right ends of the shaft Note Ensure that ...

Page 2: ...screws fitted with flat washers are used where the screws were previously removed 2 6 Setting the printer on the stand Insert the two hooks on the holding plate through the two holes on the stand Three different posi tions are available for insertion Select the position you require Once the hooks have been inserted into the holes secure the printer on the stand using the two screws 2 7 Setting the...

Page 3: ...jà installés sur l OKIPOS 407II 2 2 Installation des butoirs Essuyez la zone où seront installées les pattes en caoutchouc pour enlever toute saleté installez ensuite les butoirs Leurs positions d installation sont fonction de la largeur de papier 2 3 Retrait de la barre de tension Lorsqu un rouleau de papier thermique est utilisé la barre de tension peut ne pas être requise en raison de l épaisse...

Page 4: ...ux positions des vis retirées antérieurement 2 6 Installation de l imprimante sur le support Insérez les deux crochets de la plaque de support dans les deux trous du support Trois positions sont offertes pour insérer ces crochets Sélectionnez la position désirée Une fois les crochets insérés fixez l imprimante sur le support en utilisant deux vis 2 7 Installation du rouleau de papier 1 Poussez le ...

Page 5: ...es D en la OKIPOS 407 Nota La OKIPOS 407II ya viene con los dos ejes D 2 2 Colocación de los tapones del rollo Limpie el área en donde se colocan las patas de goma para eliminar cualquier suciedad luego fije los tapones del rollo El lugar en donde se fijan los tapones depende del ancho del rollo 2 3 Remoción de la barra tensora Cuando se utiliza papel en rollo térmico puede que no sea necesario ut...

Page 6: ...e utilizan en lugar de los tornillos que retiró anteriormente 2 6 Instalación de la impresora en el soporte Inserte los dos ganchos de la placa de sujeción en los dos huecos correspondientes del soporte Existen tres posiciones diferentes para su colocación Seleccione la posición deseada Una vez que los ganchos calcen en los huecos asegure la impresora al soporte con los dos tornillos 2 7 Colocació...

Page 7: ...á estão instalados 2 2 Instalação dos batentes do rolo de papel Limpe a área na qual os pés de borracha serão afixados para remover toda a sujeira e em seguida afixe os batentes do rolo de papel As posições para afixá los variará de acordo com a largura do papel 2 3 Remoção da barra de tensão Quando papel térmico em rolo for usado a barra de tensão pode ou não ser necessária dependendo da espessur...

Page 8: ...e os parafusos foram removidos anteriormente 2 6 Colocação da impressora no suporte Insira os dois ganchos na placa de retenção através dos dois orifícios no suporte Há três posições diferentes disponíveis para inserção Selecione a posição desejada Assim que os ganchos estiverem inseridos nos orifícios prenda a impressora no suporte usando os dois parafusos 2 7 Colocação do rolo de papel no lugar ...

Reviews: