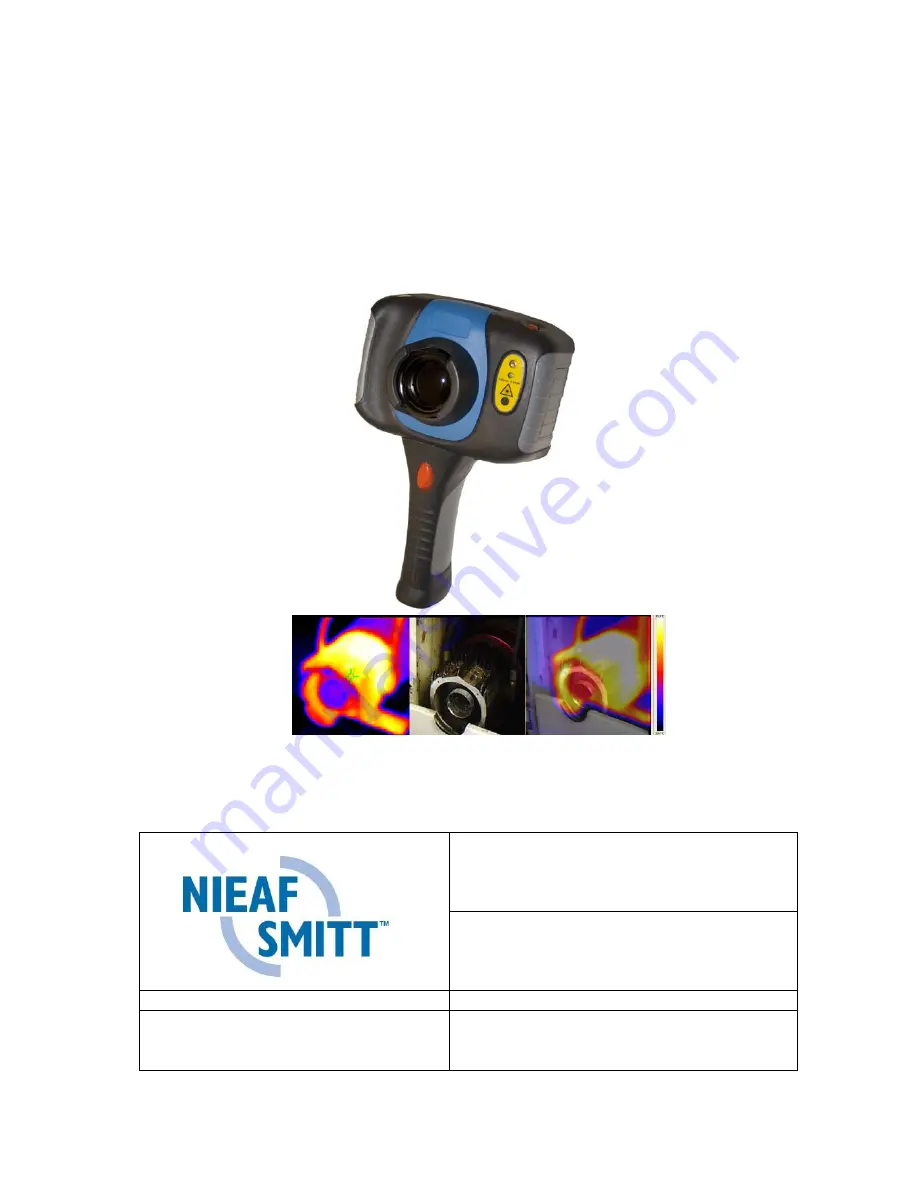
background image

User Manual 

NI IR2010 

Thermal Imaging Camera 


Supplier: 
 

Nieaf-Smitt B.V. 
Vrieslantlaan 6 
3526 AA  Utrecht  Holland 
P.O. Box 7023  3502 KA  Utrecht 


Tel. 

: 030 288 13 11 (general) 

Fax. 

: 030 289 88 16 

Tel. 

: 030-285 02 85 (helpdesk) 

e-mail 

: [email protected]  

Specifications of the equipment: 

NI IR2010 

Specifications of the manual: 

Date : 

09-04-2010 

Number : 

561144163 

Version : 

001 

Summary of Contents for NI IR2010

Page 1: ...tlaan 6 3526 AA Utrecht Holland P O Box 7023 3502 KA Utrecht Tel 030 288 13 11 general Fax 030 289 88 16 Tel 030 285 02 85 helpdesk e mail helpdesk nieaf smitt nl Specifications of the equipment NI IR...

Page 2: ...to change parts at any given moment without prior or direct notification to the client The contents of this user manual may also be changed without prior warning No part of this publication may be see...

Page 3: ...ns are used to focus attention on certain subjects or actions TIP gives you suggestions and advice to perform certain tasks easier or handier ATTENTION A remark with additional information draws your...

Page 4: ...mal and visible image blending Image fusion 25 5 3 Image alignment 26 6 Adding captions when saving images 27 6 1 Voice message 27 6 2 Text captions 28 7 Frequently asked questions 29 7 1 What Tempera...

Page 5: ...mera battery power consumption 50 7 21 What does Camera Reset do 51 7 22 How do I automatically make multiple images 52 8 Maintenance 53 8 1 Calibration and Repair 53 8 2 Cleaning the camera 53 8 3 Re...

Page 6: ...y electronic memory data are lost or changed Therefore Nieaf Smitt BV accepts no financial responsibility for losses or claims by lost or otherwise unusable information resulting from abuse misuse fai...

Page 7: ...execute measurements if strong electrostatic or electromagnetic fields are present ATTENTION Provide a clean and save workplace which has sufficient lighting TIP Contact Nieaf Smitt B V if you requir...

Page 8: ...ce engineers as ordinary tools like a screwdriver 2 1 Intended use Nieaf Smitt products and solutions are used in many industries including retail banking recreation security transportation and health...

Page 9: ...nce electrical and mechanical Domestic and industrial controls HVAC inspection and frozen Troubleshooting and fault detection 2 3 Operation Thermal cameras visualize the temperature radiated by the me...

Page 10: ...2 metres Beam Divergence 0 2mrad Maximum Output 1mW Measurement Temperature range 10 C to 350 C Radiometry Two moveable temperature measurement cursors Temperature difference measurement Emissivity C...

Page 11: ...alarm high and low Features Real time image and temperature measurement display Visible thermal mixed image fusion 100 75 50 25 0 Picture In Picture PIP Simple operation Multiple temperature measurem...

Page 12: ...controls or adjustments or performance of procedures other than those specified in this document may result in hazardous laser radiation exposure 2 6 Certification The tester complies with the releva...

Page 13: ...ase 1 The carrying case 2 Camera 3 PSU and International adaptors 4 CD user manual and software 5 USB cable camera to PC 6 Handle 7 Quick start guide certificate of conformity calibration card full ma...

Page 14: ...era on for the first time it needs to be configurated This will be explained in the underlying paragraphs options chosen by the user A yellow box around the icon for Hotkey1 or Hotkey 2 indicates that...

Page 15: ...p down buttons to move in the selected list and select the required item d Use the left right buttons to change values and options for the specific item e Press Hotkey 4 to exit or Hotkey 1 to go back...

Page 16: ...ainbow 16 3 Isotherm Style 7 Black Hot 4 Hot Metal 8 White Hot Reflected Temp Usually set to the ambient temperature Applies only when emissivity of less than 1 is selected Temp units Choose between C...

Page 17: ...on the display by the navigation buttons Cursor Tracking Select High Low or High Low in order to track and measure the hottest point the coldest point or both hottest and coldest points in the image A...

Page 18: ...within the designated area is higher or lower than a set temperature The high and low set temperatures may be adjusted by means of Hotkey 1 and the navigation buttons 4 3 4 Camera settings See chapte...

Page 19: ...n to add a voice message at the start of a set of images A session ends when the imager is switched off Select Individual to add a voice message to each saved image Select Combined to add a common voi...

Page 20: ...s Hotkey 3 When a stored image is displayed press Hotkey 3 to return to live imaging 4 3 7 Date Time settings a Use the left right buttons to navigate in this menu the item that can be changed is high...

Page 21: ...21 Rev 001 4 3 8 Language selection When the language is highlighted shown by a yellow box around it press Hotkey 3 to select...

Page 22: ...n to assist in focusing the image It indicates the approximate distance in metres in feet when F is selected of a focussed target from the camera Hotkey buttons Hotkey 1 Hotkey 2 Hotkey 3 Hotkey 4 The...

Page 23: ...or frozen image press the Save button once If Caption Mode or Voice Annotation has been turned on a text caption or voice annotation can be attached to the image see section 6 Please note that Hotkey...

Page 24: ...fault mode a single temperature in C is of the centre point of the cursor The other readings at the top of the display are emissivity settings and reflected temperature setting Two cursors or a measur...

Page 25: ...rmal and 50 visible 1 Press Hotkey 2 until the Visible On Off icon appears 2 If off press the centre toggle button to toggle to Visible On 3 Use either the up down or left right navigation buttons to...

Page 26: ...3 Four pre programmed alignment distances are included These are at 0 5m 1m 2m and 4m ranges With the alignment option selected by Hotkey 4 1 pressing the toggle button once aligns at 2 metres Pressin...

Page 27: ...y 2 for no Hotkey 3 for yes b Start voice recording Hotkey 3 for yes c Stop Recording Hotkey 3 to stop d Option to Re record the voice message Hotkey 2 for Yes Hotkey 3 for No Hotkey 1 for play e If c...

Page 28: ...wish to attach a text caption message to this image Hotkey 2 for No Hotkey 3 for Yes 1 Use the up down arrow buttons to cycle through letters and numbers until the one required appears The available...

Page 29: ...rs are selected the temperature difference between them is also displayed See Fig 4 Selection of cursors 1 Select the cursor by pressing Hotkey 1 Fig 1 2 Move the cursor using the navigation buttons T...

Page 30: ...the Measurement Options menu See Fig 2 and Press Hotkey 3 to select it Fig 3 3 Use the up down navigation buttons to move to the Area option 4 Use the left right navigation buttons to toggle between O...

Page 31: ...otkey 4 to select the menu Fig 1 2 Using the left right navigation buttons move to the Measurement Options menu See Fig 2 and Press Hotkey 3 to select it Fig 3 3 Use the up down navigation buttons to...

Page 32: ...overheating Selecting Isotherms 1 Press Hotkey 4 to select the menu Fig 1 2 Use the left right navigation buttons move to the Measurement Options menu See Fig 2 and Press Hotkey 3 to select it Fig 3 3...

Page 33: ...malies or discrepancies can be highlighted visually very easily How to select and use Auto Toggle Hotkey 2 until either the auto icon or the manual icon appears Fig 1 Use the centre toggle button to t...

Page 34: ...Press Hotkey 4 to select the menu Fig 1 2 Using the left right navigation buttons move to the Measurement Options menu See Fig 2 and Press Hotkey 3 to select it Fig 3 3 Use the up down navigation but...

Page 35: ...key 2 to toggle through to the visible camera on off options Fig 1 2 Press the centre toggle button to toggle between visible off and visible on See Figs 2 3 Fig 2 Fig 3 Hotkey 1 Hotkey 2 Hotkey 3 Hot...

Page 36: ...s all the temperature measurement options are available Blending Thermal and Visible Images 1 Using Hotkey 2 toggle through until either the visible camera on icon or visible camera off icon appears U...

Page 37: ...he thermal and visible images Fig 1 Fig 2 Fully aligned Fig 3 Align to the left Fig 4 Align to the right Fig 5 Align up Fig 6 Align down Four pre programmed alignment distances are included These are...

Page 38: ...the visible camera How to select the illumination light option 1 To turn the light on press Hotkey 2 to toggle through until either the light on See Fig 2 or light off icon appears See Fig 1 2 Use the...

Page 39: ...ore details on voice annotation and text caption are in Q 13 Images are saved on a micro SD card and may be viewed using the Browser Saving images 1 Press Hotkey 4 to select the menu 2 Using the up do...

Page 40: ...ht navigation buttons move to the Audio Settings menu and press Hotkey 3 to select it 3 Use the up down navigation buttons to move to Voice Annotation Fig 3 4 Use the left right navigation buttons to...

Page 41: ...save the voice message See Figs 6 7 and 8 4 After the Voice message recording is completed there is the option to add a Text Caption if selected Press Hotkey 3 for yes or press Hotkey 2 for no See Fig...

Page 42: ...42 Rev 001 TIP Pressing hotkey 4 at any point during the above will abort the process and revert to a live image Fig 8 Fig 9 Fig 10 Fig 11 Fig 12...

Page 43: ...n buttons to toggle through Off High Low or High Low In the example below we will select a high alarm 5 Press Hotkey 4 to exit 6 Use Hotkey 1 to toggle through until the high alarm icon appears Fig 4...

Page 44: ...s menu and press the Hotkey 3 to select it c In Imager Sounds use the left right navigation buttons to toggle the sound on d Press Hotkey 4 to exit 10 If the temperature at the cursor or within the me...

Page 45: ...ing colours are more useful in viewing changes of temperatures in a scene or object Change screencolours 1 Press Hotkey 4 to select the menu Fig 1 2 Infrared Settings is highlighted press Hotkey 3 to...

Page 46: ...10 for polished chromium to 1 00 for a black body An emissivity lookup table is provided which lists the emissivities of a range of common materials It is not recommended that temperature measurement...

Page 47: ...to set Relected Temperature 1 Press Hotkey 4 to select the menu Fig 1 2 Infrared Settings will be highlighted Press Hotkey 3 to select it 3 Use the up down navigation buttons to move to the Reflected...

Page 48: ...tion 1 Press Hotkey 4 to select the menu Fig 1 2 Infrared Settings is highlighted Press Hotkey 3 to select it 3 Use the up down navigation buttons to move to the Integration option 4 Use the left righ...

Page 49: ...tor Interpolation off Interpolation on Fig 1 Fig 2 How do I set Interpolation 1 Press Hotkey 4 to select the menu Fig 3 2 Infrared Settings is highlighted Press Hotkey 3 to select it 3 Use the up down...

Page 50: ...to select 3 The LCD Brightness option will be highlighted Fig 3 4 Use the left right navigation buttons to adjust the LCD brightness level Higher numbers indicate a brighter LCD The Brightness numbers...

Page 51: ...ettings Isotherms Off Date format DD MM YYYY Temp Profile Off Temp Alarm Off Language Selection Engels Camera Reset does not change the date ATTENTION bold items above are also reset on switching off...

Page 52: ...to the Camera Settings See Fig 2 and press Hotkey 3 to select it 3 Use the up down navigation buttons to move to the Sequence record option Fig 3 4 Use the left right navigation buttons to toggle betw...

Page 53: ...r calibration and or service you can send your tester post paid to Nieaf Smitt B V Technical Support Vrieslantlaan 6 3526 AA Utrecht Tel 0031 0 30 288 13 11 Tel Helpdesk 0031 0 30 285 02 85 Fax 0031 0...

Page 54: ...xide at 38 C 0 86 Emery Corundum 0 85 Snow 0 85 Stainless oxidized at 800 C 0 84 Oxidised Iron at 500 C 0 83 Cuprous Oxide at 260 C 0 82 Snow fine particles 0 81 Brass unoxidised 0 80 Glass convex D 0...

Page 55: ...izontal Profile vertical Alarm high Alarm low Playback Hotkey two Camera off Camera on Auto temperature range Manual temperature range Light off Light on No Yes Hotkey three Live Freeze No Yes Hotkey...

Page 56: ...dentification of the measuring system Trademark Nieaf Smitt B V Model Type IR2010 Nieaf Smitt herewith declares that the instrument which this declaration refers to is in conformity with the following...

Page 57: ...57 Rev 001 Appendix 4 Accessories Description Partnumber 12V car charger 626001043 Light shade 626001042 Power supply 626001044 USB cable 626001045 Carrying case 626001046 Handle 626001047...

Page 58: ...A Utrecht Holland Postbus 7023 3502 KA Utrecht Tel 030 288 13 11 algemeen Fax 030 289 88 16 Tel 030 285 02 85 helpdesk e mail helpdesk nieaf smitt nl Specifications of the software Thermal Manager Sof...

Page 59: ...to change parts at any given moment without prior or direct notification to the client The contents of this user manual may also be changed without prior warning No part of this publication may be see...

Page 60: ...that you can use this manual for reference You can find the information rapidly using the table of contents In this user manual the following marking conventions are used to focus attention on certai...

Page 61: ...r manual or manual terms to describe this document Menu options in the software are placed between quotes for example FILE Warranty Nieaf Smitt B V guarantees the software for a period of 12 months Th...

Page 62: ...ransferring saved images from the camera to the PC 8 3 1 Direct from the camera 8 3 2 From micro SD card 8 4 Using the thermal manager software 9 4 1 Starting the software 9 4 2 Opening an image 9 4 3...

Page 63: ...other related causes ATTENTION Nieaf Smitt B V reserves the right to without prior notice update the software in the camera which is returned for either reparation or other reasons ATTENTION Provide...

Page 64: ...2 2 Installation To install the thermal manager software onto a PC 1 Insert the CD into the PC 2 Use Windows Explorer to view the files on the CD 3 Open and run the file Thermal Manager 4 This will in...

Page 65: ...d images Use Windows Explorer There are two ways to transer images to the PC 3 1 Direct from the camera a Connect the camera to the PC via the USB cable b Use Windows Explorer and filing system to loc...

Page 66: ...and administration and operational use 4 1 Starting the software Double click on the Nieaf Smitt thermal manager icon to start the the software The following window will appear Note That there are at...

Page 67: ...shot The window format shown below should be displayed It may be necessary to maximise the window in order to see all the features Temperature scale for the image Level and Span Adjustment bar Visible...

Page 68: ...relating to the colours is displayed to the right of the image An adjustable span also showing a histogram of temperatures in the image is shown at the bottom of the screen There is a drop down menu b...

Page 69: ...12 Rev 001 4 3 Analysis Tools To analyse an image and change its presentation the following tools are avaialbale 1 Drop down menus 2 Icon Toolbar 3 Tabs 4 3 1 Tabs 4 3 1 1 Displayer Tab...

Page 70: ...he temperature span can also be adjusted using a mouse in the level and span adjustment bar see below To adjust span click on the dark grey and light grey border and drag To adjust level click in the...

Page 71: ...values of interpolation give a more pixelated display The following settings are available x1 47 x 47 x2 90 x 90 x4 180 x 180 x8 360 x 360 5 Zoom factor To change the zoom setting click on the arrow...

Page 72: ...utton returns the alignment to the setting when the file was opened 4 3 1 2 Cursors tab Up to 10 cursors can be added to the display 1 To add a cursor to the image double click on the image on the scr...

Page 73: ...using the arrow buttons 5 Capture date Change if required using the arrow buttons 6 Comments type in any comments in the box When saving an image on the camera if either voice annotation or and text...

Page 74: ...lect and open an image 2 Save To save changes to the image 3 Save As To save the image with a different file name 4 Revert To discard all changes since the last save 5 Excel output Selecting this prov...

Page 75: ...the image to the clipboard or to save as a bitmap Both of these options will allow three choices Full windows Snapshot or Snapshot Full window Snapshot Snapshot Full window saves the saves the image...

Page 76: ...the status bar at the bottom of the screen 3 Measurement Cursors List Toggles to show the temperature value an position of the selected cursors The value of the hottest and coldest points in the imag...

Page 77: ...with the same temperature range and are shown in the same colour This is best seen using either the White hot or Black hot colour schemes Red Isotherm Blue Isotherm Both Isotherms The red and blue iso...

Page 78: ...temperature values through a cross section of the scene The profiles are displayed as shown below The cross section lines can be moved by the user 10 Options Toggles to display options panel 11 Repor...

Page 79: ...nguage The following languages can be selected English German French Spanish Italian Chinese Japanese Korean US English and Portugese Once a language is selected exit the thermal manager software and...

Page 80: ...pection Data Information and additional data about each image can be added and then the report can be generated 5 1 Title Page tab 1 When the Report Writer Mode is opened the title page appears as sho...

Page 81: ...pears 2 Click on the browse button to open Windows Explorer 3 Highlight an image or folder and click on the open button or simply double click on a NI IR image 4 All the Images in that folder will now...

Page 82: ...ion and it appears in the image preview section on the right of the window 6 The add add all remove remove all buttons allow the selection and removal of images as required 7 Selected Image s will app...

Page 83: ...ta as required for the report 3 Once data is entered press the Save Project Report button to save the full report This allows the report to be edited later if required 4 Press the Generate PDF Report...

Reviews: