background image


Page 1 

M1 AutomationBridge Setup Guide 

Revision 1.1 


Introduction 

This tech note will step you through the steps in setting up the M1 AutomationBridge 
for the first time. 

Hardware Required 


M1XEP (Ethernet Module) with M1XEP firmware 2.0.42 or above (101-215) 


Ness M1 AutomationBridge (101-296A) 


Computer 


WiFi Network 


Active Internet Connection 


Access to a Smart Speaker (Google Home, Amazon Echo or HomePod) or an iOS 
device or Android device. 

 
Note, Smart Speakers are not included with purchase of the M1 AutomationBridge. 
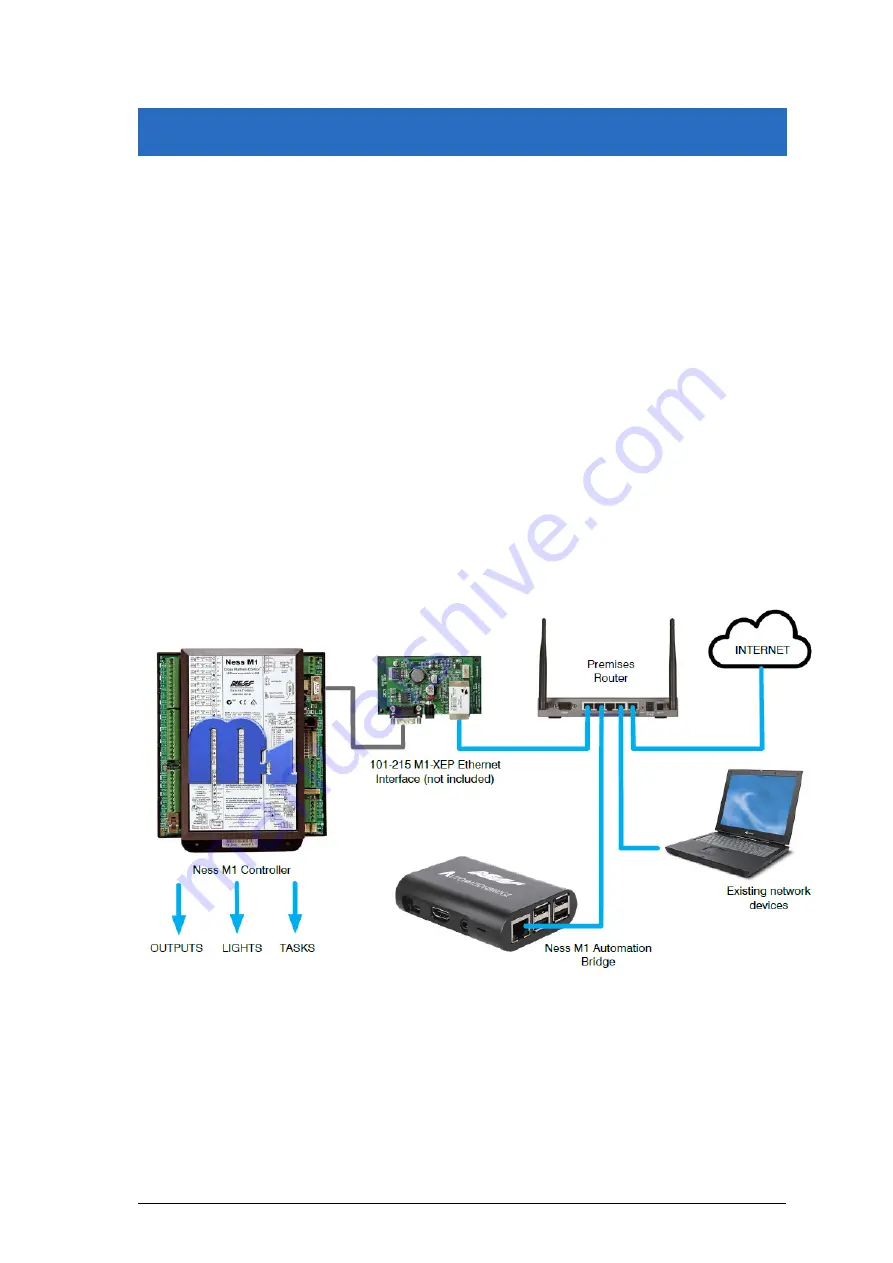
 

Wiring Diagram 

Summary of Contents for M1 AutomationBridge

Page 1: ...st time Hardware Required M1XEP Ethernet Module with M1XEP firmware 2 0 42 or above 101 215 Ness M1 AutomationBridge 101 296A Computer WiFi Network Active Internet Connection Access to a Smart Speaker Google Home Amazon Echo or HomePod or an iOS device or Android device Note Smart Speakers are not included with purchase of the M1 AutomationBridge Wiring Diagram ...

Page 2: ...your panel via the M1XEP 3 Once connected from the Accounts details page click on the M1XEP setup button 4 Select the TCP IP Settings tab and ensure you have the IP address set as a static IP address Also ensure you have enabled the non secure port Keep note of both settings as you will need this for later on If you make any changes press the send button at the bottom of the page to send the setti...

Page 3: ...Page 3 5 Once the M1XEP settings have been confirmed and sent to your panel close the M1XEP setup screen 6 Ensure your M1XEP is running the firmware version 2 0 42 or above ...

Page 4: ... macro and is used in the M1 Rules to trigger multiple events Only the Tasks that have a name and have the Show box ticked will display and can be used in the Ness M1 AutomationBridge Lights Name All the lights you want to use in the M1 AutomationBridge needs to have a name Opt Show Boxes Tick both of these boxes for the lights that you want to use in the Ness M1 AutomationBridge Voice Description...

Page 5: ...e output will not show Globals Make sure all Serial Port 0 transmit is ticked under the Globals G29 G42 Special tab Without these ticked the Ness M1 AutomationBridge won t know the status of the device Make sure you are disconnected from ElkRP once everything is setup You will need to wait approx 1 2 minutes after disconnecting from ElkRP ...

Page 6: ...ure you have only 1 network adaptor enabled and connected on your computer Plug in the M1 AutomationBridge into the network This may take up to 3 4 minutes to fully power up Open a web browser recommend Google Chrome and open the website mybridge skaro com au ...

Page 7: ...with different email addresses as it will be used when using the smart speakers Once you enter in your details into the AutomationBridge an email will then be sent to the email you entered into the AutomationBridge You then need to click on the verify link in the email to activate your AutomationBridge This will then ask you to enter in your password you used to setup the AutomationBridge ...

Page 8: ... enter in your M1 s IP address The Ness M1 AutomationBridge only works on the non secure port on the M1XEP This is still secure as it s only being used on the customer s local network and not over the internet Make sure the M1XEP has a STATC IP Address and not a DHCP IP address ...

Page 9: ...ot Depending on what device you are going to use will depend on what setting you need to enable Amazon Alexa Google Assistant iOS HomeKit Such as Amazon Echo devices Such as Google Home or Android Devices inc Android Watches Such as Apple HomePod or iOS devices inc Apple Watch Click on the Next button to save settings to the AutomationBridge ...

Page 10: ...device to apply initial configuration This will reboot your AutomationBridge and enable the services Once the AutomationBridge has rebooted it will display the main user interface Click on the menu icon up the top right and choose Settings ...

Page 11: ...o the AutomationBridge Wait for the status icon to stop spinning if you are using Google Chrome This way you will know it has finished synchronizing This will take approx 2 3 minutes to complete Once the synchronize is done click on the House icon All the Tasks Lights outputs should then display in the webpage ...

Page 12: ... to work with all smart speakers since it has been enabled for that M1 output You don t have to have all smart speakers enabled for a device For Example in the below the Google Assistant has now been enabled for the BBQ Area The Google Assistant Such as Google Home will be the only device that will allow you to control the BBQ Area with your voice Alaxa and iOS Siri won t be allowed to control the...

Page 13: ...ur Ness M1 AutomationBridge to have a static IP address before pairing your Smart Speaker with the AutomationBridge Amazon Echo Alexa Open the Alexa app on your phone or tablet If you don t have it already you can download it for free from the app store Else you can open it via the Alexa website alexa amazon com Open the side menu and click Skills Search for automationbridge Select automationbridg...

Page 14: ... is the same email address and password you used to setup the AutomationBridge Then press the login button You will then be presented with a new window that will confirm that the linking was successful Now you can perform the discovery of the devices you have enabled in your bridge This normally takes approx 20 seconds ...

Page 15: ...tionBridge for Alexa will display If you enable or disable devices in the Ness M1 AutomationBridge at a later time then you can just return to the Alexa app or Alaxa web page and navigate to Smart Home Devices press the button Forget all and then Discover ...

Page 16: ...oogle Home app on your phone or tablet If you don t have it already you can download it from the app store Open the side menu and tap on Home Control Tap on the Plus icon at the bottom right the screen Find and select automationbridge from the list ...

Page 17: ...il address and password This is the same email address and password you used to setup the AutomationBridge Then press the login button Your devices that you enabled from the AutomationBridge for Google Assistant will display ...

Page 18: ... the iOS screen in the Ness M1 AutomationBridge in the web browser on a computer Scan the QR code that is displayed on the screen with the app on your iOS device A warning message may appear Click on Add Anyway when prompted to do so Continue through the setup process by pressing the next button up the top right to assign devices to rooms as required Once this has been done you will find your devi...

Page 19: ... Example Alexa turn on off device name Alexa turn ON Bedroom light Alexa turn device name on off Alexa Bedroom light OFF Alexa Dim device name to percent Alexa Dim Bedroom light to 40 Outputs Command Example Alexa turn on off device name Alexa turn ON Bedroom Curtains Alexa turn device name on off Alexa Bedroom Curtains OFF Tasks Command Example Alexa activate device name Alexa activate Theatre sc...

Page 20: ... the device name Hey Google Open the bedroom curtains Tasks Command Example Hey Google activate device name Hey Google activate Theatre scene iOS HomPod Siri Lights Command Example Siri turn on off device name Siri turn ON Bedroom light Siri turn device name on off Siri Bedroom light OFF Siri Dim device name to percent Siri Dim Bedroom light to 40 Siri Is the device name on off Siri Is the Bedroom...

Page 21: ...ame else it may have an issue working out which device you are wanting to control Make sure your Ness M1 AutomationBridge has a Static IP address else it will stop working in a few days weeks Additional Information Customer Service Phone 1300 551 991 M F 8 30am 5 00pm Email customerservice ness com au YouTube www youtube com nesscorporation ...

Reviews: