

AM1-002696-001
January, 2015
Preface
Thank you for buying the Speed Wi-Fi NEXT WX01 (simply called the "product" from here on). Before using the product, be
sure to read the Setup Guide (this manual) and the Notes on Usage to ensure correct use. The Setup Guide (this manual)
handles only basic operations for main features.
As an instruction manual related to the product, the Setup Guide (this manual), the Notes on Usage, and the "
取扱説明書 詳
細版
(Full Instruction Manual)" (Japanese) are available for download from the WiMAX Support Information website. In this
manual, all such manuals are collectively referred to as the "Instruction Manual".
• The PDF version of the "
取扱説明書 詳細版
(Full Instruction Manual)" (Japanese) is also included in the product.
Connect the product to a PC or the like by means of wireless LAN (Wi-Fi®) or a microUSB cable, launch the web browser,
type "http://192.168.179.1" in the address and log in to the Advanced Settings on the Quick Setting Webpage to view "
情
報
(Information)", and access "
マニュアル
(Manual)".
• The PDF versions of the Instruction Manuals can be downloaded from the WiMAX Support Information website.
http://www.necat.co.jp/wimax/support/uqc/nad31/index.html
• Company names and product names referred to in this manual are trademarks or registered trademarks of the respective
companies.
• The illustrations and screenshots that appear in this manual may not be a precise representation of the actual product.
Furthermore, part of the screenshots used may be omitted.
Disclaimer and Safety Tips
Before using the product, please read through the "Exemptions" and "Safety Precautions (Observe Strictly)" on the "Notes on
usage" to ensure correct handling of the product.
When using the product
• This product can connect with WiMAX 2+ and WiMAX. Although communication will automatically switch between WiMAX
2+ and WiMAX in response to the reception environment, there may be periods of several seconds during switching when
communication will not be possible.
• Keep the product at least 1.5cm away from your body, and make sure that there are no intervening metallic objects when
you communicate.
• Communication is not possible even in the service area in places where the signal does not reach (e.g. tunnels and
basements). Also, communication is sometimes not possible in poor reception areas. Communication is sometimes
interrupted if you move into a poor reception area during communications.
• Since this product uses radio waves, the possibility of communication interception by third parties cannot be eliminated.
(The WiMAX 2+ method and the WiMAX method, however, off er secure communication encryption and secrecy functions.)
• It is presumed that the product will be used in Japan. It cannot be taken out of Japan and used abroad.
• Since this product is a radio station under the Radio Law, you may be asked to temporarily submit the product for
inspection in accordance with the Radio Law.
• Take care not to disturb people around you when you use the product in a public place.
• When the product is used by a child, parents or guardians should thoroughly read the "Instruction Manual" and teach the
child how to use it.
Data Communication Terminal Etiquette
■
Use of the product is not allowed in the following places!
• Use of this product on board is restricted. Follow the instructions of each airline.
■
Pay attention to the place of use!
• In a city area, use in a place where you do not bother people walking.
• It is extremely dangerous to walk while looking at the screen of the product. Do not operate the product while walking or
by stopping suddenly.
• Move to a place where you do not disturb others while you are in shinkansen, a hotel lobby, etc.
■
Consider people around you!
• There may be a person with a cardiac pacemaker nearby at a place fi lled with people such as in a crowded train.
Turn off beforehand.
• When a medical institution has laid down designated areas where use of the product is prohibited or is not allowed to be
brought in, abide by the instructions of that medical institution.
Waiting or Idling
- Waiting: A function to minimize power consumption in order to increase the operating time.
- Idling: A function for prompt start from wireless idling state.
Technically Certifi ed
Preparing for Setup
Attach the au Micro IC Card (LTE)
When attaching the au Micro IC Card (LTE), disconnect the product from the power source and make
sure to turn off .
Remove the microUSB cable and cradle (sold separately) when they are connected.
a
Insert the au Micro IC Card (LTE) with its IC
(metal) part facing down until it clicks into
position.
* This product supports only au Micro IC Card (LTE). Other IC
cards besides au Micro IC Card (LTE) are not available.
* Confi rm the correct inserting direction of the IC card.
Failure to do so may cause a malfunction or damage.
* Refrain from inserting the SD card and IC card with a
conversion adapter. Doing so may cause failures.
* Be careful not to touch or damage the IC (metal) part of
the au Micro IC Card (LTE).
SIM card slot
Notch
Attach the Battery Pack
a
Slide the battery pack into the end with the
marked surface (Recycling symbol etc.) facing up.
Contact the terminal of the battery pack with
the terminal of this product and then push in.
②
①
Terminal area
Terminal area
b
Attach the rear cover
Press the cover onto the unit until the clips of
the Q side of the UQ logo click into position.
* Be sure to fi rmly press the edges of the cover so that there
are no gaps.
Charging the Product
Explains how to charge using the enclosed AC adapter supplied with this product.
* Charge the battery in power off or idle state. If the battery is charged during operation or when temperature of main unit or
battery is high, charging may stop even if the battery is not full in order to keep the battery life long.
a
Insert the microUSB connector of the microUSB cable into the microUSB port on the product.
* Plug the microUSB connector straight into the microUSB port of this product with its side bearing the USB mark facing down.
b
Attach the other end of the USB connector to the AC adapter and insert the power plug of the AC
adapter into a power outlet.
* Press the POWER button to check the battery status (remaining battery level). The battery level is indicated under the charging
icon as a percentage.
(An indication estimates the remaining battery level. It varies depending on the usage environment or status of this product.)
* Plug the USB connector into the AC adapter with its side bearing the USB mark facing down.
* Make sure that the AC adapter is in a secure position.
* Charging may stop in order to protect the battery from overheating.
For information on how to charge the battery pack on the cradle (sold separately), refer to the
Instruction Manual of the cradle "WX01
クレードル
(NAD31PUA)
取扱説明書
" (Japanese).
Switch Power On
Hold down the POWER button until "NEC" appears in the display and this product is turned ON.
* When the "Normal display" (refer to "Displayed Information" on the reverse side) appears, proceed to
STEP 2
.
* To turn OFF the product, hold down the POWER button until "Power OFF" appears in the product display.
If "New Firmware is released. Do you want to update?" appears on the display when the power is
turned on, update the fi rmware. (Refer to "Firmware Update" on the reverse side)
Consult the homepage for the latest firmware.
Check the product version on the “Terminal Info” display. (Reference to “Display Menu Operations” on the back surface.)
When “New Program Released” appears on the display of this product, it indicates that a new firmware exists. In that case, refer to the “Firmware
Update” on the back surface of this manual to update the version.
Switching to English display
a
Launch the Quick Setting Webpage and log in (Refer to
STEP 4
).
b
Click [English] and then click [Save] from the menu on the left of the Quick Setting Webpage screen.
• The display and the Quick Setting Webpage of this product will switch to English.
Verify the following product settings.
Check
• Primary SSID (wx01-xxxxxx)
• Primary key (encryption key) (AES) (13 alphanumeric characters)
Confi rm the enclosed “Wireless LAN Setup QR Code (label)”.
How to confi rm by the display menu is described below.
1
While the product display is in the normal display, press the SELECT button a few
times to display [Wi-Fi Info].
2
Press the SET button to display the Primary SSID.
3
Press the SELECT button to display the Primary Key.
Primary SSID
Primary Key
* Have these available for
STEP 2
.
* The Primary SSID and Primary key of this product are also indicated on the sticker under the battery pack.
Connecting via Wireless LAN (Wi-Fi®)
Check the Contents of the Package
Before you start using the product, make sure that you have all the following packaged with the product.
Speed Wi-Fi NEXT WX01 (main unit)
AC adapter (NAD11PQA)
Use this cable to charge the product. It may also be used to
connect the product to the PC.
AC adapter
microUSB cable
つなぎかたガイド
"Setup Guide" (Japanese)
ご利用にあたっての注意事項
"Notes on Usage" (Japanese)
無線LAN設定用QRコード(シール)
"Wireless LAN Setup QR code (label)" (Japanese)
Keep this label safe by placing it on the <Wireless LAN Setup
QR Code> fi eld described in
STEP 2
of the enclosed “Setup
Guide” (Japanese).
Warranty card (Japanese)
Battery pack (NAD31UAA)
Rear cover
Names and Functions of Components
5
microUSB port
1
Display
2
POWER
button
3
SET button/
RAKURAKU
START button
6
SIM card slot
7
Strap hole
4
SELECT button
Name
Function
1
Display
Lets you view the key settings of
the product.
2
POWER button
Switches the power ON / OFF.
Used to light up the display that
has been automatically turned off .
Used to recover the product from
a state of waiting or being idle.
3
SET button/
RAKURAKU
START button
Used to set display menu and items.
Used to confi gure the product
with Rakuraku wireless start.
Used to confi gure WPS-enabled
wireless LAN (Wi-Fi®) devices and
wireless LAN (Wi-Fi®).
Used to light up the display that
has been automatically turned off .
4
SELECT button
Used to select display menu and
items.
5
microUSB port
Used to connect the enclosed
microUSB cable to the product or
when placing the product on the
cradle (sold separately).
6
SIM card slot
Insert the au Micro IC Card (LTE)
into this slot.
7
Strap hole
Used to put a strap.
Instruction Manual
Windows 8.1/8
This section explains how to establish a wireless
LAN (Wi-Fi®)
connection by WPS.
a
Select [
デスクトップ
(Desktop)] on the [
ス
タート
(Start)] screen.
b
Enable the wireless function of your PC.
* For details on confi gurations, refer to relevant
documentation such as the instruction manual for your PC.
c
Click the network icon appearing in the
notifi cation area (task tray).
d
Choose the network name (SSID) of the
product from the list of networks.
* The network name (SSID) of the product can be found by
clicking on [Wi-Fi Info] in the display menu. (See "Check" in
STEP 1
.)
e
Click on [
接続
(Connect)].
f
In the normal display, press the SELECT button a few
times, select [Setup Wi-Fi with Rakuraku/WPS] in the
menu and press the SET button.
* If the display has been turned off , press the SET button to
turn on the normal display.
g
Select [WPS] with the SELECT button, and press
the SET button.
h
Hold down the SET button as instructed on-
screen with the dialogue of [Starting the
waiting... Press [SET] and Hold it.].
i
The message [Setup completes] will be displayed.
j
Check that a value of "1" or more is displayed
under the
icon in the product display.
* This number indicates the number of connected devices.
A value of "0" will be displayed when no connections have
been established.
Mac OS (OS X v10.10)
a
In the Apple Menu, click on [
システム環境設
定
(System Confi guration)] - [
ネットワーク
(Network)].
b
Select [Wi-Fi] from the list of services.
c
From the [
ネットワーク名
(Network Name)]
pull-down list, select the network name (SSID)
of the product.
* The network name (SSID) of the product can be found by
clicking on [Wi-Fi Info] on the display menu. (See "Check" in
STEP 1
.)
d
Type the encryption key of the product in the
[
パスワード
(Password)] fi eld and click on [
接
続
(Connect)].
* The network name (SSID) of the product can be found by
clicking on [Wi-Fi Info] in the display menu. (See "Check" in
STEP 1
.)
e
[
接続済み
(Connected)] will be displayed in the
[
状況
(Status)].
f
Close the window.
g
Check that a value of "1" or more is displayed
under the
icon in the product display.
* This number indicates the number of connected devices.
A value of "0" will be displayed when no connections have
been established.
Smartphone / Tablet (Android)
Confi guration with Rakuraku QR Start
a
Search the Google Play Store for the "
Aterm
らくらくQRスタート for Android
(Aterm
Rakuraku QR Start for Android)" application to
download and install it.
* This application is also available for download on the
"
AtermらくらくQRスタート
(Aterm Rakuraku QR Start)"
website listed below (as of January, 2015).
http://qr.aterm.jp
b
On the Home screen, tap the "
Atermらくらく
QRスタート
(Aterm Rakuraku QR Start)" icon.
c
With the Camera View screen, scan the
enclosed "
無線LAN設定用QRコード
(Wireless LAN Setup QR code)".
* The
"
無線LAN設定用QRコード
(Wireless LAN Setup QR
code)" may be attached to the space provided below.
d
Tap [
設定適用
(Apply Changes)].
* Make sure that the power of the product has been turned
ON.
e
The connection will be established.
f
Tap [
終了
(Finish)].
g
Check that a value of "1" or more is displayed
under the
icon in the product display.
* This number indicates the number of connected devices.
A value of "0" will be displayed when no connections have
been established.
iPad/iPhone/iPod touch
Confi guring with Rakuraku QR start
a
Search the App Store for the "
Atermらくら
くQRスタート for iOS
(Aterm Rakuraku QR
Start for iOS)" application to download and
install it.
* This application is also available for download on the
"
AtermらくらくQRスタート
(Aterm Rakuraku QR Start)"
website listed below (as of January, 2015).
http://qr.aterm.jp
b
On the Home screen, tap [
設定
(Confi gure)] to
turn off the [
機内モード
(Airplane Mode)] and
turn on [Wi-Fi].
c
On the Home screen, tap the "
Atermらくらく
QRスタート
(Aterm Rakuraku QR Start)" icon
and then tap [OK].
* After a moment upon being activated, Camera View will be
displayed.
d
With the Camera View screen, scan the
enclosed "
無線LAN設定用QRコード
(Wireless LAN Setup QR code)".
* The
"
無線LAN設定用QRコード
(Wireless LAN Setup QR
code)" may be attached to the space provided below.
e
Tap [
設定適用
(Apply Changes)].
* Make sure that the power of the product has been turned ON.
f
Tap [OK].
g
Tap [
インストール
(Install)].
h
Tap [
インストール
(Install)].
i
Tap [
インストール
(Install)].
j
Tap [
完了
(Complete)] - [OK].
k
Check that a value of "1" or more is displayed
under the
icon in the product display.
* This number indicates the number of connected devices.
A value of "0" will be displayed when no connections have
been established.
1
2
Read to connect and confi gure the product
Verifying the Connection Status
3
◆
If
or
is displayed along with
in the display and this product can be connected
to the Internet,
* For an explanation of each icon, see "Displayed Information" on the reverse side
of this manual.
confi guration of the product has been completed.
◆
If
is displayed along with
in the display and this product cannot be connected to the
Internet,
confi gure the connection destination in
STEP 4
.
◆
If the Wireless LAN (Wi-Fi®) connection with the product is not established,
Select [Functions Maintenance] - [Wi-Fi Management Frame] in the display menu, set [No
Protection] and reconnect via Wi-Fi in
STEP 2
.
◆
If "Not available" is displayed,
confi gure the connection destination in
STEP 4
.
<Wireless LAN Setup QR Code>
Attach the QR code label to the location described in
STEP 2
of the
enclosed
つなぎかたガイド
“Setup Guide” (Japanese).
This QR code contains the
default wireless LAN confi guration information
(network name (SSID), encryption mode, encryption key) for this product.
Data communication can be performed with this product by connecting wireless LAN (Wi-Fi®) devices such as a PC, game console, smartphone, etc.
Up to 10 wireless LAN (Wi-Fi®) devices can be connected to this product.
However, the wireless LAN (Wi-Fi®) function and the Bluetooth function cannot be used simultaneously.
WiMAX 2+/
WiMAX
Wi-Fi SPOT
PC, game console, etc.
Smartphone
Confi guring the Connection Destination
WiMAX 2+/WiMAX / Wi-Fi SPOT Connection
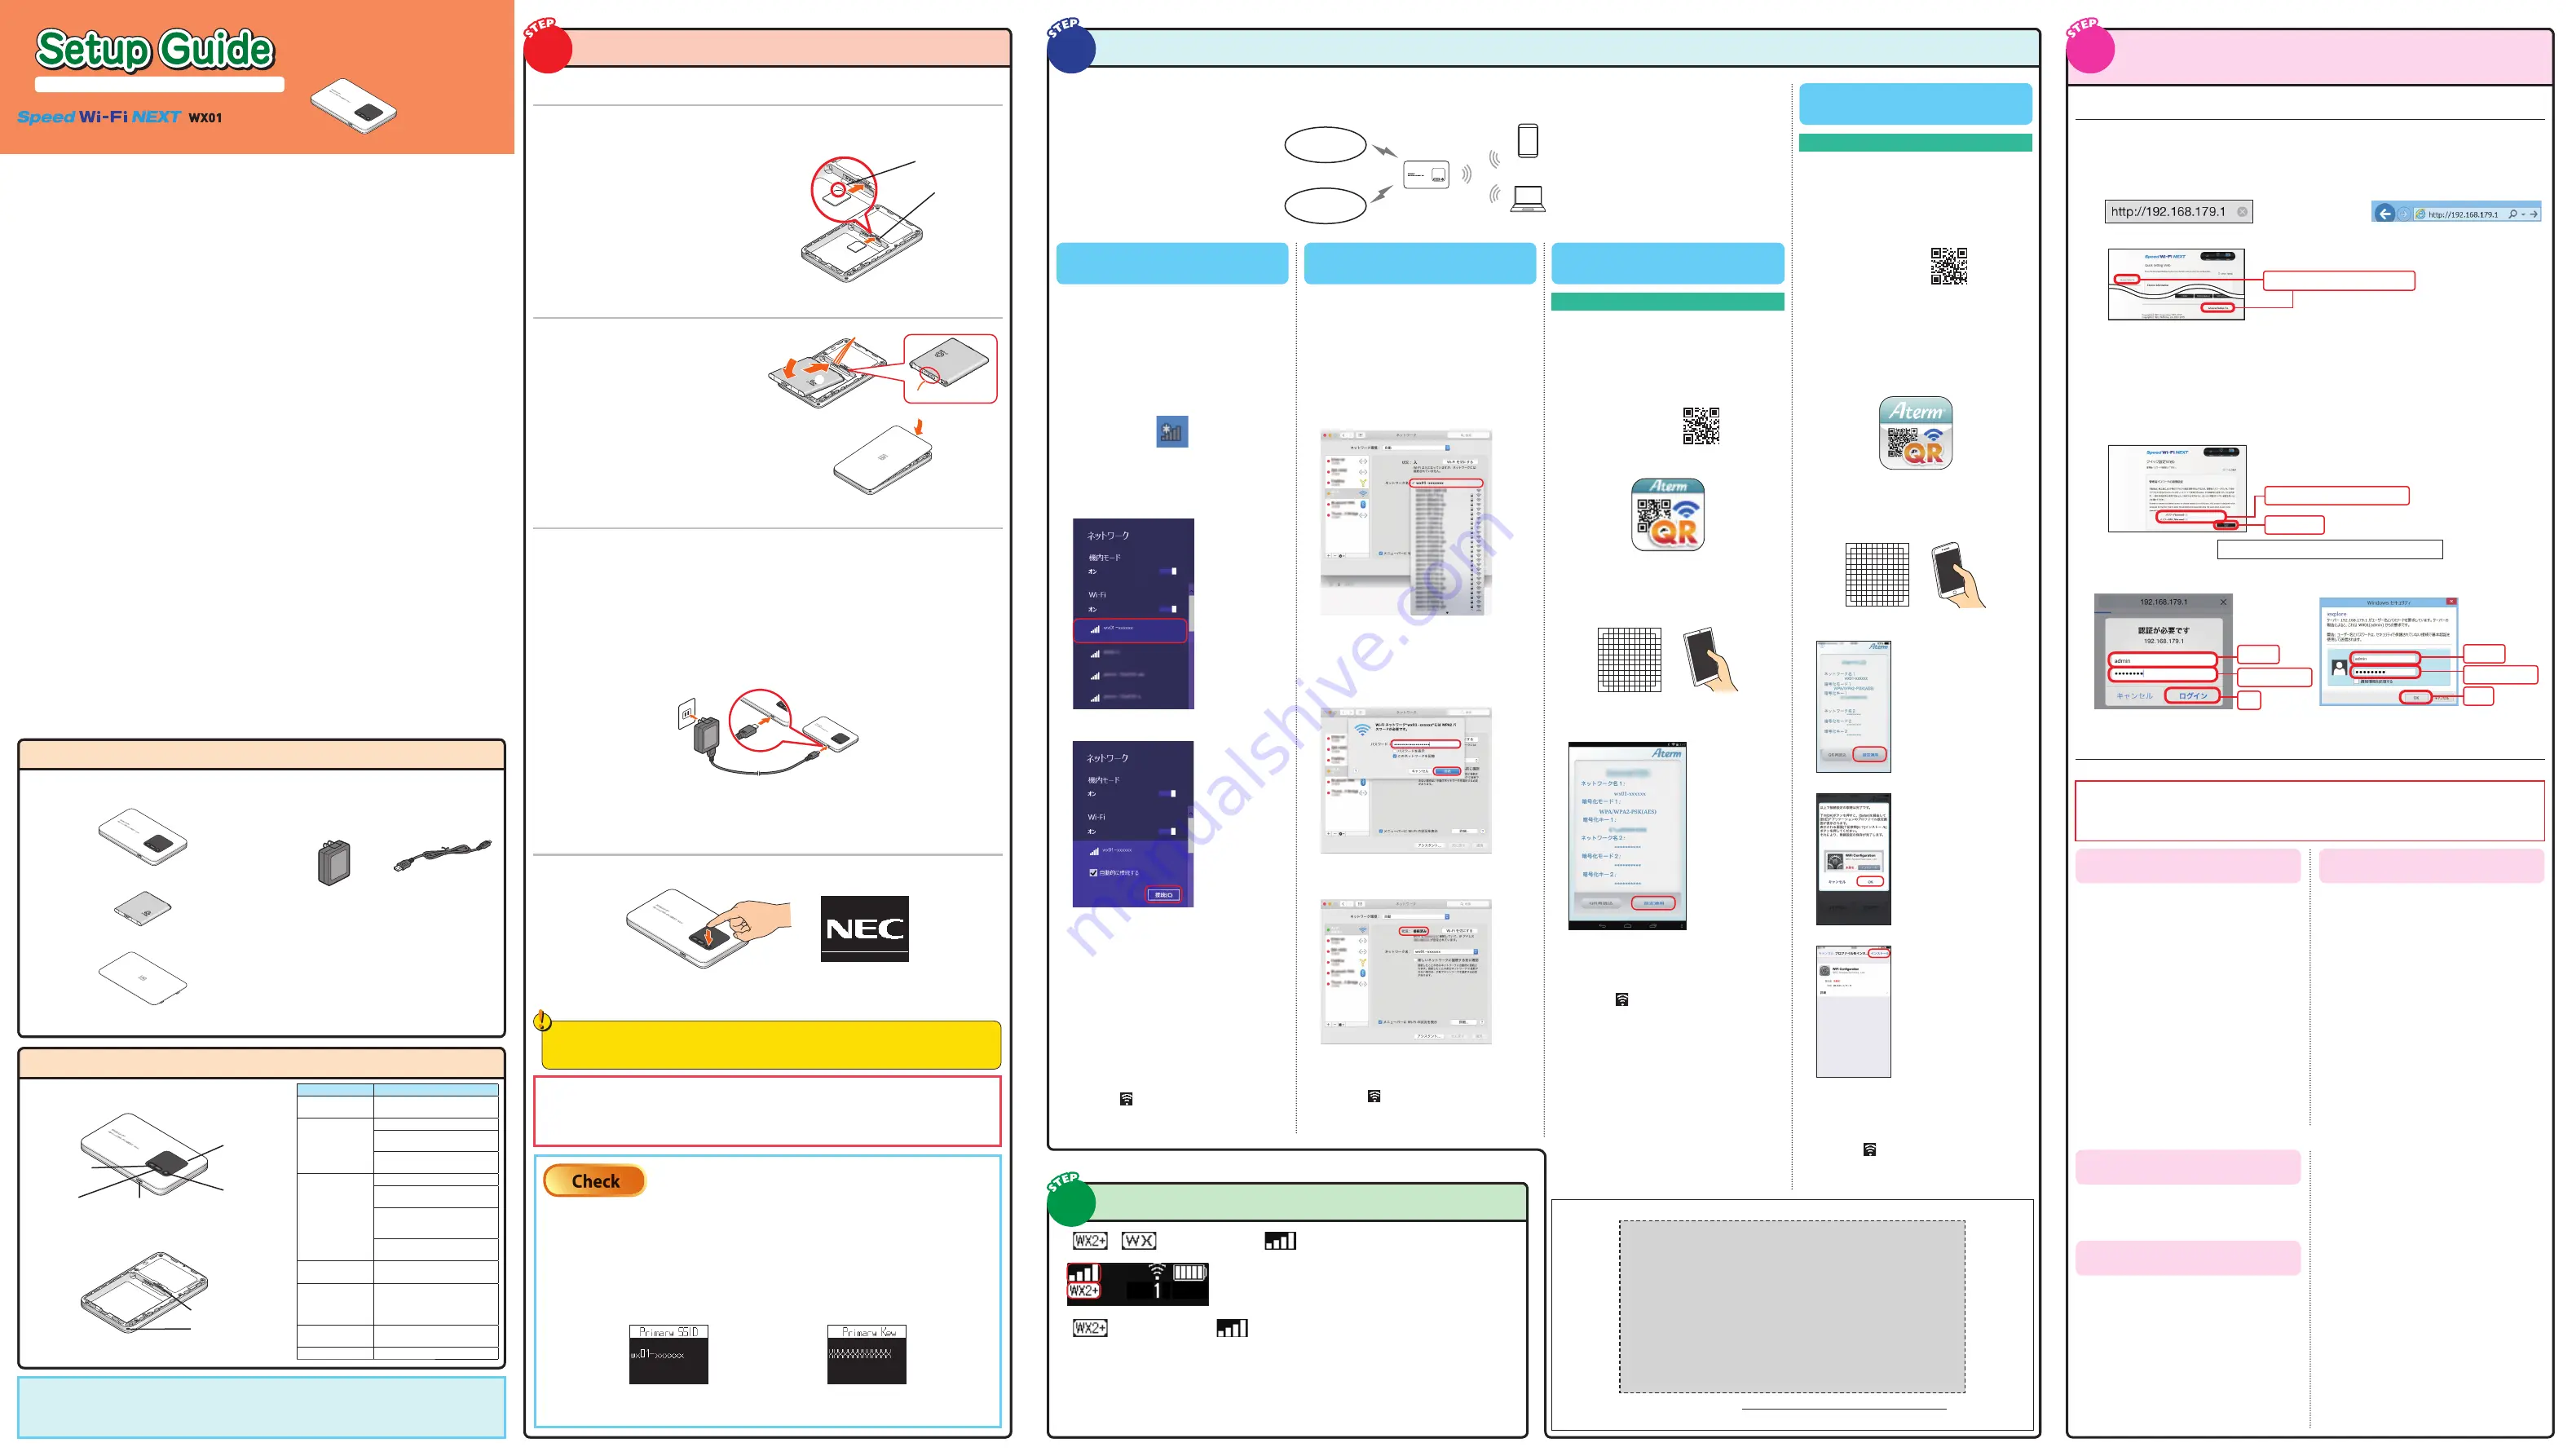
Launch the Quick Setting Webpage
a
Open the web browser on the wireless LAN (Wi-Fi®) device (such as a smartphone) connected to
the Product in
STEP 2
.
b
Open Quick Setting Webpage for the product.
Type "http://192.168.179.1" into the address bar in the web browser and either tap [
実行
(Execute)] or [
開
く
(Open)], or press the Enter key on the keyboard.
c
Tap or click on [Advanced Settings Top] in the screen of the Quick Setting Webpage.
[Advanced Settings Top] button
Follow instructions below for detailed settings
d
-1 Perform initial confi gurations for the administrator password.
Type a password (any string of characters) in the [
パスワード
(Password)] (password reentry) fi eld and tap
or click on [
設定
(Set)].
* Numbers 0 - 9, letters a - z and A - Z, hyphens (-) and underscores (_) may be used in the password. A password may be up to 64
single-byte characters.
This password will be required every time you open the "Advanced Settings" in the "Quick Setting
Webpage" for the product.
Make sure that you do not lose this password.
Administrator Password Field
Tap or click
Administrator Password Memo
d
-2 Type "admin" for the [
名前
(Name)] or [
ユーザー名
(User Name)] and the "administrator password"
set in
d
-1 for the [
パスワード
(Password)], and then tap [
ログイン
(Login)] or click on [OK].
admin
Administrator Password
Tap
admin
Click
Administrator Password
《
Page for mobile phone
》
《
Page for PC
》
Confi guring the Connection Information
●
Connecting to WiMAX 2+/WiMAX
Follow procedures below to add profi les when information required for internet connection (user name, password
etc.) is specifi ed by your WiMAX operator.
If the WiMAX operator to whom you are subscribed specifi es the preset profi le, select the profi le in [Functions
Maintenance] - [APN] in the display menu. If there is no such information provided, you can use the profi le (Profi le
name "Internet") of this product to connect to internet.
When using a smartphone / tablet
(Android) / iPad / iPhone / iPod touch
a
Tap [
ネットワーク設定
(Network Settings)] -
[
プロファイル設定
(Profi le Settings)].
b
After selecting [no setup] in the [
プロファ
イルリスト
(Profi le List)], tap [
選択
(Select)],
enter the setup information such as the APN
of the WiMAX operator to whom you are
subscribed, and tap [
設定
(Apply)].
* The displayed content may be grayed out.
* If you have any question, please check with the WiMAX
operator to whom you are subscribed to.
c
Tap [
詳細設定TOPへ
(Advanced Settings Top)].
d
Tap [
ネットワーク設定
(Network Settings)] -
[
接続設定
(Connection Settings)].
e
In the Profi le Selection, select the profi le which
you selected in Step
b
, and tap [
設定
(Apply)].
f
Tap [
詳細設定TOPへ
(Advanced Settings
Top)], and tap [
保存
(Save)].
Try opening a website to verify the connection.
When using a PC
a
Tap [
ネットワーク設定
(Network Settings)] -
[
プロファイル設定
(Profi le Settings)].
b
After selecting [no setup] in the [
プロファイ
ルリスト
(Profi le List)], click [
選択
(Select)],
enter the setup information such as the APN
of the WiMAX operator to whom you are
subscribed, and click on [
設定
(Apply)].
* The displayed content may be grayed out.
* If you have any question, please check with the WiMAX
operator to whom you are subscribed to.
c
Click [
保存
(Save)].
d
Click [
ネットワーク設定
(Network Settings)]
- [
接続設定
(Connection Settings)].
e
In the Profi le Selection, select the profi le
which you selected in Step
b
, and click [
設定
(Apply)].
f
Click [
保存
(Save)].
Try opening a website to verify the connection.
●
Connecting to a Wi-Fi SPOT (Public Wireless LAN Service)
When using a smartphone / tablet
(Android) / iPad / iPhone / iPod touch
* Tap
[
← PC用ページに戻ります。
(To the PC-optimized
page)] and perform confi gurations by following the steps
in "When using a PC" in the screen for the Quick Setting
Webpage for PC.
When using a PC
a
Click on [Wi-Fi
スポット設定
(Wi-Fi SPOT
Settings)] - [
接続先設定
(Access Point
Settings)].
b
Click on [
接続先登録
(Access Point
Registration)].
c
Confi gure the connection destination.
a
Select the connection destination in "
プロ
バイダ選択
(Provider Selection)".
* Select "-" for connection destinations other than the preset.
b
Perform confi gurations based on
information provided by the provider of the
Wi-Fi SPOT service you will be using.
The provider to whom you are subscribed
is marked as the supported access point
by selecting in
プロバイダ選択
(Provider
Selection).
* From the destination registration screen, up to eight
access points can be registered to the destination list.
* Multiple SSIDs can be saved to the access point with [
ア
クセスポイント設定
(Access Point Set)] button.
d
Click on [
設定
(Set)].
e
Click on [
保存
(Save)].
f
Click on [Wi-Fi
スポット設定
(Wi-Fi SPOT
Settings)] - [
基本設定
(Basic Settings)].
g
Place a check in "
使用する
(Enable)" for the
"Wi-Fi
スポット
(Wi-Fi SPOT)".
* Confi gure this while you are in a Wi-Fi SPOT service area.
h
Click on [
設定
(Set)], then on [
保存
(Save)].
i
Check that the status of the connection
displayed on the product appears as "(Wi-Fi)".
Try opening a website to verify the connection.
4


