Nayax VPOS Touch, Installation Manual
The Nayax VPOS Touch is a cutting-edge product designed to streamline payment processes. Ensure seamless installation by downloading the free Installation Manual from our website. This comprehensive manual provides step-by-step instructions to set up and operate your VPOS Touch with ease. Get your manual now at manualshive.com.
Share
Download


Reviews:
No comments
Related manuals for VPOS Touch
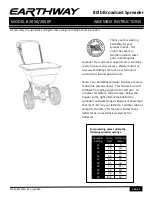
2050
Brand: EarthWay Pages: 3

Express5800/320Ma
Brand: NEC Pages: 74
MM300 - 2
Brand: SWEEX Pages: 47

35FCREADBK2
Brand: StarTech.com Pages: 2

MH941
Brand: Metrologic Pages: 33

00054115
Brand: Hama Pages: 36

Aruba CR35
Brand: Blaupunkt Pages: 17

BT-650-C
Brand: Fametech Pages: 40

DN9002K10PCI
Brand: Dini Group Pages: 169

2220000012
Brand: Kathrein Pages: 12

DRS-50 Translingual
Brand: SMART Pages: 12

SC-SAE012-S2
Brand: SIIG Pages: 12

PCIe-400i
Brand: Titan Electronics Pages: 22

Rampage AV-455
Brand: Audiovox Pages: 12

XDVD110BT
Brand: Dual Pages: 36

3DE-7985E
Brand: Alpine Pages: 44

RMD 120BT
Brand: Caliber Pages: 28

KDC-1030U
Brand: Kenwood Pages: 28


