Gyro
Pilot and
G
P +
Quick Start Guide
Thank you for purchasing a Navicom Dynamics
Gyro
Pilot
. This sheet is
intended as a quick-start guide for first-time use. For a ful
l operator’s manual,
please login to
www.navicomdynamics.com
.
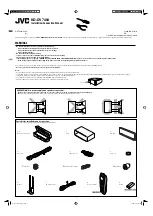
A GLANCE AT
Gyro
Pilot
•
Gyro
Pilot
unit
•
Gyro
Pilot
to AIS Pilot Plug data and charging cable
•
Gyro
Pilot
dry-pouch carry bag
•
Gyro
Pilot
+ (Optional)
•
Mains to USB power supply unit (with various country adapters)
CHARGING & TURNING ON
We recommended that you fully charge the
Gyro
Pilot
unit before its first use.
In order to do this:
•
Plug the USB cable into the power supply unit then plug the power supply
unit into the mains.
•
Plug the AIS Pilot Plug into the
Gyro
Pilot
.
•
Observe the LED on the front of the
Gyro
Pilot
–
solid blue means the unit
is charging.
NOTE:
If the unit is in
storage
, it is recommended to store the unit
at half charge
and to
recharge
at least once every
month
.
A firm press of the power button for around 3 seconds is required for switching
the unit
on
and
off
. The unit will produce three audible clicks when turned on.
WIRELESS CONNECTION (BT & Wi-Fi)
For Wi-Fi, connect to the SSID that matches the
Gyro
Pilot
serial number i.e.
‘
GP3000
’ then gather data from
IP address:
192.168.10.10 / port 5003
For Bluetooth versions, connect to the device’s virtual COM port. Once a
connection is established, the link LED will change to blue.
SETUP & OPERATION
1.
With the
Gyro
Pilot
switched
off
, place it on a flat surface in the required
location, and connect it to the vessel’s Pilot Plug using the cable supplied.
2.
Switch the device
on
. From this point onwards, do not touch the
Gyro
Pilot
, as this will disturb the gyro, resulting in incorrect readings.
3.
Once the
Gyro
Pilot
has locked onto AIS signals from the Pilot Plug and
has calibrated its gyro (30 seconds), it will begin sending the following
data to the laptop or tablet over the wireless connection:
•
all AIS messages received from the Pilot Plug (AIVDO & AIVDM)
•
rate-of-turn and smoothed heading readings in NMEA format
HANDY TIP:
In situations where AIS is not available, the
Gyro
Pilot
has
the ability to use its own on-board GNSS receiver to provide low-
accuracy position for emergency use.
SETUP WITH THE
Gyro
Pilot
+
Gyro
Pilot +
is an addon module and acts as a GNSS antenna, providing
independent and highly accurate position data. It is recommended to
place the unit on the bridge wing with a clear view of sky.
Place the
Gyro
Pilot
into pairing mode by holding the Configuration
button for 3 seconds. Then on the
Gyro
Pilot +
, hold the configuration
button until the GNSS LED flashes red and blue. Both units will
automatically pair and the LED will change to blue. It is important to note
the physical position and enter the position and heading offsets into your
charting software.
Summary of Contents for GyroPilot
Page 2: ......