Multi-language Quick Installation Guide
E
N
G
L
I
S
H
G
E
R
M
A
N
I
T
A
L
I
A
N
Layout
F
R
E
N
C
H
FCC-B Radio Frequency Interference Statement
This equipment has been tested and found to comply with the limits for a class B digital device, pursuant to
part 15 of the FCC rules. These limits are designed to provide reasonable protection against harmful inter-
ference when the equipment is operated in a commercial environment. This equipment generates, uses and
can radiate radio frequency energy and, if not installed and used in accordance with the instruction manual,
may cause harmful interference to radio communications. Operation of this equipment in a residential area
is likely to cause harmful interference, in which case the user will be required to correct the interference at
his own expense.
Notice 1
The changes or modifications not expressly approved by the party responsible for compliance could void the
user’s authority to operate the equipment.
Notice 2
Shielded interface cables and A.C. power cord, if any, must be used in order to comply with the emission
limits.
VOIR LA NOTICE D’INSTALLATION AVANT
DE RACCORDER AU RESEAU.
This device complies with Part 15 of the FCC Rules. Operation is subject to the following two conditions:
(1)
this device may not cause harmful interference, and
(2)
this device must accept any interference received, including interference that may cause undesired
operation.
Copyright Notice
The material in this document is the intellectual property of
MICRO-STAR INTERNATIONAL
. We take
every care in the preparation of this document, but no guarantee is given as to the correctness of its contents.
Our products are under continual improvement and we reserve the right to make changes without notice.
Trademarks
All trademarks used in this manual are the property of their respective owners.
Pentium is a registered trademark of Intel Corporation.
Windows is a registered trademark of Microsoft Corporation.
Part No.: G52-O8452T1
Micro-Star International
TEL.886-2-32345599
FAX.886-2-32345488
http://www.msi.com.tw
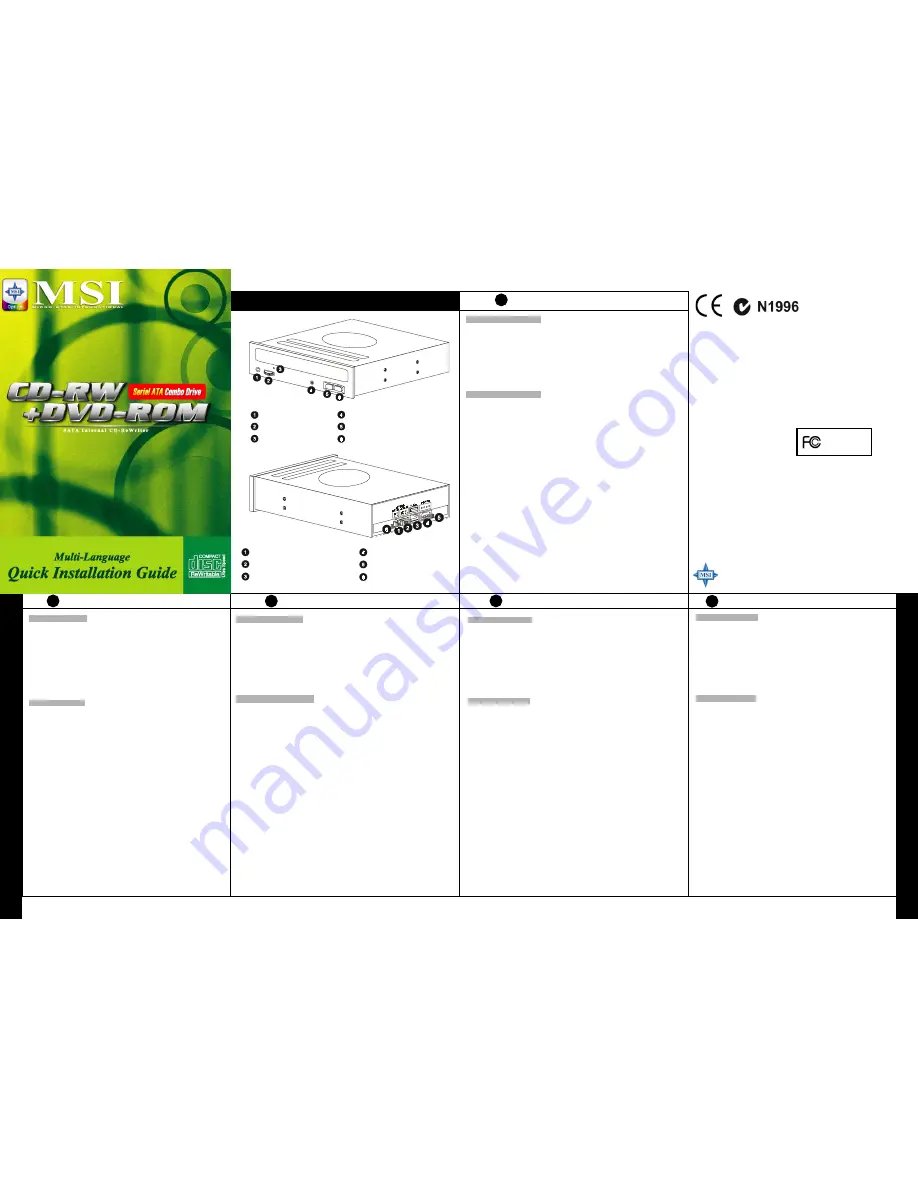
For the best performance and disc compatibility, please check MSI home page at www.msi.com.tw for the latest firmware update.
Headphone Jack
Volume Control
Emergency Eject Hole
Read(Green) / Write(Red) LED
Play / Skip Button
Stop / Open / Close Button
Digital Audio Output Connector
Analog Audio Output Connector
S-ATA Connector
Power Supply Connector
Test Jumper (Do not use)
Test Jumper (Do not use)
CD-RW/DVD-ROM Combo Drive
Hardware Installation
1. Turn off the power to your computer and peripheral devices, then, remove the cover from
your computer.
2. Insert the COMBO drive into one of the vacant 5.25-inch bays and secure it with the
mounting screws included in the COMBO package.
3.
Connect Power Cable to the Power Plug.
4.
Connect the SATA Cable to the SATA connector of the COMBO drive and the connector on
motherboard.
5. If you have a sound card, connect the 4-pin CD Audio cable to the COMBO drive’s Analog
Audio line out connector, and the audio-in connector of the sound card.
6.
Replace the cover on your computer, and reconnect the power cords.
Software installation
For Windows 95/98/ME:
It will be automatically detect and determine the new COMBO drive and load the correct device
driver. Hence, there is no need to install any COMBO device driver under Window
95/98/ME
system.
If your COMBO drive cannot be detected automatically, please do as follows:
a.
Restart your computer, and then Click on the
“control panel”
icon under
“my
computer.”
b.
Double-click on the
“add new hardware”
icon, then, click
“next”
and
“yes”
at the
dialog boxes.
c.
Allow windows to search for your new COMBO drive automatically, and loads the
driver software to complete the installation.
For Windows NT/2000/XP or OS/2 WARP or other systems
The COMBO drive supports the standard ATAPI drive interface and your system should be able
to load the appropriate driver for your drive.
Emergency Eject Hole:
When the tray cannot be open automatically for any reasons, please
insert an eject-bar a straightened paper clip with diameter of 1.2mm can be used as an
eject-bar, press it inside of emergency eject hole, then, eject the tray manually. Make sure to
turn off the power before doing this action.
Caution
Do not use poor quality, deeply scratched or cracking discs that may cause crush.
Do not move or shake drive while operating.
Do not write on a disc over its maximum allowed speed.
Installation matérielle
1.
Eteindre votre ordinateur ainsi que les périphériques connectés, puis ouvrer le boitier de
votre unité centrale.
2.
Insérer le lecteur COMBO dans une baie 5.25 libre, et fixer le grâce à la visserie fournie.
3.
Connecter le câble d’alim entation de votre boitier à votre lecteur.
4.
Connecter le cable SATA à votre lecteur COMBO et sur votre carte mère.
5.
Si vous avez une carte son, connecter le câble CD audio 4 broches sur le connecteur
Analog Audio line out du COMBO, à l’entrée ligne de votre carte son.
6.
Referm er le boitier de votre UC et reconnecter les câbles d’alim entation.
Installation des logiciels.
Pour Windows 95/98/ME:
Le lecteur COMBO sera automatiquem ent détecté par votre ordinateur. Ainsi il n’y a pas de
nécessité d’installer des pilotes spécifiques sous Windows 95/98/ME
Si votre COM BO n’est pas détecté automatiquement, suiver les instructions suivantes:
a.
Redémarrer votre ordinateur. Dans le menu démarrer, cliquer sur panneau de
configuration.
b.
Double-cliquer sur ajout de m atériel, puis “suivant” et “oui” dans la boîte de
dialogue.
c.
Laisser Windows chercher le lecteur COMBO automatiquement, et charger les
pilotes nécessaires.
Pour Windows NT/2000/XP ou OS/2 WARP et autres systèmes
Le COMBO est com patible avec la norm e ATAPI. Votre système le détectera
automatiquement et chargera les bons pilotes.
Ejection en cas d’urgence
: Si le tiroir de votre lecteur ne peut pas s’ouvrir, vous pouvez
insérer une pointe de 1.2 mm de diamètre dans l’orifice situé sur la face avant du lecteur. En
appuyant fortement vous obtiendrez l’ouverture du tiroir. Veillez à bien enlever l’alimentation
du lecteur avant de procécer à cette opération.
Précautions
Ne pas utiliser des CD de m auvaises qualités, ou bien rayés dans votre lecteur.
Ne pas bouger ou secouer le lecteur durant son utilisation.
Ne pas forcer l’écriture d’un disque au delà de sa vitesse certifiée par le constructeur.
Hardware Installation
1.
Schalten Sie den Com puter und die angeschlossenen Geräte aus und entfernen Sie den
Gehäusedeckel.
2.
Setzen Sie das MSI COMBO-Laufwerk in einen freien 5.25-inch-Einschub und sichern Sie
es mit den beiliegenden Schrauben.
3.
Verbinden Sie das Strom kabel m it dem Strom anschluss des Laufwerks.
4.
Verbinden Sie das SATA-K abel m it dem SATA-Anschluss Ihres COMB O-Laufwerks und
dem SATA-Anschluss auf Ihrem Mainboard.
5. Verbinden S ie das 4-Pin CD-Audiokabel mit dem analogen Audio-Ausgang des
Com bo-Laufwerks und dem Audio-In-Anschluss Ihrer S oundkarte oder onboard-Sound
6.
Schließen S ie das G ehäuse des Com puters und verbinden Sie das Strom kabel.
Software-Installation
Für W indows 95/98/M E:
Das Laufwerk wird autom atisch erkannt und m it dem richtigen Treiber installiert. Sie benötigen
deshalb keine zusätzliche Treiberinstallation.
Falls Ihr Laufw erk nicht autom atisch erkannt wird, führen Sie folgende Schritte aus:
a.
Starten Sie den Com puter neu und wählen Sie unter „Arbeitsplatz“ die
“System steuerung” aus
b.
Führen Sie einen Doppelklick auf “Neue Hardware hinzufügen” aus. Klicken S ie in
den folgenden Dialogfeldern auf „weiter“ und dann auf „Ja“.
c.
Lassen Sie W indows autom atisch nach dem Laufwerk suchen. Das Betriebssystem
wird das Laufwerk erkennen und den richtigen Treiber autom atisch installieren.
Für W indows NT/2000/XP oder O S/2 W ARP oder andere System e
Das CO MBO-Laufwerk unterstützt die Standard ATAPI-Schnittstelle und Ihr Betriebssystem
sollte die richtigen Gerätetreiber autom atisch installieren.
Notauswurf-Loch:
W enn sich der Laufwerkschacht nicht autom atisch öffnet, stecken Sie bitte eine Auswurfhilfe
(etwa einen festen Papierstreifen m it einem Durchm esser von ca. 1,2m m ) in das Auswurfloch,
um den Schacht zu öffnen (bitte keine spitzen Gegenstände wie Nägel oder Nadeln verwenden)
Vergewissern S ie sich, dass das Gerät abgeschaltet ist und nicht unter Strom steht, bevor Sie
diese Maßnahm e durchführen.
Bitte beachten S ie:
Verwenden Sie keine Rohlinge schlechter Qualität oder angebrochene, oder zerkratzte
Medien.
Bewegen S ie das Laufwerk nicht während des Betriebs.
Beschreiben Sie ein Medium nicht m it einer schnelleren Geschwindigkeit als vorgesehen.
Installazione Hardware
1. Spegnete il computer e I dispositivi ad esso collegati e rimuovete il coperchio del vostro
PC.
2. Inserite il drive combo in bay libero da 5,25'' e fissatelo con le viti incluse nella confezione.
3. Collegate il cavo Power con il Power Plug.
4. Collegate il cavo SATA al connettore SATA del drive del Combo e al connettore della
scheda madre.
5. Se disponete di una scheda Audio collegate il cavo 4-pin CD Audio al connettore Analog
Audio line out del Combo e il connettore Audio-in della scheda Audio.
6. Ripristinate il coperchio del vostro PC e ricollegatelo alla corrente elettrica.
Installazione Software
Per Windows 95/98/ME:
Il nuovo dispositivo Combo dovrebbe venire automaticamente rilevato, quindi non dovrebbe
essere necessario installare nessun software aggiuntivo per il Combo se utilizzate come
sistema operativo Window 95/98/ME.
Se il Drive Combo non viene rilevato automaticamente seguite queste istruzioni:
a. Riavviate il vostro PC e cliccate sull’icona “pannello di controllo” che trovate nelle
Risorse del computer
b. Fate doppio click su “aggiungere nuovo hardware” e ciccare successivamente
“next” e “yes” nelle seguenti finestre di dialogo.
c. Lasciate con Windows cerchi automaticamente il dispositivo Combo e installate i
driver per completare l’installazione.
Per Windows NT/2000/XP o OS/2 WARP o altri
Il Drive COMBO supporta lo standard ATAPI e il vostro sistema dovrebbe essere in grado di
installare l’appropriato drive necessario.
Eject Hole di emergenza:
Nel caso in cui il dispositivo non si apra automaticamente inserite
una eject-bar può essere usata a tale scopo una lamina rigida del diametro di 1.2mm,
premetela all’interno e estraete manualmente il vano CD. Assicuratevi di avere spento il
dispositivo prima di compiere questa operazione.
Precauzioni
Non utilizzate CD rovinati o di scarsa qualità che potrebbero arrecare danni al dispositivo.
Non scuotete o manomettete il dispositivo.
Non masterizzate a velocità non consentite.
S
P
A
N
I
S
H
Instalación de hardware
1.
Desconecte la fuente de alimentación de su ordenador y de los periféricos, entonces quite
la tapa de su ordenador.
2.
Inserte la unidad COMBO en una de las bahías vacías de 5.25 pulgadas y asegúrela con
los tornillos incluidos en la caja de la unidad COMBO.
3.
Conecte el cable de corriente en el enchufe de la unidad.
4.
Conecte el cable SATA al conector SATA de la unidad COMBO y a la placa base.
5.
Si usted tiene una tarjeta de sonido, conecte el cable de audio CD de 4 pins, con la salida
de audio analógica de la unidad COMBO, y la entrada de audio en la tarjeta de sonido.
6.
Ponga la tapa en su ordenador, y vuelva a conectar los cables eléctricos.
Instalación del software
W indows 95/98/ME:
Detectará y determ inará autom áticamente la nueva unidad COMBO y cargará el
driver correcto. Por lo tanto, no hay necesidad de instalar ningún driver de la unidad COMBO
en sistemas con
W indows 95/98/ME.
Si su unidad COMBO no se detecta automáticamente, por favor haga lo siguiente:
a. Reinicie su ordenador, y después haga clic en
"panel de control
" dentro del icono
"mi PC."
b. Haga doble click en
"agregar hardware"
, entonces, haga clic en
"siguiente"
y
"sí"
en las
ventanas de diálogo.
c. Permita que W indows busque su nueva unidad COMBO autom áticamente, y que cargue el
software del driver para terminar la instalación.
Para W indows NT/2000/XP u OS/2 u otros sistemas,
La unidad COMBO soporta el interfaz estándar ATAPI y su sistema debe poder cargar el driver
adecuado para su unidad.
Agujero de expulsión de Emergencia:
Cuando la bandeja no pueda abrirse automáticamente
por alguna razón, por favor inserte una barra de expulsión
puede utilizar un clip de aluminio
enderezado con un diámetro de 1,2mm, y presione dentro del agujero de expulsión de
emergencia, entonces, saldrá la bandeja manualmente. Compruebe que el sistema está
apagado antes de hacer esta acción.
Precaución
No utilice discos de mala calidad, profundam ente arañados o agrietados, ya que pueden
causar daños dentro de la unidad.
No mueva ni agite la unidad mientras funciona.
No escriba en un disco a una velocidad superior a su velocidad máxima permitida del
disco.
Micro Star International
MS-8452T