background image

3A0978A

Instructions

Gear/Drive Kit for Magnum X5, X7, 
LTS 15, LTS 17 (Series B)

This manual contains kit installation instructions only

Kit: 16E778, 16E835

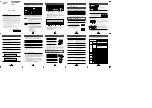
Pressure Relief Procedure

Important Safety Instructions

For detailed sprayer information and warnings, 
see Operation manual 312001, 313034.

To help prevent injection injuries, follow this procedure 
when you stop spraying and before you service or clean 
the sprayer, remove parts, or repair leaks.

1.

Turn Power switch OFF. Unplug sprayer.

2.

Turn Spray/Prime valve to PRIME to relieve pressure. Turn
pressure control knob left (counterclockwise) to minimize
pressure.

3.

Trigger gun.

4.

Put trigger safety in safety ON position.

NOTE: Leave Spray/Prime valve in PRIME
position until you are ready to spray again.

If you suspect that the spray tip or hose is completely clogged or 
that pressure has not been fully relieved after following the steps 
above,
 VERY SLOWLY loosen the tip guard retaining nut or hose 
end coupling to relieve pressure gradually. Then loosen it com-
pletely. Clear the tip or hose obstruction.

ti15766a

ti11868a

ENG

Summary of Contents for 16E778

Page 1: ...ir leaks 1 Turn Power switch OFF Unplug sprayer 2 Turn Spray Prime valve to PRIME to relieve pressure Turn pressure control knob left counterclockwise to minimize pressure 3 Trigger gun 4 Put trigger safety in safety ON position NOTE Leave Spray Prime valve in PRIME position until you are ready to spray again If you suspect that the spray tip or hose is completely clogged or that pressure has not ...

Page 2: ...fy the stud on the new drive assembly is still pre greased If that lubricant has been lost apply a small amount of chassis grease to the drive pocket in the piston 3 Rotate the drive gear to bring the stud towards the pump then insert the stud into the piston pocket Align the drive shaft with the pump bushing then push the drive into the pump rotating the gear to draw the drive inward Press the dr...

Page 3: ...e pinched between the shroud and motor then install one side screw C Tighten to 20 25 in lb X7 and LTS 17 Only Install under side shroud screw E and tighten to 25 35 in lb 12 Install left shroud D to shroud H and the front cover Verify that no electrical leads are pinched between the shroud halves then install side shroud screws C T 20 Tighten to 20 25 in lb Install screws B through the front cove...

Page 4: ...s This manual contains English MM 3A0984 Graco Headquarters Minneapolis International Offices Belgium China Japan Korea GRACO INC P O BOX 1441 MINNEAPOLIS MN 55440 1441 Copyright 2010 Graco Inc is registered to ISO 9001 www graco com 08 2010 Wiring Diagram WIRING DIAGRAM WHITE BOARDWIRE AUTO PRIME POWERCORD BLACKWIRE POWERCORD WHITEWIRE 10A FUSE POWERCORD GREENWIRE CHASSIS GROUND ON OFF SWITCH PRE...

Reviews: