background image

User Guide for the Mobius2 ActionCam


Description


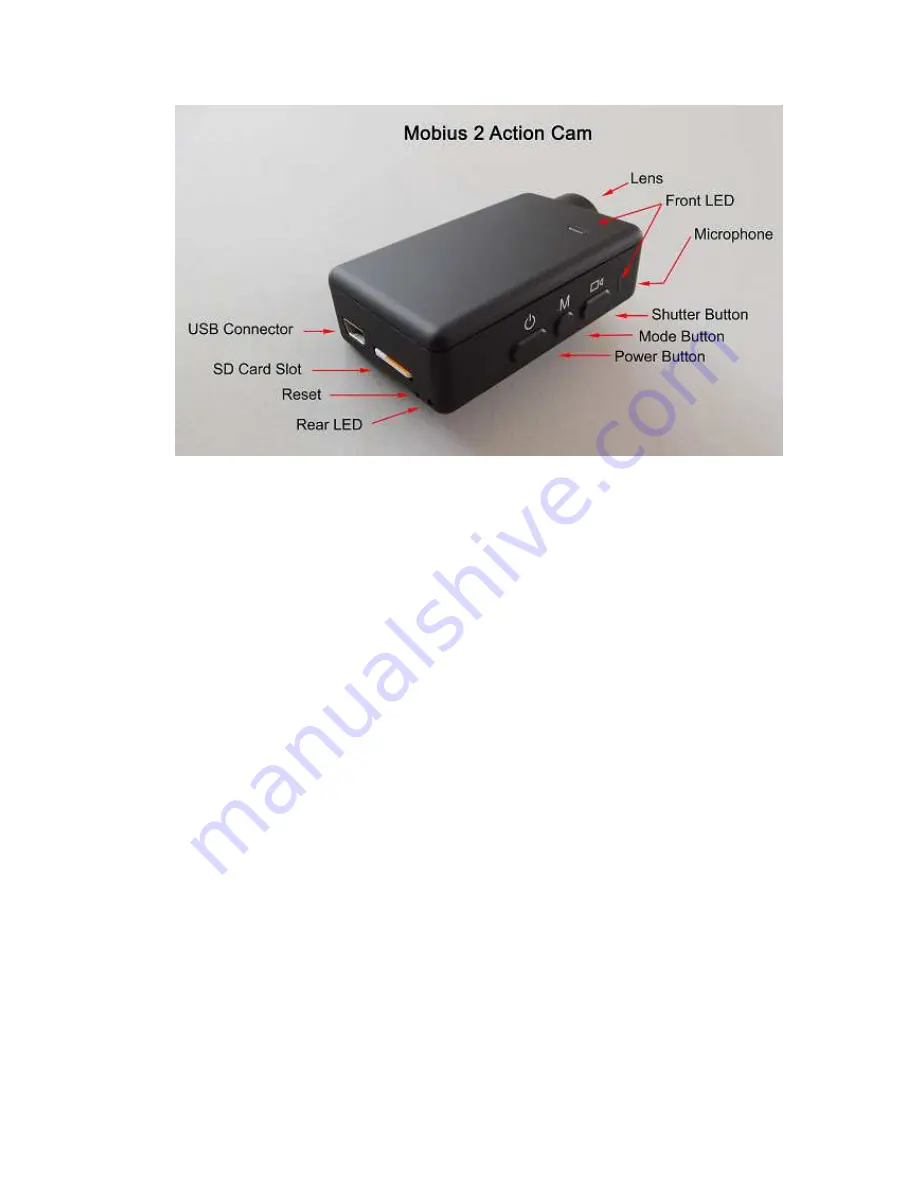
The above picture shows the arrangement of the user operating features. 
On the bottom of the case there are 4 screw holes which can be used to attach a 
copper base for a tripod mount. These screw holes are part of the heatsink and can 
become very hot during usage. Likewise, the copper base will become hot. This is 
normal. You should never leave the camera turned on in extreme heat without proper 
cooling - for example in a car parked in the baking sun. If you wish to use the camera 
in very hot conditions you should ensure the camera is adequately cooled, for 
example by directing cool air onto the camera or using a ventilator to dissipate the 
heat away from the camera. High temperatures will also damage the internal LiPo 
battery. If you use your camera in very hot conditions with external power, for 
example as a dashcam, you should consider replacing the battery with a Super 
Capacitor. 

This manual does not cover replacing the internal battery or lens. 

This manual assumes the camera is loaded with the latest firmware available at the 

time of writing. Functionality may vary with earlier or later firmware versions. 
 

Cards


You should always use micro SDHC or Micro SDXC cards with a class rating of 10 or 
above. The cards must be formatted as FAT32 (see below). Currently, all cards with 
a capacity up to 200GB are supported 


Summary of Contents for 2

Page 1: ... adequately cooled for example by directing cool air onto the camera or using a ventilator to dissipate the heat away from the camera High temperatures will also damage the internal LiPo battery If you use your camera in very hot conditions with external power for example as a dashcam you should consider replacing the battery with a Super Capacitor This manual does not cover replacing the internal...

Page 2: ...s a built in card formatter which can be used as follows Make sure the battery is charged and the camera is disconnected Press and hold the Mode and Shutter buttons Do not release them Very briefly press the Power button The red and blue LEDs will start flashing Release the Mode and Shutter buttons Confirm you want to format the card by pressing the Shutter button or press the Mode button to cance...

Page 3: ...the camera from being accidentally turned on After a short while the red LED will turn on and then blink before a steady yellow LED is shown The camera is now ready for use standby If the camera has been configured with Auto Power On Record set to On the camera will automatically begin recording in Mode 1 To turn off the camera first stop any recordings that may be running by pressing the shutter ...

Page 4: ... drive setup Always connect the camera directly to the PC Do not use a USB hub You cannot record video or photos if the camera is connected to the PC as an external drive Charging Connect one end of the supplied standard USB cable to the camera Connect the other end to a USB 5V DC power source wall charger PC or external battery When the yellow LED turns on press the Power button to turn the camer...

Page 5: ...w LED will slowly flash at 2 second intervals indicating that the camera is recording If the camera has been configured with Auto Record set to OFF default setting the camera will switch to Video Mode 1 yellow LED and remain in standby mode until a button is pressed or Auto Power Off times out Turn off Camera Power Off can be configured as fast or delayed In fast mode the camera will turn off almo...

Page 6: ...cfg2 txt file located in the root folder of the card for the camera You can use any ASCII editor for example Notepad to modify the parameters The syscfg2 txt must be in plain ASCII it must not be in Unicode If you don t know what a root folder is or you don t know what ASCII is or don t know how to manually edit ASCII files please only use mSetup exe or the Android app A syscfg2 txt file must firs...

Page 7: ...y which was not previously available It is good practice to keep your camera updated with the latest firmware version You can upgrade or downgrade your firmware as often as you wish Both procedures are identical and are referred to as updating in this manual The latest firmware version can be found at http www rcgroups com forums showpost php p 34846438 postcount 3 The firmware consists of three f...

Page 8: ... camera is now ready for use Recording using an external power supply With the M2 it is possible to charge the battery and record at the same time using a standard external USB 5V DC power supply The power supply may be mains driven normal household wall plug or run off batteries including the car charger USB plug optional accessory and cable supplied with the camera External USB power supplies us...

Page 9: ...ecording can be enabled or disabled by software or by manually editing the syscfg2 txt file It can be enabled or disabled separately for both Video Mode 1 and Video Mode 2 By default Loop Recording is disabled in both Modes meaning the camera will record clips until the card is full The camera will then stop recording and enter standby mode If Loop Recording is enabled the oldest clips will be ove...

Page 10: ...ograms to format the card while it is in the camera Q The camera functions normally but only records very short clips and may turn off A This can be caused by the following The battery may not be charged Charge the battery for about 2 5 hours until the green LED turns off The battery is too cold to provide the power needed to record video Keep the battery warm before using the camera in cold tempe...

Page 11: ...ra performs erratically A Make sure the correct kernel rootfs and firmware are installed It is imperative that both the kernel and rootfs are the correct versions for which the firmware was designed Q The camera does not charge or does not automatically start recording when external power is connected and the Power On Auto Record is set appropriately A External USB power exceeds 5 25V or is under ...

Reviews: