CAR BATTERY CHARGER – 230 V
2 A / 4 A – AUTOMATIC
EN
Read and understand these instructions before attempting any operation of this
battery charger and retain for future reference!
Warnings:
1. The battery charger is designed for use only with lead-acid batteries. It can
not be used as DC power source because it may cause accidents even fire.
2. The charger is fitted with only one type of mains plug and must not
be modified or replaced. If the cable length is not long enough, use an
extension cord, but make sure the cable thickness is adequate for the power
supply (min. 3 x 1.5 mm
2
) Do not use excessively long power cords!
3. If the power cord shows any external damage or breaks, you must interrupt
the charging process, immediately disconnect the power supply and consult
an electrician, who will replace the cord properly. Unauthorized repairs can
be dangerous due to fire and electric shock
4. If any dirt gets on the outer casing, first unplug the power cord and use a
lightly damp cloth to remove any dirt.
5. Gas is generated during charging! Only start charging in a well ventilated
area.
6. The battery charger cannot be used to charge non - rechargeable batteries!
7. Keep the appliance out of the reach of children! It should not be used by
persons with reduced physical or mental abilities. The appliance should
only be used by a person who has read this manual or received appropriate
instructions for accident-free operation!
8. When connecting the battery clamps and cables, make sure they are in the
correct order and polarity! First, connect the red clip to the + pole of the
battery, then the black to the negative, then connect the device to a power
outlet.
9. When charging is complete, disconnect the device from the power outlet
before removing the battery clamps! First black, then red.
10. Always ensure that the clamps do not come in contact or short-circuit during
use. This will prevent overheating, sparking, fire and personal injury.
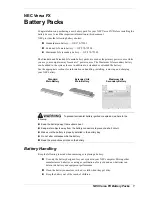
Parts of LCD display:
1. Slow charging mode
2. Fast charging mode
3. Winter charging mode 12 V
4. 6 V charging mode
5. Faulty battery indication
6. Clamp reversal and short circuit show(!)
7. Voltage level
8. Battery level indicate, each trellis represent 25%, outline border flashing
means it’s charging, outline border and four trellis all light mean the battery
is full.
6V
V
!
4
5
1
2
6
8
3
7
Technical specifications:
1. 12 V Car battery charging: standard lead-acid battery, AGM battery, GEL
battery, max charging current: 4 A. Cut-off voltage: 14.5 V
2. 12 V motor battery charging: standard lead-acid battery, AGM battery, GEL
battery, max charging current: 4 A. Cut-off voltage: 14.5 V
3. Winter mode: 12 V standard lead-acid battery, AGM battery , GEL battery,
can be used in this mode even under 5
o
C, in this mode the max charging
current: 4 A. Cut-off voltage: 14.8 V
4. 6 V mode: standard lead-acid battery, AGM battery ,GEL battery max
charging current: 2 A. Cut-off voltage: 7.5 V
Protection
class
Input voltage Input power
Output
Battery max
capacity
IP65
220 – 240 V
50 Hz
Max. 70 W
12 V DC
2 A / 4 A,
6 V DC 2 A
120 Ah
Work environment and placement:
1. The charger shall be put in places that are well-ventilated, dry, sunshine-free,
heat-free and erosive gas-free. It shall be kept as distant as possible from
storage battery when the direct current cable allows and be placed stable to
avoid falling. Do not use the device with the cable in the air (hanged).
2. Never place the charger directly on the battery or battery on the charger
which is very dangerous!
3. During charging, if the battery temperature exceeds 40
o
C, the current must
be reduced, switch to slow charging mode. If the temperature exceeds
45
o
C, the charging must be stopped. We recommend using an infrared
thermometer to check this regularly. Charging should not be restarted until
the battery temperature has dropped below safe limits.
Connection and operation instructions:
1. When battery is removed: Connect the charging clamps first to the
appropriate pole of the battery and then to the AC outlet. The smart charger
automatically detects the connected battery and starts charging at 6 V or
12 V. (Note: Always check that the device has started charging properly!)
2. With a battery left in the vehicle: Place the red charging clamp on the plus
(+) pole of the battery and, if possible, place the (-) black charging clamp
as far away from the battery and fuel system as possible, then connect
the device to an AC outlet. The smart charger automatically detects the
connected battery and starts charging at 6 V or 12 V. (Note: Always check
that the device has started charging properly!)
3. When charging is complete, disconnect the charger from the mains and
then remove the charging clamps.
AUTOBATTERIELADEGERÄT – 230 V
2 A / 4 A – AUTOMATISCH
DE
Bitte lesen Sie diese Gebrauchsanweisung und die folgenden
Sicherheitshinweise sorgfältig, bevor Sie das Gerät zum ersten Mal benutzen.
Wir empfehlen, dass Sie dieses Handbuch zum späteren Nachschlagen
aufbewahren.
Warnungshinweise:
1. Das Ladegerät dient nur zum Laden von Bleiakkumulatoren. Es kann
nicht als Gleichstromquelle verwendet werden, da es unfallgefährdet und
feuergefährlich ist.
2. Das Ladegerät ist nur mit einem Netzwerkanschluss ausgestattet. Er darf
nicht modifiziert oder ersetzt werden. Wenn die Kabellänge nicht lang
genug ist, verwenden Sie ein Verlängerungskabel. Überprüfen Sie jedoch,
ob die Kabeldicke für die Stromversorgung korrekt ist. (min 3 x 1,5 mm
2
)
Verwenden Sie kein unnötig langes Netzkabel.
3. Wenn das Netzkabel von außen beschädigt oder unterbrochen ist,
müssen Sie den Ladevorgang unterbrechen, das Gerät sofort von der
Stromversorgung trennen und einen Elektriker kontaktieren, der das Kabel
professionell austauscht. Eine unsachgemäße Reparatur kann zu Feuer oder
Stromschlag führen.
4. Wenn Schmutz auf das Gehäuse gelangt, trennen Sie zuerst
das Netzkabel und entfernen Sie den Schmutz mit einem leicht
feuchten Tuch.
5. Beim Laden entstehen Gase. Beginnen Sie den Ladevorgang nur in einem
gut belüfteten Bereich.
6. Das Ladegerät darf nicht zum Laden von nicht wiederaufladbaren
Akkumulatoren verwendet werden.
7. Von Kindern fernhalten. Das Gerät darf nicht von Personen mit
eingeschränkten körperlichen, geistigen oder seelischen Fähigkeiten
verwendet werden. Das Gerät darf nur von einer Person verwendet werden,
die diese Packungsbeilage gelesen oder entsprechende Anweisungen zur
unfallfreien Verwendung erhalten hat.
8. Stellen Sie beim Anschließen der Klemmen und Kabel sicher, dass die
Reihenfolge und Polarität korrekt sind. Befestigen Sie zuerst die rote
Klemme am Pluspol der Batterie, dann die schwarze Klemme am Minuspol
und verbinden Sie das Gerät mit der Stromversorgung.
9. Wenn der Ladevorgang abgeschlossen ist, ziehen Sie zuerst den Netzstecker
aus der Steckdose und entfernen Sie dann die Batterieklemmen. Zuerst die
schwarze, dann die rote Klemme.
10. Stellen Sie bei der Verwendung immer sicher, dass die Klemmen einander
nicht berühren, wodurch ein Kurzschluss entsteht. Dies verhindert
Überhitzung, Funken, Feuer und Verletzungen.
Teile des LCD-Displays:
1. Langsamer Lademodus
2. Schneller Lademodus
3. Winter-Lademodus mit 12 V
4. Lademodus mit 6 V
5. Anzeige vom Batteriefehler
6. Warnung für Verpolung bzw. Kurzschluss (!)
7. Spannungswertanzeige
8. Akku-Ladezustandsanzeige Jede Einheit entspricht einem Ladezustand
von 25%. Wenn die Kontur blinkt, wird der Ladevorgang ausgeführt. Wenn
die Kontur und alle Einheiten kontinuierlich leuchten, ist der Ladevorgang
abgeschlossen. (vollgeladen)
6V
V
!
4
5
1
2
6
8
3
7
Technische Informationen:
1. Laden von Autobatterie mit 12 V: bei Standard-Bleiakkumulatoren, AGM,
GEL ist ein schneller Lademodus möglich, die Stromstärke ist in diesem Fall:
4 A. Abschaltspannung: 14,5 V.
2. Laden von Motorbatterie mit 12 V: bei Standard-Bleiakkumulatoren, AGM,
GEL ist nur ein langsamer Lademodus möglich, die maximale Stromstärke
55784C