background image

UHF Wireless
Microphone System
WMU96

User


Manual

Transmitter

Receiver

Summary of Contents for WMU96

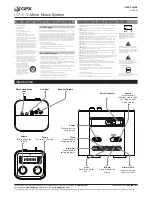
Page 1: ...UHF Wireless Microphone System WMU96 User Manual Transmitter Receiver...

Page 2: ...ic Display Bar Low Cut Filter Auto IR Sync Transmitter Power Monitor Real time Monitor Low Power Consumption Lattice LCD Optional Language 120m Working Distance Dual Mic Trigger Auto scanning Adjustab...

Page 3: ...switching during usage The working distance will be affected by the surrounding environment Please try to keep the environment open without interference during usage and close the WIFI of the device...

Page 4: ...ns WMU96 A 2TX RX WMU96 B TX RX Transmitter Tx Receiver Rx Transmitter Tx Receiver Rx Transmitter Tx 3 Accessories Belt Clip 3 5mm Mic Input Cable 3 5mm 3 5mm Output Cable 3 5mm XLR Output Cable Cold...

Page 5: ...Button LCD Screen 3 5mm Audio Output Socket 3 5mm Monitoring Socket IR Sensor 1 4Cold boots fixed hole Belt Clip Group 2 Antenna 10 11 13 14 12 13 14 4 1 2 3 4 5 6 7 8 9 11 10 12 15 15 15 AA Battery...

Page 6: ...one body Attention 1 To open the battery cover door you have to press the door please follow the arrow direction Please make sure to turn the microphone in off condition while you intend to install th...

Page 7: ...and clear Signal strength high low switching effect With high signal strength the wireless working distance is up to 80 120M high power consumption battery life is short With low signal strength the w...

Page 8: ...96 LED Indicator Light Instruction 7 TX RX POWER POWER green light Power full red light Power half Power low red light flash Power low Power full Power half green light green light flash red light fla...

Page 9: ...Installation and Usage Lavalier Transmitter 2 Long press the power button to turn on the transmitter 1 Insert the 3 5mm audio input line into MIC socket 8...

Page 10: ...th the receiver it could check whether transmitter is work normally according volume bar display 4 Connect the belt clip to the connection hole 0dB 4dB 7dB 12dB 16dB 19dB 24dB Mic gain 1 CH 96 520 000...

Page 11: ...he channel matching Transmitter and receiver it can be used Please refer to screen operation instruction for channel matching Products include Group 2 Group 2 Transmitting power Group 1 Receiving Audi...

Page 12: ...96 590 300MHz CH 01 SETTINGS Channel 1 Volume 1 Channel 2 Channel 1 Channel 1 CH 01 CH 96 Channel 2 Channel 2 Manually adjust the receiver channel 1 2 Long press button into setting page 1 Adjust freq...

Page 13: ...nning 96 Volume1 VOL 01 VOL 16 Volume1 SETTINGS Volume 1 Volume 2 Volume2 VOL 01 VOL 16 Volume2 Auto scan 1 SETTINGS Short press choose Volume1 then press to adjust volume SET Short press choose Volum...

Page 14: ...4 IR Sync 1 2 Selection SETTINGS IR Sync 1 IR Sync 2 IR sync start IR Sync 1 Short press choose Auto scan2 then Auto scan automatically SET Short press choose IR Sync 1 Receiver automatically paired...

Page 15: ...ving screen of the transmitter against the receiver P the Channel Through Infrared Sync air Short press choose IR Sync 2 Receiver automatically paired with transmitter 2 frequency SET 14 2 5 1 1 2 Cha...

Page 16: ...1 2 Short press choose Power lock then press to choose Disable Enable SET Short press choose LCD light then press to choose mode SET When open power lock power button is lock it will not power off wh...

Page 17: ...s Stereo mode SETTINGS Output OUTPUT Mono Stereo LANGUAGE English SETTINGS Language RESET Yes SETTINGS Reset NO Short press choose Output then press to choose mode SET Short press choose Language then...

Page 18: ...VERSION SETTINGS Version V0 1 0 1 11 Version Short press button to Version display page SET 17 1...

Page 19: ...reen MIC External Input IR Sensor 1 4 Mounting Hole Belt Clip LINE IN External Input AA Battery Compartments Power Working Status Indicator Light 11 12 14 10 11 12 13 14 18 1 2 3 4 5 6 7 13 9 8 1 2 Ch...

Page 20: ...Emitter screen description 1Group Muting Locking Channel Power Indication Audio dynamic display bar Channel Frequency 1 CH 96 520 250MHz 2Group 1 2 Muting Unlocking Normal recording Muting 19...

Page 21: ...Power lock 1 Group 1 2 Selection 520 25MHz 554 45MHz CH 01 CH 96 CH 01 556 100MHz CH 96 590 300MHz CHANNEL CHANNEL CHANNEL CHANNEL SETTINGS Channel Power lock Short press enter then press to choose f...

Page 22: ...hen press to choose Disable Enable Power lock SET When open power lock power button is lock it will not power off when long press power button avoid misoperation power off If want return normal operat...

Page 23: ...LIGHT Delay 20s Delay 40s ON OFF MIC GAIN Mic gain Low cut LCD Light 5 Backlight Lighting time turn off Adjustment Short press choose then press to choose Microphone gain effect Mic gain SET Short pre...

Page 24: ...d the main audio source will be more crisp Appropriately remove the low frequency part of the sound reduce the ambient noise of the low frequency part to make sound more clean and clear Low cut functi...

Page 25: ...s SETTINGS Reset NO 10 Reset to Defaults VERSION SETTINGS Version V0 1 0 1 11 Version Short press button to Version display page SET Short press enter Language then press to choose mode SET Short pres...

Page 26: ...96 Group 1 Carrier frequency Transmit power 520 250MHz 554 450MHz 556 100MHz 591 300MHz 17dBm Receiver RX Channels 96 520 250MHz 554 450MHz 556 100MHz 591 300MHz Group 2 Carrier frequency Group 1 Car...

Page 27: ...udio Distortion Reference Audio Input Level Battery Type Weight Dimensions Operating Temperature Storage Temperature 96 1 or 2 70dB 60dB 40mW 1 4 Wavelength Wire Antenna 5kHz 60dBV 1kHzinput 0 5 40dB...

Page 28: ...oise Ratio Sound delay Reference deviation Audio Distortion Battery Type Weight Dimensions Operating Temperature 96 1 and 2 1 4 Wavelength Wire Antenna 10dB 87mW 32 95dB 70dB 40Hz 18kHz 3dB 5kHz 60dBV...

Page 29: ...UHF WMU96 UHF 16 RF MIC LINE IN 96 1 2 LCD 2 AA UHF WMU96 16 LCD 1 2 2 AA 120m 80m 120m 1 2 16 LCD LCD 120m EN 28 ABS...

Page 30: ...TX RX WIFI RF LOW TRS TRRS APP 60cm 29...

Page 31: ...WMU96 A 2TX RX WMU96 B TX RX TX TX RX TX RX 30 3 5mm Mic 3 5mm 3 5mm 3 5mm XLR...

Page 32: ...1 2 3 4 5 6 7 8 9 1 2 SET 3 5mm 3 5mm IR 1 4 AA 10 11 13 14 12 13 14 15 31 1 2 3 4 5 6 7 8 9 11 10 12 15 1 2 1 2...

Page 33: ...AA 1 2 3 32...

Page 34: ...SET 1 2 80 120m 30 60m 33 WMU96 LED 96 TX POWER RX POWER...

Page 35: ...1 3 5mm MIC 2 PO W ER M UTE 34...

Page 36: ...3 MIC 0dB 4dB 7dB 12dB 16dB 19dB 24dB 4 1 CH 96 554 000MHz 35...

Page 37: ...CH01 1 2 1 2 1 2 1 2 1 2 1 2 1 2 1 2 CH01 1 2 s 2 3 5mm 3 5mm OUTPUT 3 5mm 1 36 OU T PU T IR...

Page 38: ...1 2 SET 1 1 2 1 2 1 1 01 520 250MHz CH01 1 2 1 2 1 1 SET 1 96 554 450MHz 2 01 556 100MHz 1 1 2 2 SET 2 96 590 300MHz 37 1 2...

Page 39: ...2 1 2 1 01 1 2 1 2 1 SET 2 SET 1 16 2 01 2 16 3 1 2 1 2 1 00 1 SET 1 96 38 1 2 1...

Page 40: ...2 4 1 2 1 2 2 00 1 SET 2 96 1 39 2 1...

Page 41: ...2 1 2 SET 2 5 40 2 1 1 2 1 2 1 2 1 1 2 2...

Page 42: ...6 7 20 40 SET SET CH01 1 2 SET 41 1 1...

Page 43: ...CH01 1 2 8 English 9 Language SET Language 10 SET SET CH01 1 2 s 11 V0 1 0 1 SET V0 1 0 1 42 1 1 1 1...

Page 44: ...1 2 3 4 5 6 7 8 9 1 2 SET 3 5mm IR 1 4 Line in AA 11 12 14 10 11 12 13 14 43 1 2 3 4 5 6 7 13 9 10 8 1 2...

Page 45: ...1 1 CH 96 554 450MHz 2 1 2 44...

Page 46: ...SET 01 520 25MHz 1 1 CH 96 520 250MHz SET 96 554 450MHz 01 556 100MHz SET 96 590 300MHz 45 Group1 520 25MHz 554 450MHz Group2 556 100MHz 590 300MHz 1 2...

Page 47: ...0dB 4dB 7dB 12dB 16dB 19dB 24dB 4 5 20 40 SET SET 46 1 1...

Page 48: ...2 3 SET 1 CH 96 520 250MHz Mute SET 47 1 1 1 2 1 2 1 2 1 2...

Page 49: ...6 7 SET LINE IN MIC 48 1 1 MIC LINE IN...

Page 50: ...English 9 Language V0 1 0 1 11 SET 10 8 SET Language SET SET 49 1 1 1 1...

Page 51: ...50 TX 96 Group 1 Group 2 520 25MHz 554 450MHz 556 100MHz 590 300MHz 17dBm RX 96 Group 1 Group 2 520 250MHz 554 450MHz 556 100MHz 590 300MHz...

Page 52: ...96 1 2 70dB 60dB 40mW 10 ms 1 4 5kHz 60dBV 1kHz 0 5 40dB 0dB 2 AA 79 5g 220 64 24mm 0 50 20 55 51 520 25 MHZ 591 30MHz...

Page 53: ...96 1 2 1 4 10dB 95dB 70dB 40Hz 18kHz 3dB 5kHz 60dBV 1kHz 0 5 2 AA 79 5g 220 64 24mm 0 50 20 55 52 10 ms 87mW 32 520 25 MHZ 591 30MHz...

Page 54: ...Made in China RM 1902 EASEY COMM BLDG 253 261 HENNESSY ROAD WANCHAI HK TEL 86 755 89325423 HONGKONG MCOPLUS TECHNOLOGY CO LIMITED WWW MCOPLUSHK COM info mcoplus213 com...

Page 55: ......

Reviews: