So Cool Keyboard Rev 1.1
MAN & MACHINE, INC.
•
3706 West St. Landover, MD 20785
•
301 341 4900
Page 1 of 2
How to Update the So Cool Firmware
1.
Copy the new firmware (
So Cool Firmware V1.1 02212013.s19
) to the desktop of the PC that is going to be used
to update the keyboard. You need another mouse or touchpad to complete the upgrade. No special software or
driver required to do the update.
2.
If the keyboard is plugged in, unplug the keyboard first.
3.
Press the
Left Ctrl
,
the
Left Shift
and the
Space Bar
keys simultaneously and plug the keyboard to the USB port
of the PC.
4.
Check to see if the Caps Lock, Num Lock and the two Ctrl LEDs are on. If they are all on, release the keys.
5.
The keyboard will connect in bootloader mode and appears as a new USB drive in the host computer. The volume
name of the drive is BOOTLOADER, and the status file is
READY.TXT
. The bootloader is now ready to receive
the firmware image file. (Figure 3.1, 4.1 or 5.1 ) Notes:
I.
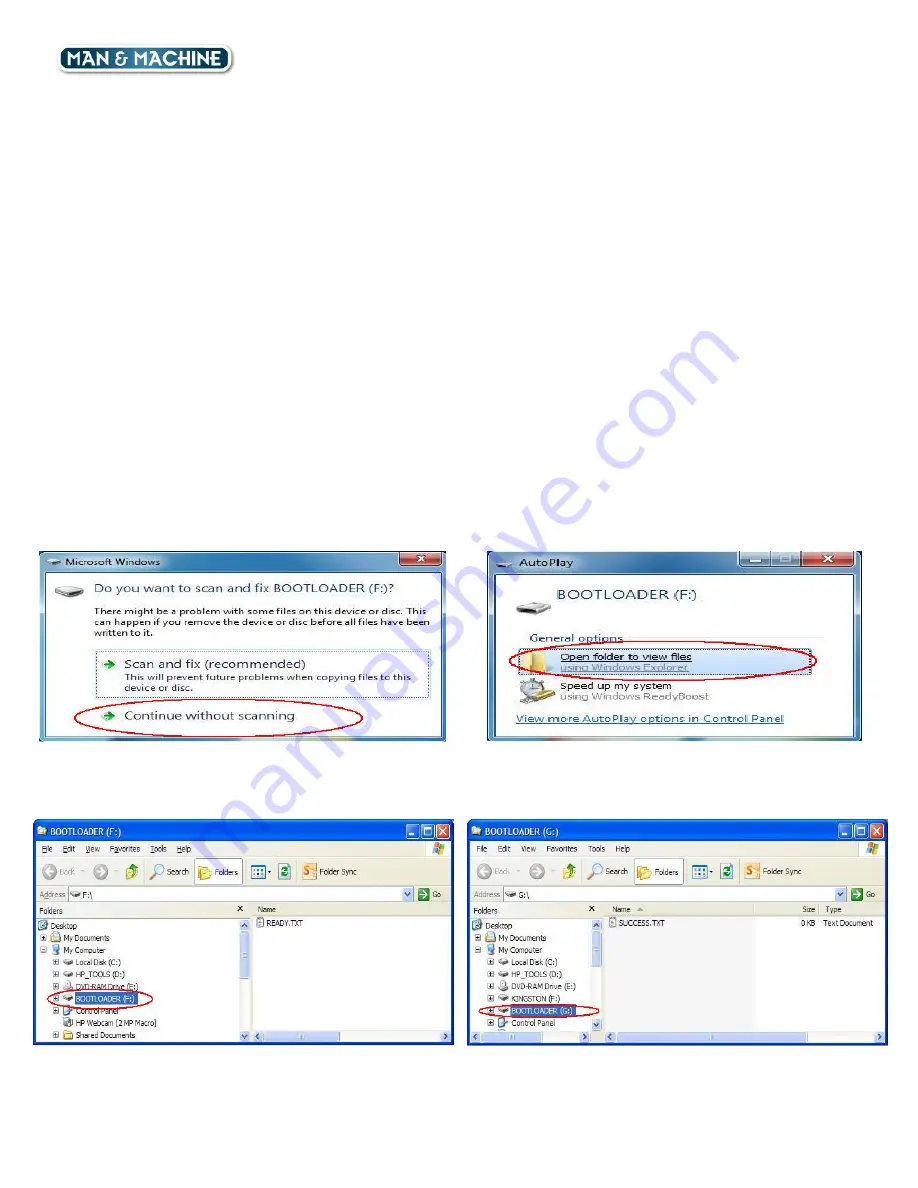
If the computer asks to scan and fix the drive, click
Continue without Scanning
. (Figure 1)
II.
If the drive opens with AutoPlay, click
Open folder to view files
. (Figure 2)
6.
Go to the desktop, copy the new firmware image (
So Cool Firmware V1.1 02212013.s19
), and paste it into the
bootloader drive. Dragging and dropping the file also works.
7.
After the file transfer is complete, the bootloader drive disappears. After a few seconds, the drive will re-appear.
Click on the bootloader drive to verify the status file is
SUCCESS.TXT
. (Figure 3.2, 4.2 or 5.2 )
8.
Close the window and unplug the keyboard. The keyboard is now updated with the new firmware.
Figure 1. Click Continue without scanning
Figure 2. Click Open folder to view files.
Windows XP
Figure 3.1 Win XP READY.TXT Screen
Figure 3.2 Win XP SUCCESS.TXT Screen