Installation Instructions
Please Read Before Installing
Lutron Elec tron ics Co., Inc.
7200 Suter Road
Coopersburg, PA 18036-1299
Made and print ed in the U.S.A. 3/09 P / N 043-269 Rev. A
Symptom
Cause and Action
LEDs on an adapter-powered keypad do not light.
No power available to keypad.
• Verify adapter is plugged in.
Faulty adapter.
• Replace adapter.
A battery-powered keypad will not “wake up” when a but-
ton is pressed.
Dead, low, or no batteries in keypad.
• Replace the batteries.
Batteries are incorrectly installed.
• Install batteries as indicated inside battery compart
-
ment.
Batteries are not making contact with the battery terminals.
• Adjust the batteries so they make contact with the
terminals.
A battery-powered keypad “wakes up” but goes to “sleep”
quickly after a button press.
Batteries are low.
• Replace the batteries.
A battery-powered keypad’s LEDs cycle up and down
during “wake up”, but the system lights do not respond to
button presses.
Keypad is out of system communications range.
• Move the keypad to within 30 ft (9 m) of a Hybrid Re
-
peater or RF Processor.
An adapter-powered keypad’s LEDs scroll down twice after
a button press.
Keypad is out of system communications range.
• Move the keypad to within 30 ft (9 m) of a Hybrid Re
-
peater or RF Processor.
Button presses on keypad cause the keypad to quickly
flash all its LEDs simultaneously.
Keypad has not been addressed.
• See the
HomeWorks
Software online help for setup
details.
Button presses on keypad cause the keypad to slowly flash
all its LEDs simultaneously.
Keypad has an address, but does not have a valid
programming database. A database is being sent to the
keypad.
• See the
HomeWorks
Software online help for program
-
ming details.
System lights do not respond to a button press.
Button being pressed has not been programmed.
• See the
HomeWorks
Software online help for program
-
ming details.
English
These products may be covered under one or more of the following U.S. patents: 5,838,226; 5,848,054;
5,905,442; 5,982,103; 6,687,487; 6,803,728; D422,969; D428,855; D461,782; D510,073 and corresponding
foreign patents. U.S. and foreign patents pending. Lutron, HomeWorks and the sunburst logo are registered
trademarks of Lutron Electronics Co., Inc.
© 2009 Lutron Electronics Co., Inc.
Troubleshooting Guide
RF Keypads will not function until they are addressed and programmed using the
HomeWorks
Software.
Wireless Tabletop
Keypads
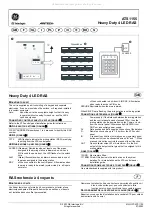
Installation
Find a suitable location for the Wireless Tabletop Keypad. Place the keypad in a
convenient and accessible location.
Note:
Wireless Keypads must be located within
30 ft (9 m) of a Hybrid Repeater or RF Processor.
Battery installation
1. Remove battery cover.
2.
Install batteries as shown. Use two (2) 1.5 V AAA alkaline batteries only. Refer
to battery installation diagram molded inside battery compartment.
3. Replace battery cover.
Adapter installation
1. Apply power to the Wireless Tabletop Keypad.
Overview
Wireless Tabletop Keypads are for use with
HomeWorks
systems. The keypad but
-
tons are programmed with a personal computer using the
HomeWorks
Software.
Up to 32 Wireless Keypads, each with a unique address, can be assigned to a
single
HomeWorks
Processor with RF capability.
Important Notes
Codes:
Install in accordance with all local and national electrical codes.
Battery Power:
Use only high quality alkaline batteries, two (2) size AAA, 1.5 V
each.
Caution -
Do not use rechargeable batteries. Using improperly rated batter
-
ies could damage the Keypad.
Caution -
Do not disassemble, crush, puncture, or incinerate the batteries.
Do not dispose of batteries in normal household waste. Please recycle, take
to a proper battery disposal facility, or contact your local waste disposal
provider regarding local restrictions on the disposal or recycling of batteries.
Adapter Power:
Use only a Lutron adapter with your Wireless Tabletop Keypad.
Caution -
Using an adapter not rated for the proper specifications could
damage the keypad and possibly overheat the adapter. Refer to ratings
shown at top of page.
Environment:
Ambient operating temperature: 32 °F to 104 °F (0 ºC to 40 °C),
0 to 90% humidity, non-condensing. Indoor use only.
Faceplates:
Do not paint controls or faceplates.
Cleaning:
To clean, wipe with a clean damp cloth. Do not use any chemical cleaning
solutions.
Setup:
Wireless Tabletop Keypads will not function until they are addressed and
programmed.
RF Performance:
The range and performance of any RF system is dependent on
a variety of complex factors such as: distance between devices, materials separat
-
ing devices, geometry of the home, geometry between devices, RF interference,
and other installed electronic equipment. These installation factors are beyond
Lutron’s knowledge and control; therefore, Lutron cannot guarantee a minimum
range between devices. Range performance could be reduced below the guidelines
described in this installation instruction sheet. Refer to Application Note #85, “Under
-
standing RF Communication - Path Loss”, for details.
Warranty:
For Warranty information, please see the Warranty enclosed with the
product, or visit www.lutron.com/resiinfo.
Plug in power
cord and
adapter
Mounting Diagram
Wireless Tabletop Keypads may be wall mounted using the supplied wall bracket.
1. Attach wall bracket to wall using the supplied screws and wall anchors.
2.
Wrap excess cord (if using adapter) around the cord holder. Align keypad
mounting slots and snap onto wall bracket.
Returning Keypads to Factory Default
Note:
Returning a keypad to its Factory Default Settings will remove the keypad
from the system and erase all programming.
For HRT- keypads that shipped
prior to
January, 2007, refer to Application Note
#HW-102.
For all other keypads, follow this method:
Step 1:
Triple tap any button on the keypad. DO NOT release after third tap.
Step 2:
Keep the button pressed after the third tap (for approximately 5 seconds)
until all the status LEDs start to flash slowly.
Step 3:
Release the button and triple tap the button again until all the status LEDs
on the keypad flash quickly.
The keypad has now been returned to Factory Default Settings.
To verify the device was returned to Factory Default Settings, press any button on
the keypad. All the status LEDs should flash quickly for a few seconds.
Mounting slots
120 V
Models
HRT-6LRL, HRT-5S2RL, HRT-10S2RL, HRT-15S2RL,
HRT-5RL-C, HRT-10RL-C, HRT-15RL-C
Adapter: 120 V
60 Hz 6.5 W (input); 9 V
300 mA (output)
Batteries: two (2) AAA alkaline 1.5 V
each
240 V
Models
HRT-6LRL-868, HRT-6LRL-434, HRTS-5RL-1, HRTS-5RL-2,
HRTS-10RL-1, HRTS-10RL-2, HRTS-15RL-1, HRTS-15RL-2,
HRT-5RL-868, HRT-5RL-434, HRT-10RL-868, HRT-10RL-434,
HRT-15RL-868, HRT-15RL-434
Adapter: 220-240 V
50 Hz 80 mA (input); 9 V
300 mA (output)
Batteries: two (2) AAA alkaline 1.5 V
each