Copyright © 2014 Linear LLC
1
2GIG-GB3-433
GLASS BREAK DETECTOR
INSTALLATION INSTRUCTIONS
The
2GIG
Glass
Break
Detector
(2GIG
‐
GB3
‐
433)
is
a
fully
‐
supervised,
tamper
‐
protected,
ceiling
‐
or
wall
‐
mounted
unit.
It
communicates
with
the
control
panel
using
the
433
MHz
frequency.
The
detector
provides
a
15
ft
(4.6
m)
maximum
detection
range,
360°
maximum
horizontal
sensing
angle,
and
dual
‐
stage
glass
break
detection.
Box Contents
Verify
that
the
package
includes
the
following:
•
1—Glass
Break
Detector
(with
Mounting
Base)
•
2—Lithium
Batteries
•
3—Plastic
Wall
Anchors
with
Screws
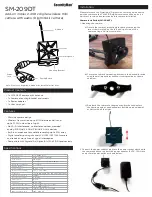
Figure 1
LED Indicators
Inserting and Replacing the Batteries
To
insert
or
replace
the
batteries:
1
Unwrap
the
detector.
2
Holding
the
cover
and
base,
twist
the
cover
in
a
counter
‐
clockwise
motion.
When
the
imprinted
arrows
on
the
side
of
the
detector
are
aligned,
separate
the
unit.
3
Remove
the
old
batteries.
IMPORTANT:
Always
dispose
and/or
recycle
used
batteries
in
accordance
with
the
hazardous
waste
recovery
and
recycling
regulations
for
your
location.
Your
city,
state,
or
country
may
also
require
you
to
comply
with
additional
handling,
recycling,
and
disposal
requirements.
4
Insert
the
batteries
in
the
compartment.
Always
match
the
plus
(+)
sign
on
the
battery
with
the
flat
side
of
the
compartment
and
the
minus
(
‐
)
sign
on
the
battery
with
the
spring
side
of
the
compartment.
It
takes
approximately
five
(5)
seconds
for
the
detector
to
power
ON.
Figure 2
Glass Break Detector
—
Base
NOTE:
If
closing
the
detector
when
batteries
are
not
present,
gently
push
the
RED
tabs
on
the
backside
of
the
base
away
from
the
detector
(see
Figure
1
above).
5
Holding
the
cover,
align
the
imprinted
arrows
on
the
detector
and
then
twist
the
cover
in
a
clockwise
motion
to
close
the
unit.
WARNING:
Failure
to
follow
these
warnings
and
instructions
can
lead
to
heat
generation,
rupture,
leakage,
explosion,
fire,
or
other
injury,
or
damage.
Do
not
insert
the
battery
into
the
compartment
in
the
wrong
direction.
Always
replace
the
battery
with
the
same
or
equivalent
type
(see
Never
recharge
or
disassemble
the
battery.
Never
place
the
battery
in
fire
or
water.
Always
keep
batteries
away
from
small
children.
If
batteries
are
swallowed,
promptly
see
a
doctor.
Wall Mounting
When
wall
mounted,
the
detector
provides
protection
coverage
on
the
opposite
or
adjacent
window.
Windows
on
the
same
wall
as
the
detector
are
not
protected.
To
mount
the
detector
to
a
wall:
1
If
not
already
installed,
insert
the
batteries
(see
2
With
the
cover
off,
place
the
base
of
the
detector
on
the
adjacent
or
opposite
wall
from
the
window
being
protected.
3
Use
the
three
(3)
Plastic
Wall
Anchors
(provided)
to
mount
the
base
of
the
detector
to
the
wall.
IMPORTANT:
Always
mount
the
detector
so
the
Test
button
is
in
the
downward
position.
4
Holding
the
cover,
align
the
imprinted
arrows.
Then
use
a
clockwise
twist
motion
to
lock
the
cover
into
place.
A
RED
LED
B
GREEN
LED
C
TEST
button
D
Imprinted
arrow
(for
alignment
of
cover
and
base)
A
Tamper
switch
B
Battery
compartments
(RED
tabs
located
behind
compartments)