

1
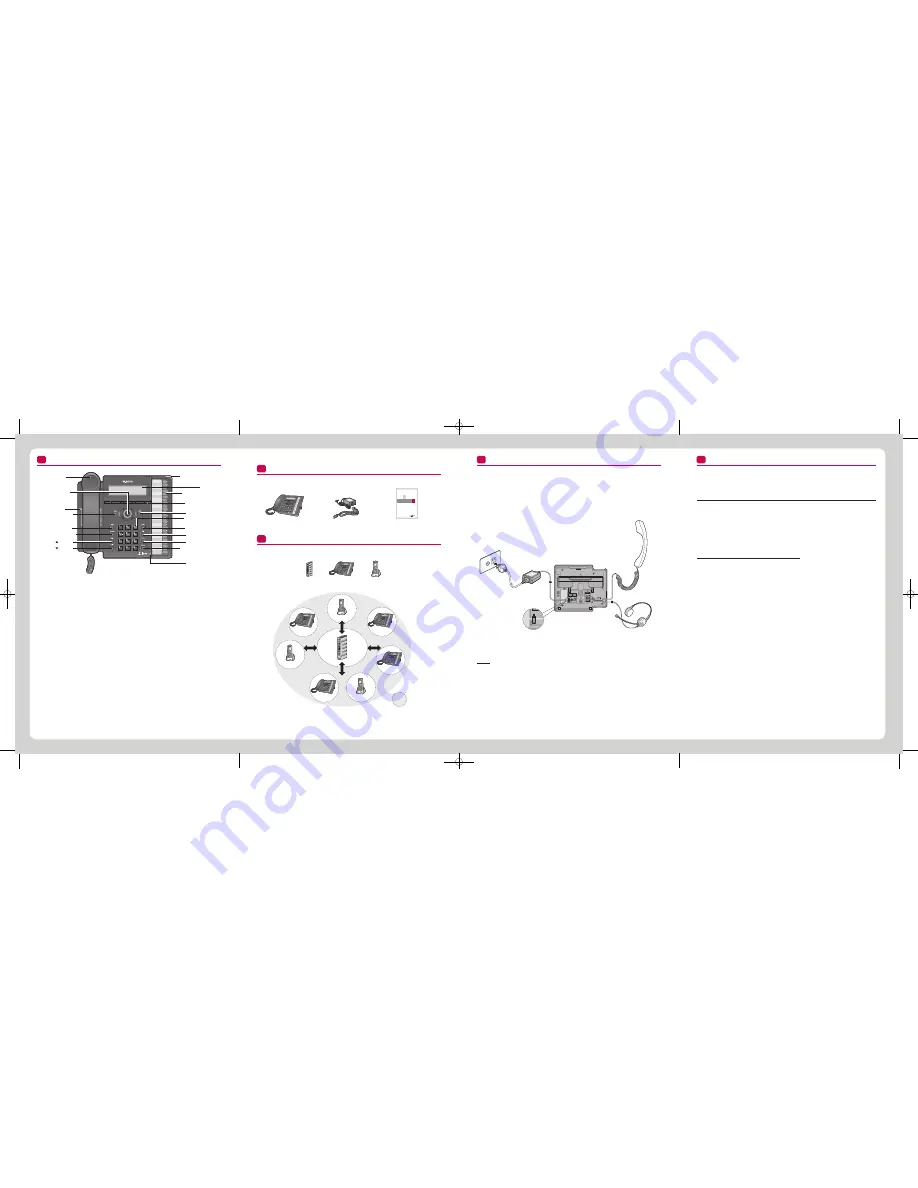
LWS-WK Appearance
Handset
Navigation
/OK Key
Headset Button
Speaker
DND Button
Vol Button
Vol Button
Menu Button
RING Indication
/Message Wait
LCD
Dial Buttons
(Digits/Characters)
Line & Station
Selection Buttons
Soft Buttons
Mute Button
Speaker Button
Microphone
Hold Button
Trans Button
MSG Button
Brief Description of Features
DND Button
– Do Not Disturb - Blocks incoming calls ringing. This applies to outside calls, inter-
com calls and transfers. Red LED illuminates when DND is on. Press to turn on/off.
Headset Button
– Used to place/answer calls using the headset.
Vol
q
Button
– Adjusts Handset, Speaker or Headset during a call/off hook state. Ringer
volume is turned up or down if phone is ringing. LCD contrast is turned up or down if phone is
in idle state.
Trans Button
– Transfer a line call or an intercom call to another station during a call.
Hold Button
– Places an active call on hold, the held party will hear a hold music.
Mute Button
– In call state this disables the handset, speakerphone or headset microphone
whilst continuing to listen to the other party. Red LED illuminates when the ‘mute mode’ is on.
Speaker Button
– Used to place/answer calls using the speaker/microphone.
Menu Button
– Used to set or change the configuration, or to register to a iPECS-LIK system.
MSG Button
– Used to access voice messages.
3 Soft Buttons
– Used to set features displayed on the LCD.
Line & Station Selection Buttons
– Access Lines and Stations for making, receiving and trans-
ferring line and intercom calls. These illuminate to provide visual line and station status.
RING Indication
– Illuminates when ringing.
Message Wait
– Flashes when message is received (optional).
LCD
– Displays status and information about the phone interface or setting.
Microphone
– Used for hands-free speakerphone function.
Navigation Key
– Used to set or change the configuration with Menu and soft buttons.
2
LWS-WK Contents in the Package
Verify that all parts shown below were provided in the package.
3
Configuration
The following image depicts a sample configuration using iPECS-LIK system and phones.
WTIM
Keyset
(LWS-WK)
Wireless Handset
(GDC-450H)
Station 7
Station 1
Station 2
Station 3
Terminal
System
Station 4
Station 5
Station 6
Sample Configuration
4
LWS-WK Connections
To connect the LWS-WK to be used with the system:
1. Plug the AC/DC Adaptor cord into the bottom of the LWS-WK.
2. Fasten the AC Adaptor cord to the latch Hook as shown (inset detail).
3. Connect the handset to the bottom of the LWS-WK.
4. Connect the headset to the headset jack on the bottom of the LWS-WK. (Optional)
Headset
Handset
AC/DC
Adaptor
(SA-B122)
Hook
LWS-WK Connections
5
LWS-WK Registration to iPECS-LIK system
iPECS-LIK system controls the functional service and registration related to the LWS-
WK. Each LWS-WK must be registered to iPECS-LIK system before use. Only one
LWS-WK can be registered to iPECS-LIK system at a time.
To enable a registration, the below procedure must be performed on iPECS-LIK system
1. Open the web admin and enter login.
2. Select the DECT Data.
3. Select DECT Registration(0#).
4. Enter the phone number.
5. Select the phone type. (4:“LWS-WK”)
6. Press the Send button.
7. Display the message “Subscribe enable”.
Registering the LWS-WK to iPECS-LIK system
To register to iPECS-LIK system, below procedure is performed on the LWS-WK.
1. Press
[Menu]
button to display the menu.
2. Highlight
[Phone Register]
using the Navigation up/down key, and then press
[OK]
soft button or Navigation ‘OK’ key.
3. Select
[Subscription]
using the Navigation up/down key, and then press
[OK]
soft
button or Navigation ‘OK’ key.
4. Display the “BASE RPN(0~23)”.
5. Enter RPN number.
6. Display
[Searching..1]
.
7. The system
[RFPI
: eg. 01234567890123
]
will be displayed when a system is found.
The RFPI of your system is available from your System Administrator, or perhaps the
attendant.
8. display the “AC Code”.
9. Enter AC Code value.
10. Press
[OK]
soft button or Navigation ‘OK’ key. In a few second, a confirmation tone is
received at the LWS-WK.
11. Display the message “Subscription Done”.
12. Rebooting the terminal for location registering.
13. If the registration fails, repeat procedure from Step 5 to 7 at iPECS-LIK system and Step
1 to 10 from the LWS-WK.
LWS-WK
Power Adapter
AC power cord
Quick User Guide
Please read this manual carefully before
operating Phone your set. Retain it for future reference.
Quick User Guide
LWS-WK
note:
1. If two LWS-WK are located in one base, there is no more located with the same RPN base
number.
2. If two LWS-WK already subscribed in one cell and LWS-WK just move from designated cell
coverage to another or power off, system side don’t know these actions--> Even if one LWS-WK
is located in one cell, it is impossible to subscribe new one.
3. LWS-WK can’t be unsubscribed in web admin menu(“DECT Unsubscribe” when it is
searching(base) state.-->In this case, operator should erase both system and LWS-WK.
4. LWS-WK should be subscribed within the scope of order number 1~8.
->View “DECT Registered Station menu” in web menu.


