background image

IB-CD511(TA)-SW-E-091002
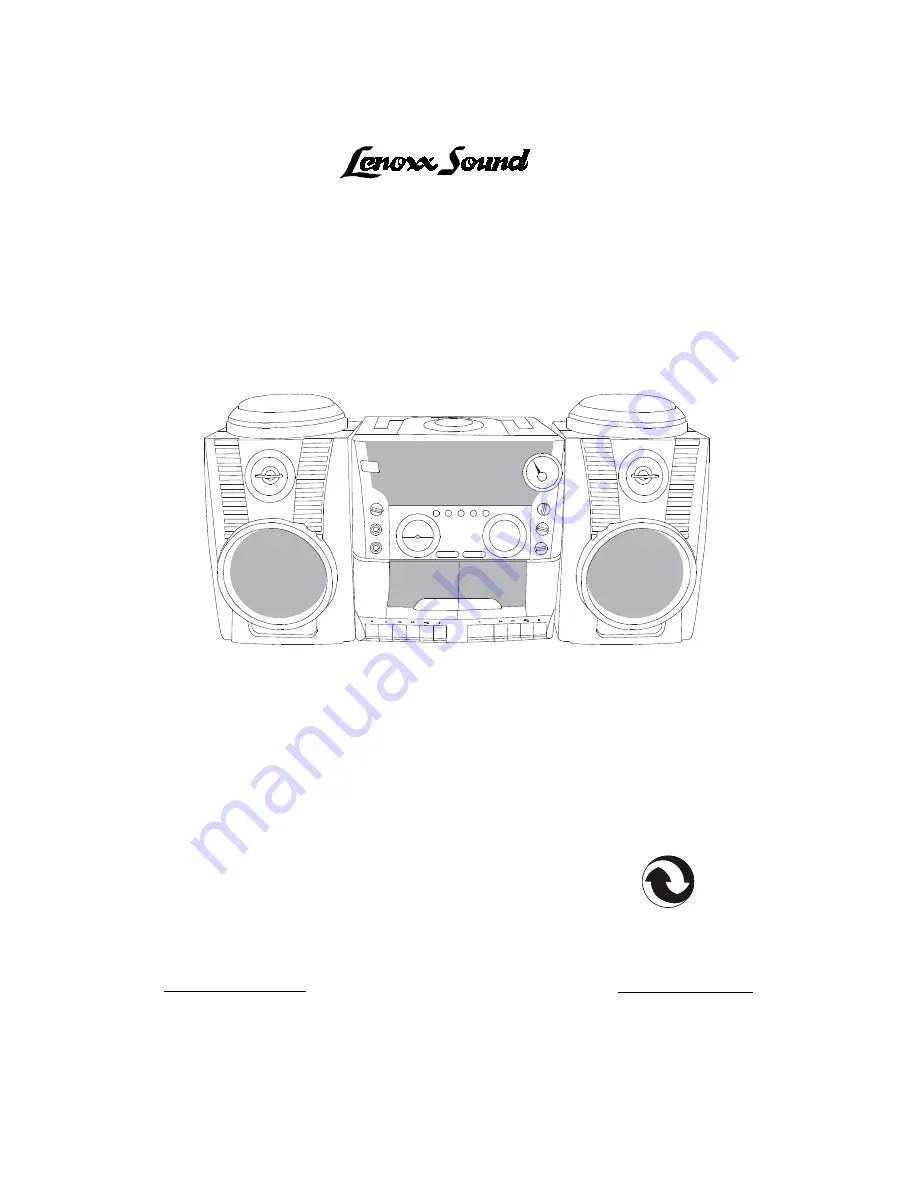
COMPACT DISC PLAYER

MW/FM DUAL CASSETTE RECORDER

WITH REMOTE CONTROL

MODEL CD-511

•

INCLUDES FULL FEATURE REMOTE CONTROL

•

MULTI-COLOURED FLUORESCENT DISPLAY

•

PLAYS MUSIC COMPACT DISCS

•

SING ALONG WITH KARAOKE

•

FULLY PROGRAMMABLE CD PLAYER WITH REPEAT PLAY
FUNCTION

•

RECEIVES MW/FM STEREO BROADCASTS

•

ROTARY BASS & TREBLE CONTROLS

•

RECORDS FROM CD, TAPE OR RADIO

•

2 WAY POWER - AC/DC

•

REQUIRES 8 X LR20 (SIZE “ D ”) BATTERIES 

(NO INCLUDED)

OPERATING INSTRUCTIONS

PLEASE READ CAREFULLY BEFORE USE

Imported and distributed by Worldwide Retail Sourcing (UK) Limited

491 Holloway Road London N19 4DD

email address: [email protected]

®

Summary of Contents for CD-511

Page 1: ...WITH KARAOKE FULLY PROGRAMMABLE CD PLAYER WITH REPEAT PLAY FUNCTION RECEIVES MW FM STEREO BROADCASTS ROTARY BASS TREBLE CONTROLS RECORDS FROM CD TAPE OR RADIO 2 WAY POWER AC DC REQUIRES 8 X LR20 SIZE D BATTERIES NO INCLUDED OPERATING INSTRUCTIONS PLEASE READ CAREFULLY BEFORE USE Imported and distributed by Worldwide Retail Sourcing UK Limited 491 Holloway Road London N19 4DD email address WWRetail...

Page 2: ... symbol within a triangle is a warning sign alerting the user of dangerous voltage inside the player To reduce the risk of electric shocks do not remove the cover No user serviceable parts inside the player Refer all servicing to qualified personnel This player operates on 12V and PSU 240V If it is not to be used for a long time the AC power cord should be unplugged The player must not be exposed ...

Page 3: ...es should be replaced at the same time Mixing old and new batteries could increase internal cell pressure and damage the batteries 7 When inserting batteries into this product the correct polarity or or direction must be observed 8 Remove the batteries from the product if it is not to be used for a long period of time several weeks or more 9 Remove old or flat batteries as soon as possible as they...

Page 4: ...lights up when using AC power L O W E R U P P E R 1 Connecting the AC power cord If the CD does not play on batteries this means the batteries are almost used up But the radio may continue to play on these weak batteries because it uses less power than the CD player Insert one end of the supplied AC power cord located in the polyfoam into the socket located at the back of the player and the other ...

Page 5: ...1 to 3 above for the left side 5 Carefully unwind the speaker wire from behind each speaker and insert the right plug into Speaker Jack R and the left plug into Speaker Jack L as shown in FIG 3 Wrap the remaining wire behind each speaker FIG 1 FIG 2 FIG 3 NOTE This player can be used with the speakers either attached to the main unit or standing alone so long as both speaker plugs are plugged into...

Page 6: ...be used for a long time 2 months or more the batteries should be removed to avoid possible damage that may be caused by battery leakage Avoid keeping the remote control in extremely hot or humid locations The remote control will operate at a distance of between about 0 2m 8 inches and 6m 20 feet from the remote sensor 1 POWER ON OFF 2 MUTE 3 REPEAT ONE ALL SONGS 4 PROGRAMME 5 VOLUME UP DOWN 6 SKIP...

Page 7: ...ower cord or batteries see page 3 3 Slide the FUNCTION switch to the CD position Two dashes will appear on the VFD display 2 Close the CD DOOR by pushing it down The display will show the total number of tracks songs on that CD 5 Press the CD PLAY button The player will play all the songs tracks once in order TIP WILL APPEAR IN THE DISPLAY IF THERE IS NO DISC IN THE CD COMPARTMENT OR IF THE DISC I...

Page 8: ...OP first VOLUME CONTROL FUNCTION SWITCH Turn off the player Press the POWER button and the display will go off To resume play press the PAUSE button again will stop flashing and the CD will play 7 If the player or the table it is sitting on is knocked while a CD is playing the CD will stop or skip for a few seconds This is normal for this type of player TIP FORWARD BACKWARD STOP PLAY PAUSE This se...

Page 9: ...no REPEAT button on the main unit Press the REPEAT button twice programmed tracks Press the REPEAT button twice while programmed tracks are being played FUNCTION SWITCH Display shows To cancel Repeat Play Press the REPEAT button until REP goes off 8 POWER BUTTON REPEAT 2 Set the FUNCTION switch to the CD position 3 Select the track by pressing or and then press 4 Press the CD REPEAT button on the ...

Page 10: ...s the SKIP SEARCH buttons or until the desired track shows in the display Press the PROGRAMME button and PRG will flash in the display Repeat steps 2 and 3 until all the desired tracks are programmed Press the PLAY button to start programmed play PRG and the track number being played will show in the display To change the current programme Simply create a new programme by following the programing ...

Page 11: ...er band position MW or FM and the FM MODE switch to STEREO or MONO Tune into the station of your choice using the TUNING control Adjust for the clearest sound 4 FM ST will appear in the VFD display when receiving FM Stereo broadcasts 10 4 Press the POWER button for the VFD display and the AUDIO LEVEL to come on 5 6 To change the tone adjust the BASS and TREBLE controls as desired 6 MW FM PROG 3 ...

Page 12: ...from STEREO to MONO Turn off the Radio Set the FUNCTION switch to the TAPE position or press the POWER button To improve broadcast reception Change position of the antenna for FM or FM Stereo Move the player itself for MW VOLUME 11 FM MODE FUNCTION This player has an electronic volume control The volume can be raised or lowered by pressing the VOLUME UP or DOWN button PROG PROG PROG ...

Page 13: ... 4 2 2 3 Press the PLAY button The player will come on and start playing the tape PLAY Set the FUNCTION switch to the TAPE position 1 4 When the player comes to the end of one side of the tape it will stop To listen to the other side of the tape turn the tape over insert and press PLAY AUTO STOP STOP EJECT 12 1 Press the POWER button for the VFD display to come on 5 A EMPTY REEL INSERT THIS WAY FU...

Page 14: ...eries see page 3 To play tapes in DECK A and then DECK B follow the steps below Press the cassette PLAY button on DECK B When DECK A finishes playing DECK B will automatically start playing When the player reaches the end of the tape in DECK B it will stop 2 Set the FUNCTION switch to the TAPE position 1 Press the POWER button for the VFD display and AUDIO LEVEL to come on 5 PLAY PAUSE PLAY 4 6 13...

Page 15: ... Pause playback PAUSE button Press again to resume play STOP EJECT button VOLUME CONTROL PAUSE STOP EJECT FAST F REWIND PLAY To enjoy music without disturbing others headphones are not included Insert your headphone plug into the HEADPHONE jack at the front of the player 14 To turn the power off Make sure none of the cassette buttons are down on and the POWER button is off STOP EJECT FAST F REWIND...

Page 16: ...ition and tune into the desired station see page 10 To record from the microphone set the FUNCTION switch to the TAPE position and plug the microphone not included into the MICROPHONE JACK Speak into the microphone To listen to what you have recorded set the FUNCTION switch to the TAPE position press REWIND and then PLAY 5 REWIND PLAY 15 To record from DECK A set the FUNCTION switch to the TAPE po...

Page 17: ...ECT button PAUSE button Press the button again to resume recording Pause recording For best recording effect use AC power instead of batteries To erase a recording simply start a new recording and the old one will auto matically be erased PAUSE STOP EJECT 16 DUBBING SPEED switch from NORMAL to HIGH speed Adjust recording speed when copying tapes See page 20 for notes on cassettes PROG DOUBLE SPEED...

Page 18: ... the steps for playing a CD see page 6 To sing along with a tape set the FUNCTION switch to the TAPE position insert a KARAOKE TAPE into Deck A or B and follow the steps for playing a TAPE see page 12 Press the CD PLAY PAUSE button on the CD player or the PLAY button on Deck A or B Adjust the volume controls both the VOLUME control on the player and the MICROPHONE VOLUME control to achieve the bes...

Page 19: ...C volume MIC VOLUME VOLUME control VOLUME CONTROL 18 Adjust the sound effect for low or high tones TIP If any squealing or howling feedback occurs during KARAOKE use move the microphone away from the speakers or turn down the volume Adjust the CD or TAPE volume BASS or TREBLE control BASS TREBLE MIC VOLUME ...

Page 20: ...mechanical shocks Do not place anything within one inch of the back of the cabinet The ventilation holes must not be covered for the player to operate properly and to prolong the life of its components Powerful magnets are used in the speakers so personal credit cards using magnetic coding and spring wound watches should be kept away from the player to prevent possible damage from the magnets The ...

Page 21: ...cording Do not expose CDs to direct sunlight or heat sources such as hot air ducts or leave them in a car parked in direct sunlight as the temperature inside the car could get extremely hot and cause damage to the CDs After playing CDs should be stored in their cases If there is a scratch dirt or fingerprints on the CD tracking errors or skipping may occur Use of a cassette with more than 90 minut...

Page 22: ...aned are completely dry before inserting a tape Cleaning the Cabinet Clean the cabinet panel and controls with a soft cloth slightly moistened with a mild detergent solution Do not use any type of abrasive pad scouring powder or solvent such as alcohol or benzene RECORD PLAY BACK HEAD PINCH ROLLER CAPSTAN COTTON SWAB ERASE HEAD 21 Storage Cassette Tapes 1 Never place tapes near a magnetic field su...

Page 23: ...s in place see page 20 Make sure the FUNCTION switch is in the TAPE position The tape does not erase completely Clean the erasing head see page 21 Replace all the batteries with new ones if they are low The tape does not record Make sure the tape is inserted correctly Make sure the safety tab on the cassette is in place Sound is weak or sound quality is poor Clean the heads pinch roller and capsta...

Page 24: ...ayers Laser wavelength 760 800 NM Tracking method 3 spot error detection 3 86 mm lens Tape Recorder Section Frequency response Standard normal bias cassette tapes 70Hz 10kHz Radio Section Tuning range FM 88 108 MHz MW 530 1600 kHz LENOXX reserves the right to make design and specification changes for product improvement PROTECT YOUR FINE FURNITURE WE RECOMMEND A CLOTH OR OTHER PROTECTIVE MATERIAL ...

Reviews: