


Reviews:
No comments
Related manuals for CookingMe

90312
Brand: Beper Pages: 36

KM-104749
Brand: Waves Pages: 20
Signal Processing Engineering Educational Device NI...
Brand: National Instruments Pages: 45

8606108251621
Brand: VOX electronics Pages: 76
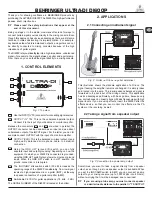
ULTRA-DI DI600P
Brand: Behringer Pages: 2

70160
Brand: Hamilton Beach Pages: 11

11105040
Brand: D.A.S. Pages: 32

BFP-2800MT
Brand: Elechomes Pages: 14

HELIX DSP MINI
Brand: Audiotec Fischer Pages: 24

70825-TW
Brand: Hamilton Beach Professional Pages: 48

FP417
Brand: Magiccos Pages: 2

840083100
Brand: Hamilton Beach Pages: 11

USP 405
Brand: Extron electronics Pages: 64

7400
Brand: ARDES Pages: 24
MultiDrive basic
Brand: IKA Pages: 15

TK361
Brand: Telefunken Pages: 34

PS1000B
Brand: Black+Decker Pages: 8

FPD1000
Brand: Ambiano Pages: 2


