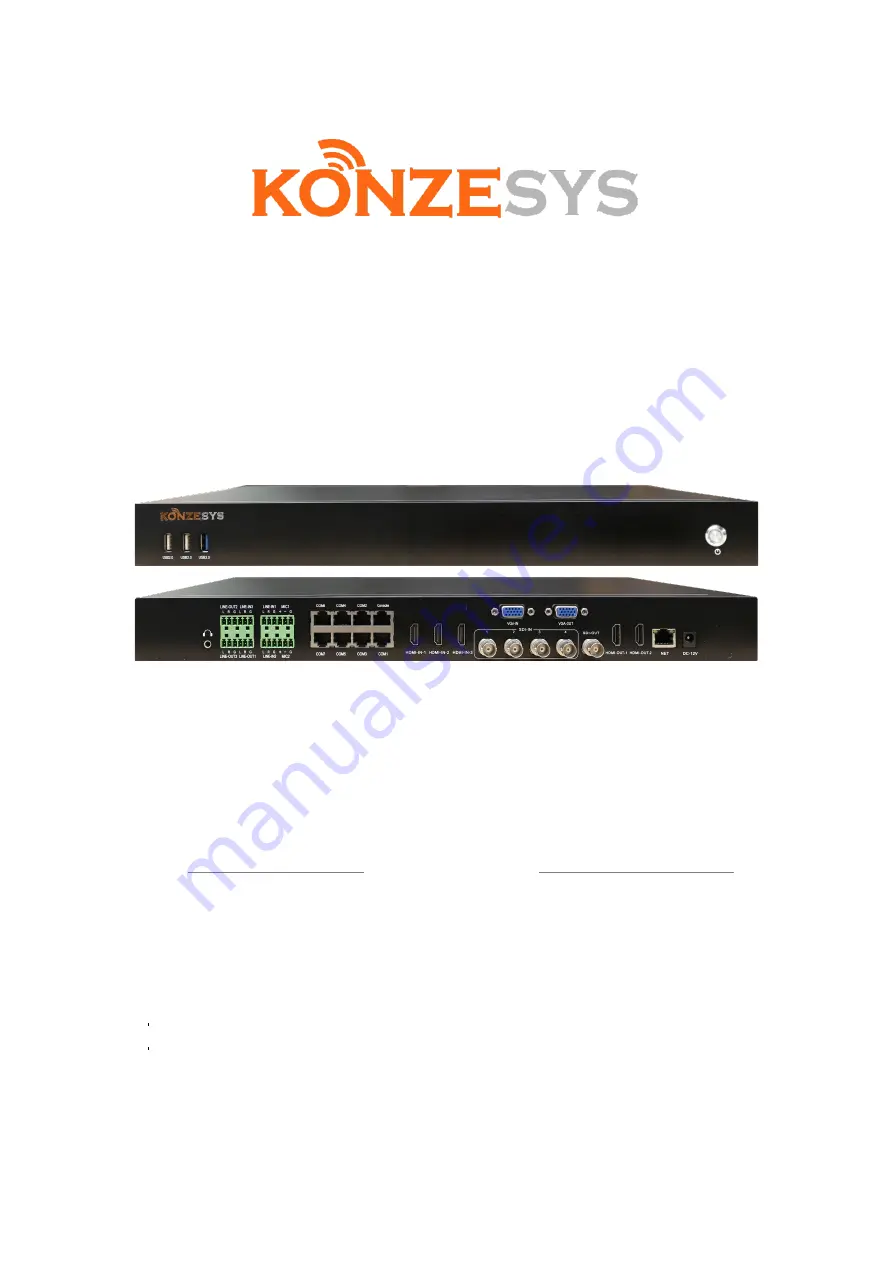
background image


KZ-NP6000 PLUS 

HD Broadcasting and Recording System 

User Manual 


Ver. 2021-V2 


(Taiwan)    http://www.konzesys.com


Konzes System Technology Co., Ltd. 

4F., No.134, Ln. 235, Baoqiao Rd., Xindian Dist., New 
Taipei City 231, Taiwan (R.O.C.) 
Tel : +886-2-89121234 
Fax: +886-2-89121099 

(China)   http://www.konzesys.com.cn 
Guangzhou Konze Electronic Technology Co., Ltd. 

7/F, Building B, Dehui Business Building, No.12, 
Meigui Road, Xinhua Street, Huadu District, 
Guangzhou, 510800 
Tel : +86-20-86031368/98 
Fax: +86-20-86031368 ext: 827 


Summary of Contents for KZ-NP6000 PLUS

Page 1: ... 4F No 134 Ln 235 Baoqiao Rd Xindian Dist New Taipei City 231 Taiwan R O C Tel 886 2 89121234 Fax 886 2 89121099 China http www konzesys com cn Guangzhou Konze Electronic Technology Co Ltd 7 F Building B Dehui Business Building No 12 Meigui Road Xinhua Street Huadu District Guangzhou 510800 Tel 86 20 86031368 98 Fax 86 20 86031368 ext 827 ...

Page 2: ...6 3 2 1 Channel Settings 17 6 3 2 2 PTZ Settings 18 6 3 2 3 Picture 20 6 3 2 4 Encode 21 6 4 PTZ CONTROL 22 6 4 1 PTZ Control 22 6 4 2 Meeting Control Distanced Interaction 23 6 5 DIRECTOR 24 6 5 1 Segmentation Transform 25 6 5 2 Subtitles Sound 26 6 5 3 Corner OSD Info Time Add OSD 27 6 5 4 Status 29 6 5 5 Titles Endings 30 6 5 6 Manual Director Auto Director 31 6 5 6 1 Manual Director 31 6 5 6 2...

Page 3: ... 50 6 6 1 2 3 1 RTMP 50 6 6 1 2 3 2 TS 51 6 6 1 2 4 Manage Platform 52 6 6 1 2 5 User and Login 53 6 6 1 2 6 Date and Time 54 6 6 1 2 7 Disk and Storage 55 6 6 1 2 8 Net and Service 55 6 6 1 2 9 Engineer 57 6 6 1 2 10 Install Debug 58 6 6 1 3 Maintenance 60 6 6 1 3 1 Safe Shut 60 6 6 1 3 2 Reboot 60 6 6 1 3 3 Reset to Default 61 6 6 1 3 4 Timing Reboot 61 6 6 1 3 5 Import Export 61 6 6 1 3 6 Syste...

Page 4: ...A 1024 768 60HZ 1920 1080 60HZ 960 540 1024 576 1024 768 1280 720 1280 960 1600 900 1600 1200 1920 1080 3G HD SD SDI 720x576 PAL 720x480 NTSC 720P 50 60 1080P 25 1080P 60 Audio Inputs MIC IN x2 LINE IN x3 Outputs 3 5mm Monitor x1 Stereo Line Out x3 Audio Coding AAC Recording Audio and Video Recording Synchronization Image Processing and Storage Video Output Format MP4 Video Coding Frame Rate 1 30f...

Page 5: ...een in Single Stream Multi Screen in Multi Stream Resource Mode and Movie Mode at the same time While in movie director resource mode will be working in background Software upgrade Internet Upgrade Supported Upgraded by RS232 Storage Embedded HD Extended USB Drive USB video export SAMBA Share Download FTP Video Download Live Broadcasting Protocol Standard RTMP Protocol RTSP Real time Protocol RTP ...

Page 6: ...OLE X 1 B RS232 X 8 C RS485 X 7 8 AUDIO IN OUT A AUDIO IN a LINE IN X 3 b MIC IN X 2 B AUDIO OUT a LINE OUT X 3 9 AUDIO OUT for monitoring 10 VGA IN Alternative port with HDMI IN 1 11 VGA OUT the same output with HDMI OUT 1 12 POWER ON OFF 13 USB PORTS A USB 2 0 X 2 For keyboard mouse and USB Drives B USB 3 0 X1 For the power supply to director control station ...

Page 7: ...KZ NP6000 PLUS User Manual 7 COM PORTS CONFIGURATION ...

Page 8: ...8 3 Connections ...

Page 9: ...9 4 Structure ...

Page 10: ...es All cables including SDI Audio VGA DVI LAN IO RS485 control power and USB mouse should be connected to KZ NP6000 PLUS Make sure power supply is correctly connected and press the Power button to turn on KZ NP6000 PLUS Please wait for 30 seconds and enter the director interface Then you will be able to operate the whole system Note A The VGA output refers to system interface of director users can...

Page 11: ...KZ NP6000 PLUS User Manual 11 6 Functionalities and Operation System Structure ...

Page 12: ...phic should not above 128KB Graphic of the system interface should be in GIF format and at 200 100 pixels resolution Please note that the graphic of the interface should be at 72 DPI While customizing the graphics the file names should not content Chinese or symbols 6 1 2 Main Interface It will take around 20 seconds to start up KZ NP6000 PLUS Plus and then you will be able to enter Main Interface...

Page 13: ...rmat These two modes support layer superimposition functionalities PIP conversation mode 2 3 4 6 displays and so on There are PGM Live streaming video and PVW Stream Preview channels There are PGM and PGM2 channels in Res Mode B When in Auto Director module both Single and Res modes only support PGM image auto switching When the Res Mode is in Manual Director mode manual display switch is supporte...

Page 14: ...e audio output E In PG and PGM2 Channels users can click the hot keys to execute following actions TS Streaming RTMP Streaming Start Local Recording Paulse Local Recording Stop Local Recording Note The server IP or TS broadcasting IP should be set up first in Recording Settings unit before proceed live streaming F The video image of PGM can be replaced by the video image of PVW by clicking PVW are...

Page 15: ...annel The following chart refers to the default inputs identifications SDI 1 Lecturer Close Up HDMI 1 Blackboard Writing Close Up SDI 2 Lecturer Panorama HDMI 2 PC Desktop Image Video Input SDI 3 Student Panorama HDMI 3 PC Desktop Image Video Input SDI 4 Student Close Up Despite of 7 occupied inputs each KZ NP6000 PLUS can be connected to another 11 distanced video and audio sources The distanced ...

Page 16: ...se Up Each Channel title is editable however we suggest not to change these titles in case of confusion Note When in Live broadcasting or recording status the certain PGM channel will be shown in RED If in preview status the certain PVW channel will be shown in GREEN C PTZ Control If the connected camera is a PTZ camera then click button at the top of the certain channel to activate PTZ control Th...

Page 17: ...ck to stop playing the video clip Local playback sources can be switched to PGM Live broadcasting channel E Audio Control Click button at the top of each channel to turn on off the audio Local and distanced audio sources are both supported 6 3 2 Channel Configurations There is a button at the up right of each channel which is for channel configurations including Channel Settings PTZ Settings Image...

Page 18: ...n be edited in this section E Source There will be AUTO HDMI and VGA sources to be selected in DVI I settings 6 3 2 2 PTZ Settings A Enable PTZ To activate PTZ by checking the box B Protocol VISCA PELCO P and PELCO D protocols are supported C COM RS48 and RS232 are supported D Baud Rate 2400 4800 and 9600 are supported for different PTZ cameras E Address Code The address code should be the same as...

Page 19: ...ear object d Iris and indicate to transfer Large and Small aperture Note The control line from the camera to KZ NP6000 Plus or the tracking host to the recording host must be correspondent and cannot be misconnected The PTZ protocol baud rate and address code in the channel need to be set to correspond to the settings of the camera to perform the PTZ operations It must be in the manual mode to per...

Page 20: ...000 PLUS User Manual 20 normally 6 3 2 3 Picture As shown the above this section is to configure Brightness Contract Chroma and Saturation of the video quality Normally there is no needs to do these settings ...

Page 21: ...to proceed recording B Encode Method H 264 is the main format C Rate Control the default is CBR Normally there is no need to change D Rate The code rate is adjustable from 50Kbps to 40Mbps the default code rate of the main stream is 4000Kbps and the sub stream is 400Kbps E Quality from 0 to 5 levels 0 indicates the best quality F FPS from 10 to 60 adjustable the default is 25 G GOP The Intervals o...

Page 22: ...o focus on distanced and near object Iris and indicate to transfer Large and Small aperture To set up the presets from 1 to 8 presets also including Big Close Up Close Up Vista Medium Shot Close Shot and so on 11 Big Close Up 14 Medium Shot 12 Close Up 15 Vista 13 Close Shot After done these settings users can click these buttons to switch Big Close Up 11 Close Up 12 Close Shot 13 Medium Shot 14 a...

Page 23: ...lecturer classroom by adding a new distanced device KZ NP6000 PLUS to proceed synchronous learning meeting As shown above when more than 2 KZ NP6000 PLUS systems are in the same intranet network the left side will display all devices automatically when clicking Add button Also users can manually add devices from Internet However the IP address of the devices in Internet should be mirrored by route...

Page 24: ...ed the second page of input channels As shown above users can adjust the volume of the selected distanced inputs In distanced input channels the audio signals in PGM or PGM2 can be played to local speakers 6 5 Director There are 8 parts of Director mode A Segmentation Transform B Subtitle Sound C Corner OSD Info Time D State E Insert Titles Endings F Full Auto Semi Auto Manual G Movie Res Mode Mov...

Page 25: ... Quick Start should be the recording of PGM and PGM 2 If the layouts of these 2 channels are multiple displays then the format of recorded videos will be one stream with multiple layouts Transform This is the settings of special effects of layout switch There are A Wipe B Cover C Push D other Stretch Dissolve PiP Layout switch can be in 4 directions and 4 diagonals to proceed the layout switch Spe...

Page 26: ...btitles can be inserted to PGM the live broadcasting channel After inserted subtitles the button will be changed into Cancel Users can click PGM Cancel or PVW Cancel to hide subtitles Only one row of subtitle is allowed and the following subtitles will replace the former ones B Sound The volume of PGM streaming PGM recording and PGM2 streaming and PGM2 recording can be adjusted in this section It ...

Page 27: ...orner logos are 8 Here below is the chart of positions NO Position NO Position 1 Up Left 3 Down Left 2 Up Right 4 Down Right The positions of No 5 No 8 are the same as the above However users can configure each position by clicking button Also the graphic can be replaced by users The best solution of the corner logo is 200 100 pixels in PNG format ...

Page 28: ...D will be shown up at the down right corner Like the settings of corner logo users can configure Uppercase Color of the letters and Background color of the OSD by clicking button C Time Add OSD Users can insert Time in PGM and PVW Channels Movie Mode and PGM PVW and PGM2 Res Mode However if users want to insert more information to channels just edit in Add OSD section ...

Page 29: ...mode 2 Movie Mode 2 refers to PGM2 channel in Res Mode When Movie Mode is in broadcasting and recording status then there will be shown LIVE and REC in RED color The display of Movie Mode 2 is the same as Movie mode Users can do the quick settings by clicking button at the up right corner in this unit ...

Page 30: ...be the recorded files or from USB drive or extended HDD Save the path by clicking OK button After clicking Insert the title will be shown up before the live broadcasting While the broadcasting is about to end just click Insert button to insert the trailer and then the video clip will be shown up at the end of the live broadcasting ...

Page 31: ...Note The commend codes of auto tracking cameras or tracking systems are identical with commends of KZ NP6000 PLUS Users can modify the commend codes of auto tracking in Recording Auto Tracking Lecturer or Student Close Up 6 5 6 2 Semi Auto In this mode the auto tracking functionality is activated but not switch automatically Users have to switch the layout or image manually 6 5 6 3 Full Auto This ...

Page 32: ...roadcasting channel in Movie Mode is PGM but can be changed to PGM2 via PVW to proceed the switch B Res Mode There are PGM and PGM 2 channels in this mode When in Manual Director users can output different director image to HD monitor There is no PVW Preview in Res Mode All layout switch will be in manual control C If the layout is included PGM and PGM2 channels then the recording will be single f...

Page 33: ...dio signals during the real time interactions However there is no need to have teachers or assistants in the student room The basic operation process is as follows 1 Click the button to activate real time interaction This function can be triggered automatically or manually 2 Click Meeting Control button of the lecture room to connect the main system of the students room 3 After the two classrooms ...

Page 34: ...udents rooms can share video image and audio signals to others 6 5 10 Quick Start This is a hot key to proceed one click start functionality after all desired settings have been set up such as Movie mode recording and Live broadcasting Movie mode 2 recording and Live broadcasting Auto Director Resources Mode Recording ...

Page 35: ...onalities There are 3 major units in this part A Simple Interface NO FUNCTION under testing B System Configurations C File Management 6 6 1 System Configurations There are 5 sections in this unit A Channel B Setting C Maintenance D File E Teach Info ...

Page 36: ...KZ NP6000 PLUS User Manual 36 6 6 1 1 Channel A Local to configure the input image from SDI DVI and HDMI cables There are 7 inputs can be configured in this unit ...

Page 37: ...te Channel Connect remote recording host and cameras in RTSP streaming protocol C File channel To configure the playback file in C8 Channel MP4 files in H 26 compression format only Looping supported D PGM PGM to configure the main stream ...

Page 38: ...dow Sequence to adjust the sequency of input channels 6 6 1 2 Settings There are 10 sections in this part A Record and Broadcast B Broadcast C Live Setting D Management Platform E User and Login F Date and Time G Disk and Storage H Net and Services I Engineer J Install Debug ...

Page 39: ...KZ NP6000 PLUS User Manual 39 6 6 1 2 1 Record and Broadcast There are 4 sections in this unit A Audio Codec B Timer Record C Video Strategy D FTP upload E One Click Start ...

Page 40: ...rs can configure A Sound Stereo or Mono B SampRate sample Rate from 8K to 48K C SampBit select Sample Bit in 8 16 32 D Rate audio rate from 8000 to 420000Kbps 6 6 1 2 1 2 Timer Recording Timer recording function is for scheduling the automatic recording of NP6000 Plus There ...

Page 41: ...PGM will be recorded the time of split and the format of the recorded file KZ NP6000 Plus supports movie mode and resource mode recordings at the same time Maximum 9 channels can be recorded 2 movie channels PGM and PGM2 and 7 resource channels In configuration of movie mode PGM PGM2 and RES Resources can be set up as automatic recording while the power is on Video clip can be divided into several...

Page 42: ...you want to record In the settings of Quick Start section select resource channel to record Then the selected resource channels can be recorded when click button in the main interface 6 6 1 2 1 4 FTP Upload To set up the path of FTP in order to transmit the video clips to the FTP server ...

Page 43: ...tart To select which function can be activated when click on the main interface 6 6 1 2 2 Broadcast There are 5 sections in this unit to configure settings regarding to video broadcasting 1 Title 2 Logo 3 Prologue Epilogue 4 Subtitles 5 Advanced Strategy ...

Page 44: ...44 6 6 1 2 2 1 Title To configure On Screen Display OSD settings and the Template ...

Page 45: ... clip or change the logo if necessary A Select the channel B Select one position of the logo should be shown C Click to insert the logo D Click OK to confirm or Cancel to abort 6 6 1 2 2 3 Prologue Epilogue Users can insert short videos as brief introductions and endings in this section Just copy the ...

Page 46: ... be inserted automatically C When finishing recording click Quick Start again to insert epilogue Note The format of prologue and epilogue is MP4 H 264 encoding AAC audio encoding dual stereo and sampling rate is 44 1KB and the resolution of the video should be less than 1920 1080 6 6 1 2 2 4 Subtitles KZ NP6000 supports real time subtitles insertion There are 13 lines maximum to insert Only one li...

Page 47: ... 47 Insert subtitles A Click to add a blank subtitle B Click the blank subtitle C Click the column and input messages by virtual keyboard D Click Modify to finish the subtitle E Click OK to confirm and finish subtitles insertion ...

Page 48: ...up parameters of subtitles including font size and color length and width of subtitles background color and the time of display etc 6 6 1 2 2 5 Autorack Strategy This is for advanced settings of Auto Tracking functionalities Click to enter advanced strategy ...

Page 49: ...KZ NP6000 PLUS User Manual 49 In this section there are 2 units Strategy Editing Strategy Information ...

Page 50: ...ng 6 6 1 2 3 1 RTMP Users can configure the live streaming of PGM and PGM 2 A To determine whether live streaming is activated or not B The default is live However users can change the activation status by clicking Record or Append C To Activate mainstream sub stream or both streams when live broadcasting is activated ...

Page 51: ...streaming can be view by VLC PLAYER ONLY UDP Protocol When selecting UDP streaming protocol users can view the live streaming by typing rtp 239 0 0 2 streaming port number in VLC Player Note A In this streaming protocol NP6000 Plus should be connected to the Intranet B The common path of UDP streaming should be 239 0 0 2 C The maximum viewers are 253 users viewing UDP streaming at the same time ...

Page 52: ... type tcp IP address of NP6000 Plus Streaming port number in VLC Player Note In this type of streaming user s laptop should be directly connected to NP6000 Plus 6 6 1 2 4 Manage Platform To input the IP Address access port ID and password to deliver video source to a certain platform ...

Page 53: ...KZ NP6000 PLUS User Manual 53 6 6 1 2 5 User and Login There are 2 units of this section User Manage To modify add and delete access ID ...

Page 54: ...US User Manual 54 Login Option To determine which ID can be automatically logged into this system Normally administration ID will be the default 6 6 1 2 6 Date and Time To set up the date and time of KZ NP6000 Plus ...

Page 55: ...User Manual 55 6 6 1 2 7 Disk and Storage To define the way to record video clips and view the detailed information of embedded hard drive in KZ NP6000 Plus 6 6 1 2 8 Net and Service To configure the network services ...

Page 56: ...KZ NP6000 PLUS User Manual 56 Ethernet To define which method that KZ NP6000 Plus connected to internet or intranet Network To proceed network testing to see if KZ NP6000 Plus is connected to a network ...

Page 57: ... NP6000 Plus is allowed to activate such as Telnet HTTP or FTP 6 6 1 2 9 Engineer To log into the root ID to get the full access of KZ NP6000 Plus NOTE This is mainly for RD personnel to maintain KZ NP6000 Plus Normally the end users do not have to log into the main system ...

Page 58: ...lfunction or controlling issues of KZ NP6000 Plus Track Machine To set up the parameters of the connected tracking system If there is a tracking system connected to KZ NP6000 Plus then it is necessary to configure all details here If not then it will be fine to ignore this unit ...

Page 59: ...rol codes to KZ NP6000 Plus The third party controllers can be integrated with KZ NP6000 Plus through this section Director Keyboard If there is a camera controller or joystick connected to KZ NP6000 Plus then it is necessary to define which way to control the camera ...

Page 60: ... the camera and KZ NP6000 Plus 6 6 1 3 Maintenance There are 6 units in this section Safe Shut Reboot Reset to Default Timing Reboot Import Export and System Info 6 6 1 3 1 Safe Shut To shut down KZ NP6000 Plus in safety mode 6 6 1 3 2 Reboot To reboot KZ NP6000 Plus in normal procedure ...

Page 61: ...l version of firmware 6 6 1 3 4 Timing Reboot To reboot KZ NP6000 Plus after a period of time 6 6 1 3 5 Import Export To import or export system configurations of KZ NP6000 Plus 6 6 1 3 6 System Info 6 6 1 4 File To manage the files in KZ NP6000 Plus such as add copy and delete files in this unit ...

Page 62: ...KZ NP6000 PLUS User Manual 62 6 6 1 5 Teach Info To input or modify the information of the current teaching activity ...

Page 63: ...KZ NP6000 PLUS User Manual 63 6 7 File Management Users can search delete copy paste rename files in this unit ...

Page 64: ...ode the VGA input cannot be switch automatically Please check whether DHCP in System Configurations Network Configuration NET2 is enabled or not If DHCP is enabled the IP address will be changed randomly which will cause such a situation So please set up the IP addresses of KZ NP6000 PLUS and the computer to be in the same network Please make sure the auto switch software is well running or not Th...

Page 65: ...aded in Disk Management section or the videos cannot be played normally Examine the media player is supported H 264 encoding and decoding Media Player supported H 264 VLC STORM and so on 7 9 There is no response after pressing START RECODING or Quick Start button Examine the connection of Central Control system and KZ NP6000 PLUS is well connected Examine the settings of the serial ports and the c...

Page 66: ...modification or failure to follow instructions included with the Product b misapplication of service by someone other than the manufacturer s representative c any shipment damages such claims must be made with the carrier or d any other causes that do not relate to a Product defect The Warranty Period of any repaired or replaced Product shall be the longer of a the original Warranty Period or b th...

Page 67: ...ted warranty or the use or performance of any product whether based on contract or tort including negligence or any other legal theory even if KONZESYS has advised of the possibility of such damages KONZESYS s total aggregate liability for damages of any nature regardless of form of action shall in no event exceed the amount paid by you to KONZESYS for the specific product upon which liability is ...

Reviews: