1
Gitcon Model G-152
Installation Guide
for Swing & Roll-Up Doors
G-152 Parts
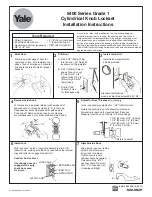
1. Lock Body Gasket
2. Lock Body mounting bolts and washers
3. Lock Body with cable
4. Input Unit mounting bolts and washers
5. Input Unit
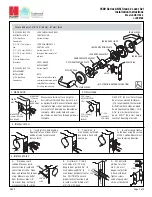
6. Handle (6a. Roll-Up or 6b. Swing)
7. Handle Mounting Hardware (Not shown in photo)
8. Back Plate (8a. Vertical or 8b. Horizontal)
9. Cable Routing Plate (9a. Vertical or 9b. Horizontal)
10. Test card (not shown).
Document Number 607.106 Rev. B - 4/08
Fig. 1 - Lock Body & Input Unit Parts
Fig. 2 - Vertical and Horizontal Plates
Fig. 3 - Roll-Up Handle & Swing Handle
1
2
3
4
5
8a
9a
9b
8b
6a
6b