background image


INSTRUCTION MANUAL


11 Ft x 11 Ft Pop Up Canopy with Netting 


After Sale Service: [email protected] 

WhatsApp: +86 18801006086
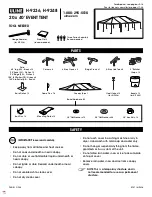
Summary of Contents for 11 Ft x 11 Ft Pop Up Canopy with Netting

Page 1: ...INSTRUCTIONMANUAL 11 Ft x 11 Ft Pop Up Canopy with Netting After Sale Service service joysidefurniture com WhatsApp 86 18801006086...

Page 2: ...his 6 months Limited Warranty All replacement products or parts will assume the remaining warranty of the original product This warranty gives youspecific legalrights Youmay alsohave other rights whic...

Page 3: ...CLUDES Part List A CanopyFrame 1pc B EaveExtender 4pcs C Small Top 1pc D BigTop 1pc E MosquitoNetting 1pc F CarryBag 1pc Hardware AA Stake 8pcs BB BigStake 4pcs CC Rope 4pcs DD Netting Rope 2pcs EE Ri...

Page 4: ...extender B into the fittings at eachcorner of the frame A They will click into place Unfold the large canopy top D and place it over the open frame Align the corner pockets with the frame corners Pul...

Page 5: ...will need C Placethesmallcanopytopoverthecentralhuboftheframe Secureeachofthefourcorners of the solid fabric onto hooks of the central frame as shown With the help of another person pull the frame out...

Page 6: ...Click Click Raiseandlockyourcanopyframebypushingthecornersliderupuntileachonelocksintoplace Your canopyheightisadjusted bypushing thecircular push pin in to unlock thelegs Pull orpush on the bottom le...

Page 7: ...You will need 2X Securetheendsoftheropestoadjacentcornersoftheframeaboveeachlegbytyingaknot Reinforcetheropesoneachsidebysecuringthemwiththeincludedvelcrostraps Finishattachingthelargecanopyinsidethec...

Page 8: ...rings and loop them through the sewn in loops on the top edge of the mosquito netting Securethe mosquito netting to theropesusing thecurtain rings Continue around the canopy until the entire mosquito...

Page 9: ...SECURE THE CANOPY IN PLACE Step 6 You will need Insert the leg skirt hook to the bottom of the canopy legs Use2pcsstakesateachfoottosecureyourcanopydownandkeepitfrommoving 8...

Page 10: ...SECURE THE CANOPY IN PLACE Step 7 You will need Attachropes at thetopfourcorners of the canopy andsecure them intoothe ground using the big stakes for added stability 9...

Page 11: ...sh 3 Pressthepushpinoneach legandretractthelegsto theiroriginal height 4 Pushthepushbuttononeachslider to unlock the frame 5 Pushinwarduntiltheframe is fullyclosed UNLOCK 6 Removetheeaveextander ateac...

Page 12: ...6 17 18 19 Part Description 1 Central Cap 2 Top Cap 3 Slider 4 Leg Assembly 5 Plastic Foot 6 Ceiling Assembly 7 Eave Extender 8 Middle Bolt Kit 9 Side Bolt Kit 10 Eave Assembly 11 Small Top 12 Big Top...

Reviews: