Using Your New TRAX Apollyon – 10 Steps from Start to Finish
You’ve just received a big box (or boxes) with the JAMAR Apollyon and all the accessories that go with it. So right about
now you’re probably thinking, ‘Where do I start?’ Don’t worry, that’s what this guide is for. We’ll take you from unpacking
the equipment to producing reports in 10 easy steps.
Step 1 – Unpacking and Checking Your Equipment
First, let’s unpack everything and make sure you got everything you were supposed to get. With most orders there should be
a packing slip that shows the items that are part of your TRAX Apollyon kit and the quantity of each item that you should
have received. Check the contents of your box\boxes against this sheet. If anything is missing, let us know.
Step 2 – Setting up Your Computer
To download the Apollyon, you’ll use a computer running the TRAXPro software.
• If you purchased the TRAXPro software, install the software using the CD provided.
• If you already have TRAXPro, check to see that you are using the latest version and update it as necessary. The latest
version of TRAXPro can be downloaded at
www.jamartech.com/updatetraxpro.
Step 3 – Selecting an Installation Site & Layout
Now that we’ve unpacked everything and setup the computer, we’re ready to select a site for doing some data collection.
The Apollyon should not be installed:
• At an intersection.
• Near where vehicles are likely to park.
• On a curve or with the tubes at an angle to the road.
For best results, the Apollyon should be installed:
• On a stretch of road that is straight, where there are
no obstructions and traffic is free flowing.
QUICK
START
The key to success with road tubes is accuracy. Make sure that you measure your tube distances in several places. Take ex-
tra care to make sure your tubes are straight across the road and parallel with each other. As vehicles drive over your tubes,
make sure that the tubes are not moving at all. Do not be stingy with the Mastic tape – using more tape is cheaper than a
recount. For more details, a video of tube installation is available at
www.jamartech.com/tutorialdemos
.
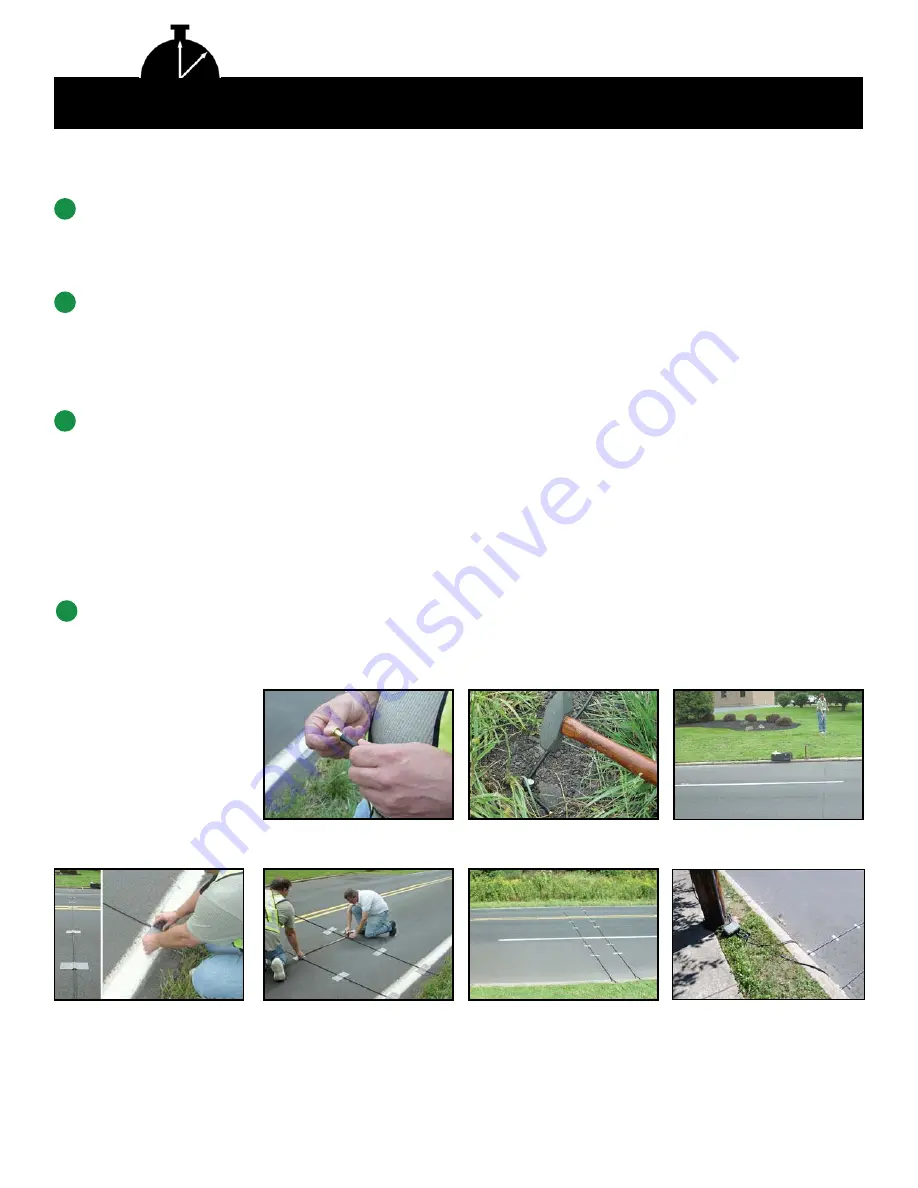
Step 4 – Installing Road Tubes
Once a site has been selected, the road tubes can be installed, as shown below. If your layout uses two equal length tubes,
make sure that each tube’s total length is within one inch of each other. If using a long tube/short tube setup, make sure
that the short tube is exactly one lane width shorter than the long tube.
Put End Plug in the end of
tube.
Secure the tube to the far
side of the road.
Pull the tube across the
road.
Tape the tube down with
mastic tape at multiple spots.
Measure proper distance* to
second tube (if used).
Which tube layout you select determines what type of data you can get. Note that layouts L5, L6, L10, L11 and L12 can
provide volume, speed, class and gap data. The remaining layouts provide only volume data.
Tape down the second tube
as you did with the first.
Connect the tubes to the
Apollyon ports.
CAUTION
Observe proper safety
precautions while in or
near the roadway.
*Note that the most common tube spacing is 2 feet (24 inches).