4.29.22 357-00061-01 Rev A © Inovonics, 2022 - www.inovonics.com
EN7380 Senior Living Gateway
Installation and Operation Manual
1 Overview
The EN7380 senior living gateway combines the functionality of an
Inovonics receiver with the flexibility of an IP appliance, enabling cloud-
based Inovonics senior living solutions to be delivered via API to your
application software.
1.1 Inovonics Contact Information
If you have any problems with this procedure, contact Inovonics technical
services:
• E-mail: [email protected].
• Phone: 1.800.782.2709, option 2.
2 Installation and Startup
1.
Review all installation instructions, as well as section 3, “Tips and
Notes” on page 2, before beginning installation to ensure you are
familiar with the process and have everything you need to install the
senior living gateway.
2.
Record the following information for future reference:
• The appropriate MAC addresses and serial number from the label on
the back of the housing.
• The eight-character alphanumeric authorization code from the label
on the lower right-hand portion of the printed circuit board, just above
the Inovonics logo.
3.
Use a Phillips screwdriver to open the senior living gateway housing.
Figure 1
Open the housing
4.
Use the included screws and drywall anchors to flush-mount the senior
living gateway.
Figure 2
Senior living gateway mounting holes
5.
Connect power to the senior living gateway, routing cabling through the
gateway’s housing knockout.
• If using line power, connect the included Inovonics ACC610
transformer and power cabling to the power terminal block.
• If using Power over Ethernet (PoE), connect one end of a RJ45
Ethernet cable to the RJ45 Ethernet jack, and connect the other end
to a PoE capable network switch. Ensure 10/100BASE-T Ethernet
with Dynamic Host Configuration Protocol (DHCP) network
management protocol.
• Inovonics recommends an Internet connection with a minimum of 512
Kbps up and down, and no filtering or proxying of HTTPS outgoing
connections.
Figure 3
RJ45 Ethernet jack and power terminal block
6.
If using line power, connect one end of a RJ45 Ethernet cable to a RJ45
Ethernet jack, and connect the other end to your LAN to establish
Internet connectivity.
• Ensure 10/100BASE-T Ethernet with DHCP network
management protocol.
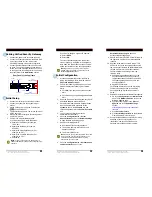
7.
The senior living gateway is able to use a range of radio frequencies,
and is shipped from Inovonics set for your geographic area using the
frequency band selection pins.
• A jumper will be set on the left two pins, marked AUS, to set the
frequency range to 915-928 MHz for Australia.
• A jumper will be set on the right two pins, marked NZ, to set the
frequency range to 921-928 MHz for New Zealand.
• The jumper will be removed to set the frequency band to 902-928
MHz for North America.
For product and installation videos visit us at
www.inovonics.com/videos or use the QR
code below.