


Model: iB75 Eng I/B (Front)
Print color : Black text on white paper
Size of manual: 180W x 270H (mm)
Date: Aug 09, 2013
The two earpieces are marked ‘L’ and ‘R’. All of the controls and the Mini 8-pin USB
charging port are located on the ‘R’ earpiece. Place the ‘R’ earpiece in your right ear and
the ‘L’ earpiece in your left ear. The cable connecting the two earpieces should be behind
your neck.
Using Your Headphones
Note: Some of the functions described below may not be supported on your speci
fi
c
smartphone. Check with your smartphone owner’s manual to con
fi
rm the features
supported by your phone.
Your headphones must be paired with your phone and turned on to perform any of the
following operations.
Receiving/Ending A Call
When you receive an incoming call, press the Multi-function button once to answer the
call through the headphones. When you are
fi
nished speaking press the Multi-function
button once more to end the call.
Making A Call
When you make a call on your smartphone the call may be automatically transferred to
the headphones if your smartphone supports this automatic transfer function. If not,
press the Multi-function button once to transfer the call to the headphones.
Voice Activated Calling
If your smartphone supports this feature with the headphones, press and hold the
Multi-function button for about 2 seconds to initiate the voice activated calling function,
then follow the instructions supplied with your phone.
Last Number Redial
If your phone supports this feature, press the Multi-function twice to redial the last
number you called.
Declining A Call
If you receive a call that you would rather not accept (indicated by the caller ID on your
phone) press the Multi-function button twice to decline the call.
Volume Control
Press the Volume “
+
” or “
–
” to adjust the volume of the incoming calls or the music
volume level.
Introduction
Your new iHome Bluetooth stereo headphones are designed to link with your Bluetooth
enabled smartphone or music player to allow you to wirelessly listen to music and answer
phone calls within the normal 10 meter (30 feet) Bluetooth operating range.
What’s Included
Speci
fi
cations
Bluetooth speci
fi
cation: Supports V2.1 + EDR with Handsfree Pro
fi
le 1.5,
Headset Pro
fi
le 1.1 and A2DP pro
fi
le 1.2 (Class ll)
Standby time:
100 hours (with fully charged battery)
Talk time:
8 hours (with fully charged battery)
Music Playing Time:
7 hours (with fully charged battery)
Operating Distance:
up to 10 meters / 30 feet
Weight:
16
grams
Certi
fi
cations:
CE, FCC, RoHS, BQB
Switching the Power On and Off
1. Press and hold the Multi-function button for approximately 3 seconds until a ‘beep’ is
heard. The LED indicator turns blue and begins
fl
ashing slowly. This indicates that the
power is ‘On’.
2. When the power is ‘On’ press and hold the Multi-function button for approximately 3
seconds until a ‘beep’ is heard. The LED indicator turns red,
fl
ashes for a few seconds
and then shuts off. This indicates that the power is ‘Off’.
Pairing With a Bluetooth Enabled Smartphone or Music Player
If your smartphone or music player, such as the iPod touch, is Bluetooth enabled
(supports the A2DP Bluetooth Pro
fi
le) you may pair these iHome headphones with your
phone or music player to listen to music and make or receive calls as long as the two
devices are within the Bluetooth operating range of approximately 30 feet of each other.
1. Make sure that your iHome iB75 headphones are in the Power Off mode. Make sure
that your smartphone or music player is ‘On’.
2. Press and hold the Multi-function button on your iB75 headphones for about 5
seconds until the LED indicator alternately
fl
ashes red and blue to indicate it is trying to
pair with a compatible device.
3. If necessary, turn on the Bluetooth function of your phone or music player so that it
begins searching for a compatible device.
4. “iHome iB75” should appear on your phone or music player’s compatible devices list.
You may also see a message such as “Not Paired”. Tap on that message to complete
the pairing process. If your phone or music player asks for a ‘password’ to complete
the pairing process, enter ‘0000’ on the keypad of your phone or music player.
5. When pairing is successful the screen on your phone should show “iHome iB75
Connected” or similar message and the blue LED indicator on the iB75 headphones
should
fl
ash repeatedly. Your headphones are now ready for use.
Wearing Your Headphones
Your iHome Bluetooth headphones are supplied with 3 different
sizes of silicon ear cushions (tips) and three different sizes of soft
rubber stabilizer ‘
fi
ns’ designed to prevent the headphones from
falling out of your ears during periods of strenuous physical
activity. Refer to the following illustration showing the proper way
to
fi
t the headphones in your ears with the stabilizer
fi
ns installed.
Although you must use the headphones with the silicon cushions to
form a proper seal in your ear canals, using the stabilizer
fi
ns is optional.
The medium (M) size cushions and ‘
fi
ns’ were installed at our factory. If you
fi
nd that the
M size cushions and
fi
ns are either too big or too small for you, you may change to the S
or L size cushions and
fi
ns. Start by removing the cushions simply by pulling them off the
plastic tubes. Then remove the rubber ‘
fi
ns’ from the speaker housing. Install either the S
of L
fi
ns on the speaker housings
fi
rst, then install either the S or L cushions by pushing
them onto the plastic posts as far as they will go. Make sure that the cushions are
securely
fi
xed on the posts so that a cushion does not remain in your ear when you
remove the headphones.
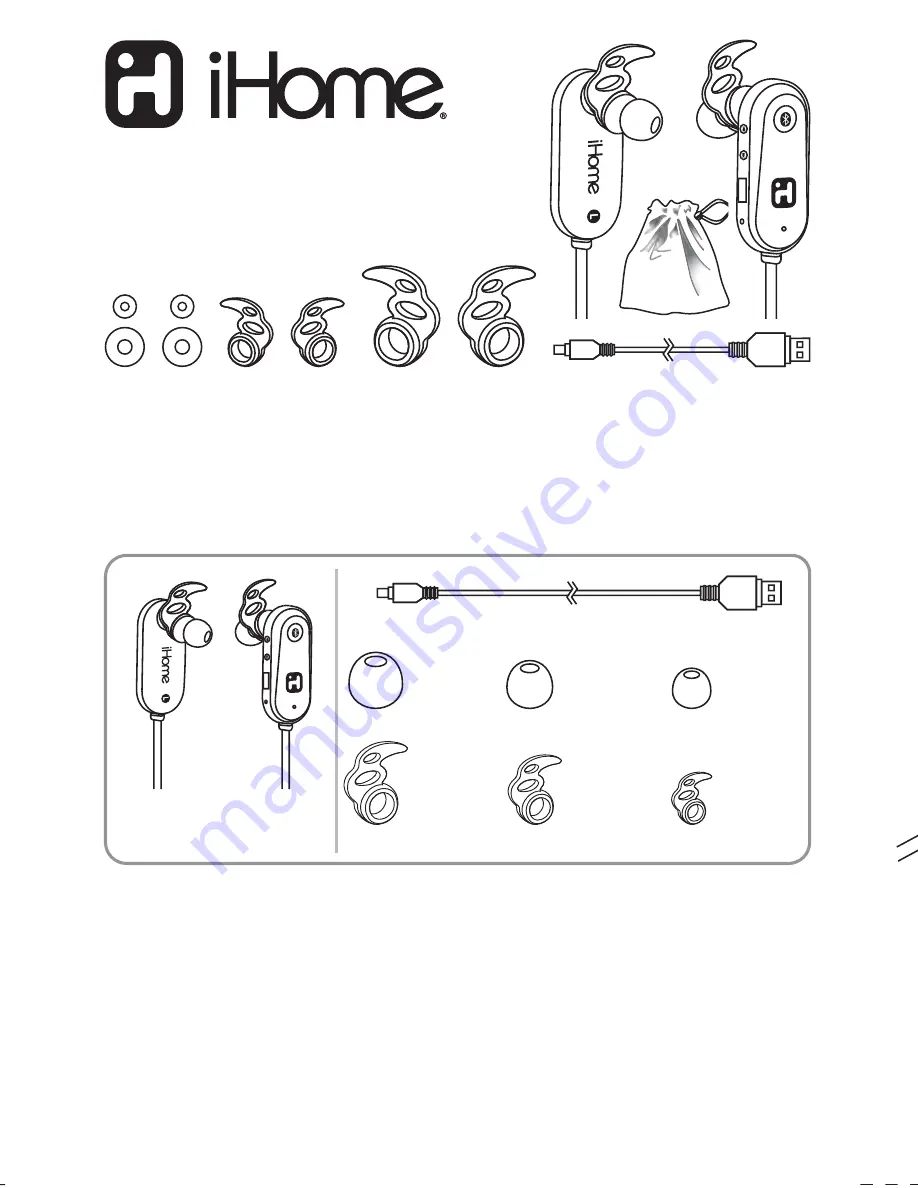
Model: iB75
Bluetooth wireless earbuds
with mic + remote and pouch
iB75 Bluetooth
Wireless Headphones
USB Cable
Silicon Tips
Stabilizer Fins
L
x 2
SIZE
M
x 2
SIZE
S
x 2
SIZE
L
x 1
set
SIZE
M
x 1
set
SIZE
S
x 1
set
SIZE
Controls and Indicators
1. Multi-function button: Power On/Off,
Answer/End, Pair, Play, and Pause
2. Speakers
3. Back button
4. Forward button
5. Mini 8-pin USB Charging Port
(located under water resistant cover)
6. Microphone
7. Volume
+
button
8. Volume
-
button
9. Power On, Charging, Pairing LED Indicator
+
-
1
9
2
7
8
2
3
4
5
6
Charging Your Headphones
IMPORTANT: Your headphones operates on a built-in rechargeable lithium-ion battery.
You should charge the battery for a full 4 hours before
fi
rst time use.
1. Lift up the water resistant cover to expose the Mini 8-pin USB charging port.
2. Connect the Mini 8-pin USB plug on the charging cable to the Mini 8-pin USB port on
the headphones.
3. Connect the standard USB plug on the charging cable to any standard USB power
port such as found on a notebook computer, or the charging adapter for an iPod,
iPhone, etc.
4. The Power/Charging/Pairing indicator will glow RED while the headphones is charging.
The indicator will turn Off when the battery is fully charged.
Reminder: Allow the battery to charge for 4 hours before
fi
rst time use. Normal recharge
time after
fi
rst use should take about 2 hours. When full charged the battery will provide
up to 8 hours of talk time, 7 hours of music playing time, or 100 hours of standby time.


