Ideal Boilers Mexico Super RS 3/40, Installation & Servicing Manual
The "Ideal Boilers Mexico Super RS 3/40" is a cutting-edge heating system designed to provide efficient and reliable performance. Ensure seamless installation and servicing with our comprehensive "Installation and Servicing Manual." Download this manual for free from our website to easily navigate through the setup and maintenance process.
Share
Download


Reviews:
No comments
Related manuals for Mexico Super RS 3/40

9
Brand: E-Tech Pages: 32

RSF820/20T
Brand: Ravenheat Pages: 56

GA100CS SERIES
Brand: Vaillant Pages: 12
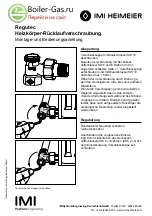
Regutec
Brand: IMI Hydronic Pages: 8

LIBRA DUAL BTFS 24
Brand: Nova Florida Pages: 28

S300S
Brand: AERMEC Pages: 64

STAR-MAX OCB30
Brand: Star Pages: 2

Paramount two
Brand: Potterton Pages: 80

50e
Brand: Potterton Pages: 29

Maximiser SE 42
Brand: Ideal Boilers Pages: 40

Falcon GTS 4
Brand: Ideal Boilers Pages: 4

114453
Brand: Ideal Boilers Pages: 8

BS1
Brand: Bryant Pages: 14

wallcon
Brand: gassero Pages: 40

CGA
Brand: Weil-McLain Pages: 24

ASTRA
Brand: Thermasis Pages: 44

CODEX
Brand: ICI Caldaie Pages: 28

REX 140
Brand: ICI Caldaie Pages: 32


