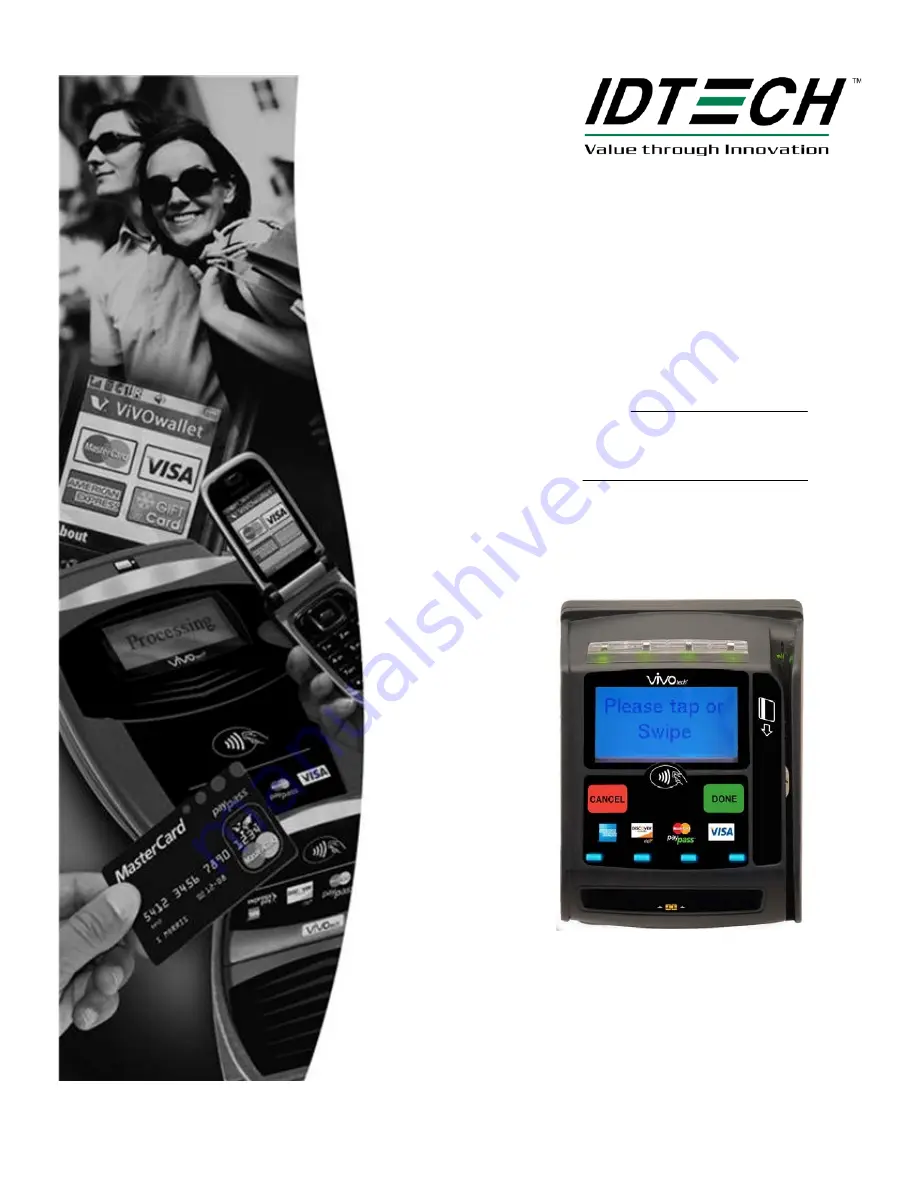
background image

Part Number: 631-0087-00 


ViVOpay

®


iris VRX,

 User Guide


Revision 1.0 


ID TECH 

10721 Walker Street 
Cypress, CA 90630 

          United States

  (408) 248-7001 

                          URL: http://www.idt echproducts.com 

Summary of Contents for ViVOpay Vend 3

Page 1: ...Part Number 631 0087 00 ViVOpay iris VRX User Guide Revision 1 0 ID TECH 10721 Walker Street Cypress CA 90630 United States 408 248 7001 URL http www idtechproducts com...

Page 2: ...of this publication may be reproduced or transmitted by electronic mechanical recorded or any other method or translated into another language or language form without the express written consent of I...

Page 3: ...3 Radio Frequency Interference 4 User Access 4 Installing the ViVOpay Vend 3 iris VRX 5 Connector and SAM Access 5 Install a SAM Card 5 Connect Data and Power 6 Connect Ethernet 8 Connect PIN Pad 9 Ex...

Page 4: ...t Interface Tests 19 Maintenance 19 Upgrading the Firmware 20 Appendix A Specifications 21 ViVOpay Vend 3 iris VRXSpecifications 21 Lithium Battery Warning 21 Regulatory Compliance 22 FCC Part 15 Clas...

Page 5: ...144443 MasterCard PayPass Magstripe v3 3 Visa payWave MSD v2 0 2 American Express ExpressPay v1 0 Google Wallet Discover Zip v1 0 Mifare ePurse Passthrough ViVOcard 1 and 2 ViVOpay Vend 3 also fully s...

Page 6: ...N 140 2035 01 United Kingdom P N 140 2035 02 Australia P N 140 2035 03 This power supply is recommended and approved by ID TECH to comply with FCC rules and regulations You mayalso need the following...

Page 7: ...must be in a location that will NOT force a customer to enter a PIN that can be viewed by a third party 2 If the ViVOpay Vend 3 iris VRX PIN pad is in view of a security camera shielding must be prov...

Page 8: ...cy antenna The range reading distance and performance of the reader can be affected by other radio frequency emitters and proximity to metal For best performance adhere to the following guidelines Do...

Page 9: ...t SAM 2 SAM 3 SAM 4 Install a SAM Card All ViVOpay Vend 3 iris VRX models have three SAM card slots in addition to one SoftSAM In Advanced Reader Firmware the SoftSAM is SAM 1 Consequently the physica...

Page 10: ...Power There are connectors for Ethernet data and power and PIN pad in back of the ViVOpay Vend 3 iris VRX The connections you need to make are dependant on your specific POS configuration and applicat...

Page 11: ...1 VBus 2 Data DM 3 Data DP 4 GND 5 GND 6 Power 12 VDC To connect data and power 1 Connect your data cable to the RS232 USB port 2 Connect the other end to the host system Refer to the pinouts given ab...

Page 12: ...ng upon the POS application If the reader fails to power up try reseating the power connector or change to a different power outlet For more troubleshooting information see Troubleshooting on page 13...

Page 13: ...er Guide 9 Installing the ViVOpay Vend 3 Connect PIN Pad The ViVOpay Vend 3 iris VRX supports connection to a PIN pad via an RJ11 connector To connect to a PIN pad 1 Connect the PIN pad cable to the P...

Page 14: ...own in Figure 1 Mounting Figure 1 Mounting hole dimensions 2 Drill a 5 8 inch hole or cut an access hole large enough to pass an RJ50 connector in the center of the area inside the mounting holes 3 Po...

Page 15: ...nd 3 3 Remove the currency acceptor or cover plate Retain the fasteners for ViVOpay Vend 3 installation Figure 2 Currency acceptor removed 4 Insert ViVOpay Vend 3 with bracket from inside the vending...

Page 16: ...Testing the Installation After you have completed the installation and have checked for PCI conformance check that the ViVOpay Vend 3 iris VRX and the POS are communicating correctly by performing a...

Page 17: ...at correct firmware is loaded local support representative only Verify that power is on and correct voltage and current are present Verify that power cable plug is fully inserted Replace the reader So...

Page 18: ...Accessing the OBD Tests To connect the ViVOpay Vend 3 iris VRX to a terminal emulator 1 Connected the RS232 data cable to the ViVOpay Vend 3 as described in Connect Data and Power on page 6 2 Launch t...

Page 19: ...r the ViVOpay AR Diagnostics all test are marked as not performed 1 Press the 0 key on the ViVOpay Vend 3 iris VRX at the ViVOpay AR Diagnostics screen The Test Results screen is displayed with the re...

Page 20: ...Press 3 Both lines of the display are filled with the character 7 Press ENTER if the correct screen is displayed otherwise press CANCEL to fail the test The AR LCD Test screen is displayed on the PC...

Page 21: ...yed LED Test Press Enter if all 4 LEDs are turned On and OFF press X if not 2 Press ENTER if all four LEDs flash on and off in sequence otherwise press CANCEL to indicate that the LEDs did not flash T...

Page 22: ...ss card phone fob close to the touch screen to verify that the antenna is able to detect a contactless card The results will be displayed on the PC 1 Press 8 on the ViVOpay AR Diagnostics screen The R...

Page 23: ...SAM3 only 4 SAM4 only Press any key to continue If the ViVOpay Vend 3 does not have an ICC contact card slot skip the first test 2 Press 0 to check the contact card reader 3 Press 1 to check all SAMs...

Page 24: ...ve to the PC you are using for the upgrade 3 Copy the vivopay inf file to the Windows inf directory 4 Connect the USB data cable to the ViVOpay Vend 3 iris VRX and PC see Connect Data and Power on pag...

Page 25: ...Temp 40 to 85 C 40 to 185 F Operating Humidity 0 to 85 non condensing Operating Environment Indoor only Power Voltage 7 5 45 VDC regulated 10 Consumption Lithium Battery Warning The Lithium Battery u...

Page 26: ...TV technician for help FCC Information for User The users manual or instruction manual for an intentional or unintentional radiator shall caution the user that changes or modifications not expressly...

Reviews: