background image

NetVista

Thin Client

N2200 Thin Client Reference

July 2000

To view or print the latest update, go to http://www.ibm.com/nc/pubs

SA23-2804-00

Summary of Contents for NetVista N2200

Page 1: ...NetVista Thin Client N2200 Thin Client Reference July 2000 To view or print the latest update go to http www ibm com nc pubs SA23 2804 00...

Page 2: ......

Page 3: ...NetVista Thin Client N2200 Thin Client Reference July 2000 To view or print the latest update go to http www ibm com nc pubs SA23 2804 00...

Page 4: ...read Safety notices on page v and Notices on page 41 First Edition June 2000 Copyright International Business Machines Corporation 2000 All rights reserved US Government Users Restricted Rights Use d...

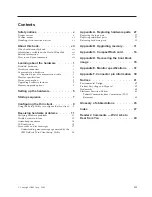
Page 5: ...rdware problems 11 Verifying hardware problems 11 Visible hardware failure 12 Audio beep sequences 14 LED indications 15 Error codes and text messages 17 Understanding error messages generated by the...

Page 6: ...iv...

Page 7: ...when possible to connect or disconnect signal cables RSFTD004 DANGER An electrical outlet that is not correctly wired could place hazardous voltage on metal parts of the system or the products that at...

Page 8: ...ents take these precautions to avoid static electricity damage v Do not open static protective packages until you are ready to install their contents v Limit your movements to avoid static electricity...

Page 9: ...e publications for information that relates to your NetVista thin client v See the IBM NetVista Quick Setup for NetVista N2200 Type 8363 Model Exx or Txx SA23 2806 pamphlet for quick hardware setup in...

Page 10: ...3430 Other countries 1 507 253 5192 v If you prefer to send comments electronically use the following network identification IBMMAIL to IBMMAIL USIB56RZ RCHCLERK us ibm com Be sure to include the foll...

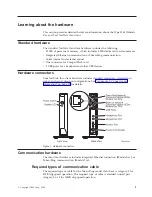
Page 11: ...d and other USB devices Hardware connectors Your NetVista thin client hardware includes standard connectors standard pin signal and signal direction configurations See Appendix F Connector pin informa...

Page 12: ...ay monitor power reduction occurs when you use the NetVista thin client with a VESA DPMS Standard monitor Upgrading hardware features You can perform the following hardware procedures v Connect USB de...

Page 13: ...and supports expansion to 288MB Appendix B Upgrading memory on page 31 explains the procedure for installing and removing a memory DIMM Refer to Appendix A Replacing hardware parts on page 27 for deta...

Page 14: ...4...

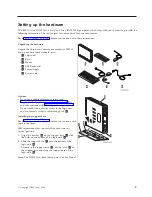
Page 15: ...Appendix B Upgrading memory on page 31 first and then continue with Installing the support base v If you would like to restrict access to the logic unit you can thread a security cable through tab A...

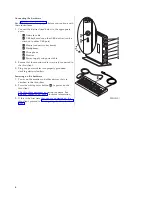
Page 16: ...cable 2 Ensure that the monitor cable is securely connected to the thin client 3 Plug any power cables into properly grounded working electrical outlets Powering on the hardware 1 Power on the monito...

Page 17: ...yboard v Monitor1 v Any USB devices2 2 The following internal hardware components initialize v Memory v L1 cache v Video memory v Keyboard controller 3 The IBM NetVista thin client screen appears on t...

Page 18: ...8...

Page 19: ...ttings v Perform advanced configurations such as changing your boot file server settings The first time you start the thin client you must use the initial Setup Utility to configure the thin client Th...

Page 20: ...ugh the Setup Utility To access the Setup Utility during a subsequent boot press Esc immediately after the following message disappears Hardware testing in progress If you worked only with the Simple...

Page 21: ...information on resolving hardware problems that are associated with your monitor and USB devices Verifying hardware problems Table 1 identifies possible hardware problem indications that can occur wi...

Page 22: ...ible hardware failure Visible hardware failure Audio beep sequences Audio beep sequences on page 14 LED indications LED indications on page 15 Error codes and text messages Error codes and text messag...

Page 23: ...dware parts on page 27 for more information on replacing a defective mouse Monitor v The monitor displays a blank screen v The monitor displays unreadable screens If the problem persists after you hav...

Page 24: ...audio and visual alerts when reporting hardware problems In the event of a hardware problem the NetVista thin client emits audio beeps before your monitor initializes After your monitor initializes er...

Page 25: ...ndix A Replacing hardware parts on page 27 for information LED indications The LED indicators of the following devices maintain a solid green color during normal operation v Logic unit system LED and...

Page 26: ...eplacing additional parts on page 27 A power interruption during a software update occurs When you power on the NetVista thin client the system LED shows a solid green color or a flashing amber color...

Page 27: ...itor refer to the documentation for your monitor for more information Error codes and text messages Error codes and text messages can appear on the bottom of your screen during the startup sequence of...

Page 28: ...the logic unit on page 27 NSB12520 Setting nonvolatile memory to manufacturing defaults Re enter setup configuration data if different from the default values NSB12530 Detected reset jumper The passw...

Page 29: ...oken Ring PCI device initialization not complete Restart the thin client If the symptom remains take any actions recommended by the text messages that accompany this message If you still cannot resolv...

Page 30: ...ory frame received Full duplex error Contact the system administrator regarding network problems or switch to half duplex If this does not resolve the problem replace the thin client logic unit see Re...

Page 31: ...ccompany this message NSB61839 Token Ring error in station query phase Indicates stage of Token ring adapter insertion Watch for any messages that accompany this message NSB61840 Error open function f...

Page 32: ...ror NSB71509 DHCP option d boot server name s failed DNS Verify that the DHCP server settings are correct NSB71515 Missing DHCP option d from server Verify that the DHCP server settings are correct NS...

Page 33: ...that the boot server settings are configured correctly NSB83539 Cannot PING boot server x s Verify your configuration settings in the setup utility and confirm the server configuration NSB83549 Unabl...

Page 34: ...fault settings on the thin client and then configure the network settings in the setup utility Understanding error messages generated by the IBM NetVista Thin Client Setup Utility Error messages that...

Page 35: ...ommunication messages sub group 0 Trivial File Transfer Protocol TFTP messages sub group 1 NFS messages sub group 2 Boot file server messages sub group 3 Gateway messages sub group 4 thin client IP ad...

Page 36: ...ut setting configurations in the setup utility see Configuring the thin client on page 9 To solve configuration errors enter the setup utility and reset all configuration options to default values All...

Page 37: ...se or memory DIMMs For upgraded service offerings a service representative delivers replacement parts transfers features and returns defective parts to IBM See Resolving hardware problems on page 11 t...

Page 38: ...lded Twisted Pair STP cable for connection to IBM Cabling System connector All Countries 60G1063 TTP RJ 45 socket adapter for connection to IBM Cabling System All Countries 73G8315 TTP RJ 45 socket ad...

Page 39: ...Japan Netherlands Antilles Panama Peru Philippines Taiwan Thailand Trinidad Tobago U S A except Chicago Venezuela 1838574 Bahamas Barbados Bermuda Bolivia Brazil Canada Cayman Islands Colombia Costa...

Page 40: ...part Note Customers must not ship features such as memory DIMMs with defective logic units that they are returning to IBM It is not possible for IBM to return these features back to customers If custo...

Page 41: ...logic unit 3 Push the logic unit B out of the cover 4 Lay the logic unit on a flat surface 5 Continue with Installing a memory card to install a memory card Installing a memory card Complete the inst...

Page 42: ...e instructions 1 To reassemble the thin client carefully slide the logic unit D back into the cover connectors first 2 Install and tighten the two thumbscrews C at the back of the thin client 3 Contin...

Page 43: ...1 to 4 in Removing the logic unit on page 31 2 Align the grooves on the sides of the CompactFlash card A to the grooves of the flash card slot B Make sure to align the grooves properly as you can ins...

Page 44: ...34...

Page 45: ...ed go to step 3 3 Carefully insert a blank CompactFlash card into the flash card slot This CompactFlash card is your recovery CompactFlash card For more information on CompactFlash cards see Appendix...

Page 46: ...CompactFlash cards see Appendix C CompactFlash card on page 33 4 Move the jumpers on headers A and B into configuration 3 5 Reconnect the power cable to the logic unit 6 Power on the thin client and...

Page 47: ...nnel DDC2B A monitor that is attached to the thin client does not require either standard The resolution in each case is configured at the client and OS level Your monitor may not support all resoluti...

Page 48: ...38...

Page 49: ...ut 14 Vertical Sync Out 15 Monitor Detect 3 DDCSCL In Out Connector shell Protective Ground Table 13 RJ 45 Twisted Pair Connector Pin Name Function 1 TPOP Transmit 2 TPON Transmit 3 TPIP Receive 4 5 N...

Page 50: ...40...

Page 51: ...orld Trade Asia Corporation Licensing 2 31 Roppongi 3 chome Minato ku Tokyo 106 Japan The following paragraph does not apply to the United Kingdom or any other country where such provisions are incons...

Page 52: ...ign The environmental efforts that have gone into the design of this product signify IBM s commitment to improving the quality of its products and processes Some of these accomplishments include the f...

Page 53: ...munications However there is no guarantee that interference will not occur in a particular installation If this equipment does cause harmful interference to radio or television reception which can be...

Page 54: ...to satisfy the protection requirements resulting from a non recommended modification of the product including the fitting of non IBM option cards This product has been tested and found to comply with...

Page 55: ...Protocol ID Identification IEEE Institute of Electrical and Electronics Engineers IP Internet Protocol IRQ Interrupt Request L LAN Local Area Network LED Light Emitting Diode LLC Logical Link Control...

Page 56: ...CP IP Transmission Control Protocol Internet Protocol TFTP Trivial File Transfer Protocol TXX Token ring thin client with country specific code XX U UDP User Datagram Protocol URL Uniform Resource Loc...

Page 57: ...rdware parts 30 replacing 27 hardware problems audio beep sequences 14 error codes and text messages 17 LED indications 15 visible hardware failure 12 I information related vii K keyboards replacing 2...

Page 58: ...W Web information available on the World Wide vii World Wide Web information available on the vii 48...

Page 59: ...ok is Very Satisfied Satisfied Neutral Dissatisfied Very Dissatisfied Accurate h h h h h Complete h h h h h Easy to find h h h h h Easy to understand h h h h h Well organized h h h h h Applicable to y...

Page 60: ..._ _ _ _ _ _ _ _ _ _ _ _ _ _ _ _ _ _ _ _ _ _ _ _ _ _ _ _ _ _ _ _ _ _ _ _ _ _ _ _ _ _ _ _ _ _ _ _ _ _ _ _ _ _ _ _ _ _ _ _ _ _ _ _ _ _ _ _ _ _ _ _ _ _ _ _ _ _ _ _ _ _ _ _ _ _ _ _ _ _ _ _ _ _ _ _ _ _ _ _...

Page 61: ......

Page 62: ...SA23 2804 00...

Reviews: