Hytera PD46 Series, User Manual
The Hytera PD46 Series offers reliable and versatile communication solutions for businesses and professionals. To get the most out of these innovative devices, simply download the free user manual from manualshive.com, ensuring easy access to detailed instructions and maximizing the potential of your Hytera PD46 Series.
Share
Download


Reviews:
No comments
Related manuals for PD46 Series

WE35
Brand: SOUNDMASTER Pages: 3

CD-1585
Brand: AudioSonic Pages: 45

airFiber AF-24
Brand: Ubiquiti Pages: 36
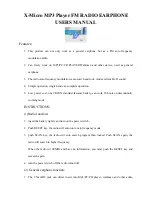
P3 Player FM RADIO EARPHONE
Brand: X-Micro Pages: 2

GD-DM824
Brand: GEARDON Pages: 3

LR-500
Brand: Listen Technologies Pages: 7

BTD-7000
Brand: Blaupunkt Pages: 97

CD6588DM3
Brand: Palsonic Pages: 1

S1DAB11E
Brand: Sandstrom Pages: 76

RRCD 1300
Brand: Grundig Pages: 17

N4X
Brand: Talkpod Pages: 12

MPI-II LBI-38558B
Brand: Ericsson Pages: 14

ODR-150
Brand: LENCO Pages: 77

7? Dual
Brand: Logic Pages: 36

HAV-SR20
Brand: König Electronic Pages: 8

Rockpower 300
Brand: Rockpals Pages: 16

W-SQ-Pro
Brand: Whisper Power Pages: 47

M-SQ Pro 27
Brand: Whisper Power Pages: 46


