ATAD-P0234-00 第3版/3rd edition
取扱説明書 / INSTRUCTION MANUAL
取扱説明書 / INSTRUCTION MANUAL
取扱説明書 / INSTRUCTION MANUAL
取扱説明書 / INSTRUCTION MANUAL
手動圧着工具名/Manual crimping tool name
製品コード/Product code
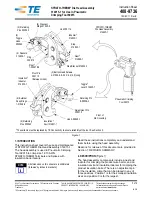
1. 工具の外観および各部の名称 / Configuration of the tool
2. 作業手順 / Operating procedures
1)
2)
3)
4)
5)
6)
【注意】
1)
2)
3)
4)
5)
6)
[Caution]
[Caution]
[Caution]
[Caution]
Withdraw the terminated wire from the tool, holding it by the wire. Exercise caution
not to catch the contact in any part of the tool while doing it.
Make sure that it is properly crimped. (Refer to "Crimping conditions table and
Crimping quality standard manual".)
When inserting the contact into the tool or taking it out from the tool be careful
When inserting the contact into the tool or taking it out from the tool be careful
When inserting the contact into the tool or taking it out from the tool be careful
When inserting the contact into the tool or taking it out from the tool be careful
that the contact is not caught with the crimper, anvil, etc., and is not deformed.
that the contact is not caught with the crimper, anvil, etc., and is not deformed.
that the contact is not caught with the crimper, anvil, etc., and is not deformed.
that the contact is not caught with the crimper, anvil, etc., and is not deformed.
Compress the handle until the moving handle releases and is fully open.
Protrude the contact holder to front side (in the direction of arrow). Insert the
crimping contact until the position where the tip of crimping contact comes in
contact with the stopper of contact holder.
Return the contact holder. Cut the wire and strip the outer insulation exposing the
conductors. Place the exposed conductor so that the end of the exposed conductor
comes in contact with the contact holder. Exercise caution as not to deform the
conductor or allow protrusion of the strands.
Compress the handle until the rachet releases and is open.
For certain cases and for certain types of hand tools the tip of the terminal and the
cable will have to be matched by eyesight, and the tip of the wire will not touch the
contact holder.
端子ホルダーを戻し、所定の長さにストリップしたケーブル先端を、芯線がほつれない
ように端子ホルダーに突き当ててください。
ハンドルをラチェットが解除するまで握って、ハンドルを開いてください。
正規に圧着されているか確認してください。(「圧着条件表および圧着品質基準書」をご
参照ください。)
端子を工具に挿入したり取り出す際、クリンパやアンビルに引っ掛ける等で、端子を
端子を工具に挿入したり取り出す際、クリンパやアンビルに引っ掛ける等で、端子を
端子を工具に挿入したり取り出す際、クリンパやアンビルに引っ掛ける等で、端子を
端子を工具に挿入したり取り出す際、クリンパやアンビルに引っ掛ける等で、端子を
変形させないように注意してください。
変形させないように注意してください。
変形させないように注意してください。
変形させないように注意してください。
圧着された端子を電線を持って引き出してください。
HT801/MDF97-22S
CL550-0417-9
ハンドルを最後まで握りラチェットを解除させ、ハンドルを最大に開いてください。
端子ホルダーを正面(矢印方向)に突き出し、端子ホルダーのストッパーに突き当たる
位置まで圧着バラ端子を挿入してください。
ハンドツールの機種によっては、ケーブル先端を端子ホルダーに突き当てせず、
目視にて端子とケーブルの先端位置を合わせていただく場合があります。
端子ホルダー/
Contact holder
端子/Contact
ケーブル/Cable
突き当て/
To be in contact
番線表示/AWG number
クリンパ/Crimper
アンビル/Anvil
HRSマーク表示/HRS logo
ラチェット解除レバー/Rachet cancel lever
可動ハンドル/Moving handle
製造年月日表示/Date of manufacture
ロットNo.表示/Lot number
端子ホルダー/Contact holder
製品名表示/Tool number
Dec.1.2018 Copyright 2018 HIROSE ELECTRIC CO., LTD. All Rights Reserved.