HP C5726A - SureStore DLT 80E Tape Drive, User Manual
The HP C5726A - SureStore DLT 80E Tape Drive user manual is available for free download on our website. This manual provides detailed instructions on using and maintaining this high-performance tape drive. Download it now for free from manualshive.com to get the most out of your product.
Share
Download


Reviews:
No comments
Related manuals for C5726A - SureStore DLT 80E Tape Drive

ACROBAT 3D
Brand: Adobe Pages: 822

RAIDXpert
Brand: AMD Pages: 120

Prism TV
Brand: CenturyLink Pages: 24

Scarbee Clavinet & Piano
Brand: Native Instruments Pages: 24

CLUSTER SUITE FOR ENTERPRISE LINUX 4.5
Brand: Red Hat Pages: 78

SoftalK
Brand: Packet8 Pages: 43

DP-200USB
Brand: Denon Pages: 38

Nikon View
Brand: Nikon Pages: 12

C4 Commander
Brand: Mackie Pages: 20

6100BD - Phaser Color Laser Printer
Brand: Xerox Pages: 56

Treo Pro
Brand: Palm Pages: 46

FLASH MEDIA SERVER 2-SERVER-SIDE ACTIONSCRIPT...
Brand: MACROMEDIA Pages: 234

PCM NATIVE DUAL DELAY
Brand: Lexicon Pages: 36

PCM NATIVE CHORUS
Brand: Lexicon Pages: 36

TELEPRESENCE CALL DETAIL RECORDS FILE FORMAT -
Brand: Cisco Pages: 26

Final Mix VST
Brand: Mackie Pages: 26

ThinkCentre M80
Brand: Lenovo Pages: 282
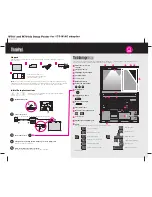
THINKPAD W701
Brand: Lenovo Pages: 2


