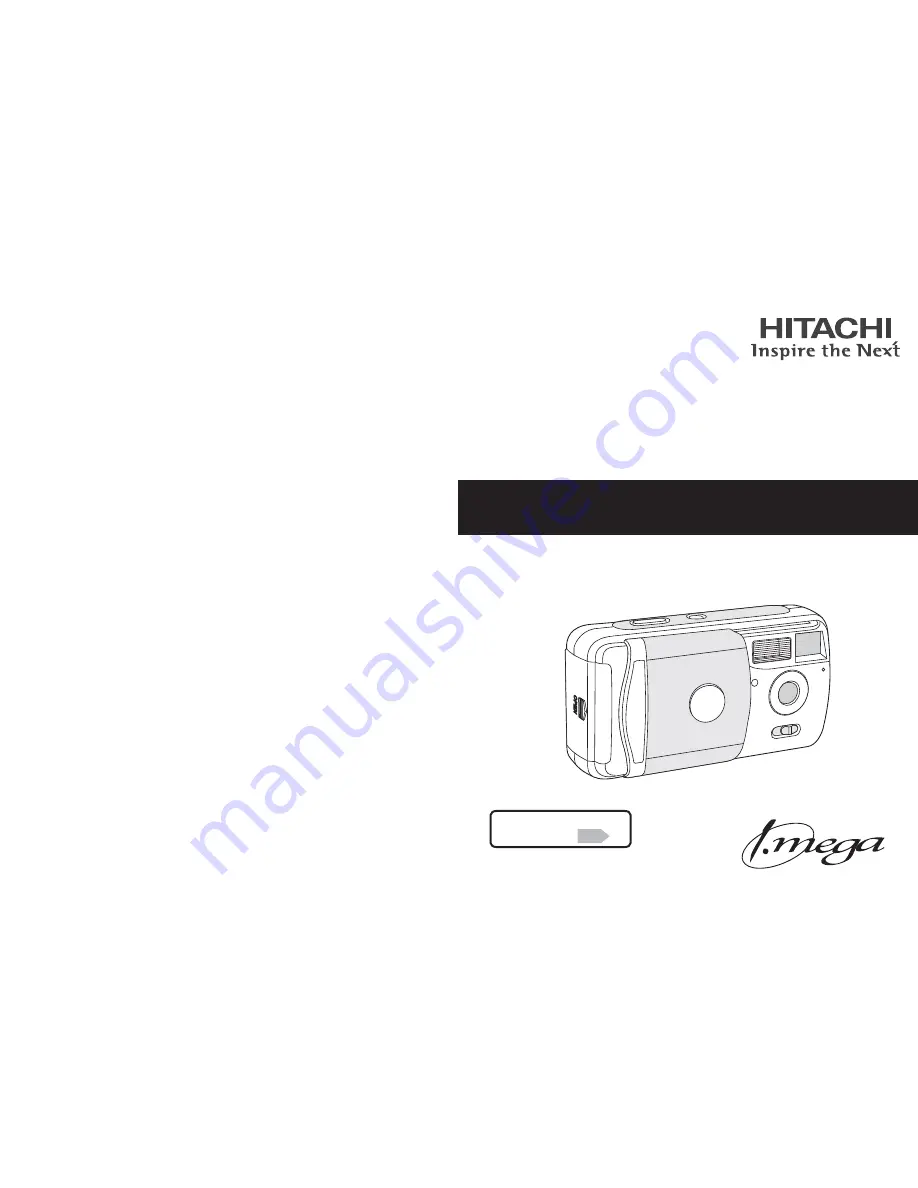
background image

Digital Camera

HDC-401EX

User Manual

Thank you for purchasing an HDC-401EX digital camera.  

Before using the camera, please read this user manual carefully 

to ensure proper use of the camera. 

6-29 Shin Ogawa-machi, Shinjuku-ku, Tokyo 162-0814 (Acropolis Tokyo) 

Phone : 81-3-3260-9611 

 Fax :      81-3-3260-9739  


See 

Using the Camera

 in the 

Quick Start Guide 

P 99

Hitachi Living Systems


Summary of Contents for HDC-401EX

Page 1: ... camera Before using the camera please read this user manual carefully to ensure proper use of the camera 6 29 Shin Ogawa machi Shinjuku ku Tokyo 162 0814 Acropolis Tokyo Phone 81 3 3260 9611 Fax 81 3 3260 9739 See Using the Camera in the Quick Start Guide P 99 Hitachi Living Systems ...

Page 2: ... Files to the Computer Reader Writer Connection 83 Removing the Camera 85 Uninstalling Deleting the HDC 401EX Driver 87 Appendix 88 Troubleshooting 89 Menu Items and Default Settings 96 Specifications 97 Quick Start Guide 99 2 1 Overview 3 Safety Precautions 3 What You Should Know 6 Notes on Handling the Camera 7 Product Overview 9 What You Will Find in the Package 9 Names of Parts 10 LCD Monitor ...

Page 3: ...hock Be aware of the hazards associated with alkaline batteries If the fluid from an alkaline battery should come in contact with your eyes or skin immediately rinse away the fluid under running water and seek medical attention The failure to do so may result in blindness or other bodily injury Never take pictures while moving Do not take pictures while walking driving a car or riding any other ve...

Page 4: ...nauthorized reproduction of all or part of this manual is prohibited Hitachi Living Systems shall not be liable whatsoever for any damage lost profit or claim by a third party arising from the use of the digital camera or software provided with the camera Hitachi Living Systems shall not be liable whatsoever for any damage lost profit etc arising from a memory erasure due to a product malfunction ...

Page 5: ...e contact area of the memory card free from dust or deposits of foreign matter To remove soiling from the contact area gently wipe the surface using a dry soft cloth etc SD Memory Card The camera cannot perform its best with dust adhering to the surface of the lens To clean the lens remove dust with a blower and then gently wipe the surface with a dry soft cloth Do not wipe the exterior surface of...

Page 6: ...and video AC adapter socket lets you use the camera for hours without worrying about batteries 2 The all in one package means you can take pictures right away 1 SD memory cards are sold separately 2 The AC adapter is sold separately What You Will Find in the Package Confirm that the following accessories are found in the package together with the digital camera Key Features 10 Names of Parts Front...

Page 7: ...age size Image quality 2304 1728 Normal Playback Menu Delete Protect Copy to card Display mode Default OK Set P33 The MODE MENU button and control panel operations are hereinafter simplified as follows Press the MODE or MENU button Press MODE or MENU Press the M N O or P direction button Press M N O P Select M N O P Press the OK button Press No Button name M Up button Function Use this button to s...

Page 8: ...illion pixels 640 480 Approx 310 000 pixels Image quality Fine Low compression 1 8 mode Normal Standard compression 1 12 mode Economy High compression 1 16 mode Saturation High Medium Not displayed if Medium is selected Low Sharpness High Medium Not displayed if Medium is selected Low Capturing Videos Viewing Still Images Videos Playback Mode Video Capture Mode 14 LCD Monitor Display Capturing Sti...

Page 9: ... is displayed Display off The LCD monitor display is turned off Use this mode to capture an image by looking into the viewfinder The Grid or Display off function cannot be used in the Video Capture mode If the power is turned off or the camera is switched to the Playback mode the selected LCD monitor display mode in the Still Image Video Capture mode returns to Default Playback Mode The LCD monito...

Page 10: ...ng on the condition or environment in which the camera is used Continuous Images are captured continuously without flash Cyclic Images are captured by repeating the sequence of Checking the subjects for 5 seconds Capture Playback for 5 seconds In both modes all images are erased once the memory gets full Even when the power is off the HDC 401EX carries a very small amount of current to back up the...

Page 11: ...e item isnユt saved set it again Power Off Time Function 19 To turn on the camera press the power switch until the viewfinder lamp red illuminates When the camera is powered up you will hear a pee sound and see the viewfinder lamp green illuminate 1 To turn off the camera press the power switch until the viewfinder lamp green goes out The viewfinder lamp green will go out and the camera will power ...

Page 12: ... hour format are displayed in this order DD MM YYYY 12 hr The day month year and hours in 12 hour format are displayed in this order MM DD YYYY 24 hr The month day year and hours in 24 hour format are displayed in this order MM DD YYYY 12 hr The month day year and hours in 12 hour format are displayed in this order Date Time Exit Date 2004 04 13 Time 16 07 Mode YYYY MM DD 24hr Date Time Exit Date ...

Page 13: ...mory card 24 23 P8 P65 P97 Open the battery SD memory card cover by sliding it in the direction of the arrow 1 Insert a memory card Insert the card securely in the direction shown until you hear it click into place 2 Label face Close the battery SD memory card cover 3 Open the battery SD memory card cover and press the memory card once to remove the card Each memory card has a write protect switch...

Page 14: ...ty 2304 1728 Normal In the Capture Menu screen select Set to Default using M N and then press A message appears prompting you to confirm the reversion 2 OK Set Capture Menu Set To Default Video Clip Mode Image size Image quality 2304 1728 Normal Select Yes No using M N and then press 3 Set To Default No Yes OK Set Setting item Default setting Image size 2304 1728 Image quality Normal Scene Auto Ex...

Page 15: ...a nearby subject is shot the image you see in the viewfinder is not exactly the same as the image that was actually captured You want to check the actual range of a captured image You want to take close up shots of flowers people or other subjects The range of a captured image can be checked accurately The camera shakes easily The subjects cannot be seen clearly when there is too much or too littl...

Page 16: ... keep the camera as still as possible Auto mode The camera automatically flashes in accordance with the environment in which the image is captured Red Eye Reduction auto mode Use this mode if you want to make the eyes of the subjects look natural in a darker environment with flash usage The camera flashes once before the main flash is emitted upon image capture Forced Flash mode The camera always ...

Page 17: ...EV or ISO capture sensitivity The Close Up mode is also effective in Video Capture mode 31 In the Still Image Capture mode set the distance selector switch to Close Up mode is displayed on the LCD monitor to inform you that the camera is now in Close Up mode 1 Distance selector switch Using the Zoom You can enlarge your subject up to 200 using the zoom function digital zoom The digital zoom is eff...

Page 18: ...lapsed time during video capture 4 To stop video capture press the shutter The camera stops the capture after emitting a bleep sound 5 The capture stops automatically when the available memory drops to below the required level The white balance Exposure EV color and Close Up mode are effective during video capture but other settings are disabled The above data size and recording time are reference...

Page 19: ...Press the power switch to turn on the power The camera enters the Still Image Capture mode 1 Press MODE once to activate the Playback mode The last captured image is displayed single playback 2 Select the image you want to enlarge using O P 1 Pressing starts the playback with the monitor zooming in on the center of the image 2 Press M N O P on an enlarged view to change the displayed portion of th...

Page 20: ...n is displayed Videos are shown with 1 Select the desired image using M N O P 2 Pressing displays a single playback screen of the selected image 3 Use O P to select the video you want to play Videos are shown with video icon 1 Pressing starts playback The LCD monitor shows the elapsed time 2 Pressing while the video is played stops playback Pressing again starts playback beginning with the first f...

Page 21: ...age Capture mode 1 Press MODE once to activate the Playback mode The last captured image is displayed single playback 2 Press the delete button N A message appears prompting you to confirm the deletion 4 This image Delete No Yes Select Yes No using M N and then press Selecting No cancels the deletion and the camera returns to Playback mode To delete another image press again and select Yes when th...

Page 22: ...ng M N and then press A message appears prompting you to confirm the deletion The images are not yet deleted 5 Delete This image Delete All Format Exit OK Set Select Yes No using M N and then press Selecting Yes deletes all images The camera returns to the Playback mode and No Image is displayed Selecting No switches the display back to the Delete menu 6 Delete Delete All No Yes In the Playback Me...

Page 23: ...etup using M N and then press The Setup menu is displayed 3 Capture Menu Date Imprint Setup Exit Off OK Set Insert the mini plug smaller plug of the video cable into the USB terminal on the camera and then connect the pin plug larger yellow plug to the video terminal on the TV 2 Keep the connected video cable slack If the cable remains taut the terminals may be subject to excessive force and susta...

Page 24: ...ting Images Setting the Startup Screen My Camera Deleting Formatting This chapter describes more detailed settings of the HDC 401EX You can choose to read the sections corresponding to the functions you want to use 47 47 49 50 51 52 52 55 57 58 59 60 61 62 63 64 65 65 67 69 72 74 74 46 45 Pressing MENU saves the selected setting and the camera exits the Capture Menu screen 5 Once TV mode is set pr...

Page 25: ...e Menu Date Imprint Setup Exit Off OK Set In the Setup menu select Language using M N and then press 3 Setup Beeper Language Power Off Time On English 3 min OK Set Select the desired language using M N and then press The camera saves the selection and returns to the Setup menu 4 Language 日本語 English Italiano Español Français OK Set セッ トアップ サウン ド 表示言語 オー トパワーオフ オン 日本語 3分 OK 設定 Pressing MENU exits t...

Page 26: ...Menu screen 4 The sound ON OFF setting selected here is retained even after the power is turned off However Setting to the Default returns the setting to ON P25 In the Capture Menu screen select Setup using M N and then press The Setup menu is displayed 2 Capture Menu Date Imprint Setup Exit Off OK Set In the Setup menu select Power Off Time using M N and then select from 1 min 3 min 5 min 10 min ...

Page 27: ...on Ratio You can set a desired image size recording resolution and image quality compression ratio according to a given purpose Image size Recording resolution 2304 1728 Approx 4 million pixels 1600 1200 1 92 million pixels 1280 960 Approx 1 23 million pixels 640 480 Approx 310 000 pixels Image quality Compression ratio Fine Low compression 1 8 mode Normal Standard compression 1 12 mode Economy Hi...

Page 28: ...n 3 Setting the Image Quality Press MENU to display the Capture Menu screen 1 In the Capture Menu screen select Image Quality using M N and then select the desired image quality level using O P 2 Capture Menu Set To Default Video Clip Mode Image size Image quality 2304 1728 Normal OK Set O P Change Capture Menu Set To Default Video Clip Mode Image size Image quality 2304 1728 Fine OK Set O P Chang...

Page 29: ... The flash mode is set to Red Eye Reduction Auto Landscape The camera automatically sets the mode most suitable for landscape pictures The flash mode is set to Suppressed Flash Back Light This mode prevents the subject from becoming dark when shooting back light or a bright background The flash mode is set to Forced flash Default setting Press MENU to display the Capture Menu screen 1 In the Captu...

Page 30: ...25 Setting the White Balance You can set the white balance according to the light source Auto The camera automatically sets the white balance Used for image video capture under daylight Used for image video capture in cloudy weather Used for image video capture at sunset Used for image video capture under tungsten lighting Used for image video capture under fluorescent lighting Press MENU to displ...

Page 31: ...ver Setting to the Default returns the setting to Medium P25 Default setting Setting the Saturation You can set the saturation of captured images High Medium Low Press MENU to display the Capture Menu screen 1 In the Capture Menu screen select Saturation using M N and then select the desired saturation level using O P 2 Capture Menu ISO Color Saturation Sharpness Auto OK Set O P Change Capture Men...

Page 32: ...he ISO The ISO is a unit of photographic film sensitivity and indicates the ability to react to light The larger the ISO number the higher the sensitivity becomes thus enabling image video capture under limited light in a dark place Auto The camera automatically sets the ISO Equivalent to ISO 100 Equivalent to ISO 200 Press MENU to display the Capture Menu screen 1 In the Capture Menu screen selec...

Page 33: ...er You can capture images using the camera s self timer function which can be set to 10 seconds or 5 seconds When the self timer is used keep the camera from moving by setting it on a tripod etc In the Still Image Capture mode press the self timer button O repeatedly to select the desired timer period The timer period is set to 10 seconds The timer period is set to 5 seconds An icon corresponding ...

Page 34: ...he Playback Menu screen 2 Playback Menu Delete Protect Copy to card Display mode OK Set In the Playback Menu screen select Copy to Card using M N and then press A message appears prompting you to confirm the copy 3 Playback Menu Delete Protect Copy to card Display mode OK Set Select Yes No using M N and then press Selecting Yes copies all images in the internal memory to the memory card whereupon ...

Page 35: ...d Display mode OK Set In the Playback Menu screen select Slide Show using M N and then press 4 Playback Menu Slide show Save as logo Setup Exit OK Set Select the desired playback interval 1 3 6 or 10 sec using M N and then press A slide show starts based on the selected playback interval 5 Slide show 1 sec 3 sec 6 sec 10 sec Exit OK Set Pressing during playback ends the slide show Only the first f...

Page 36: ...yback Menu Delete Protect Copy to card Display mode OK Set In the Playback Menu screen select Protect using M N and then press The Protect menu is displayed 4 Playback Menu Delete Protect Copy to card Display mode OK Set Select Protect One using M N and then select Lock Unlock using O P 5 Protect Protect One Protect All Exit Unlock OK Set O P Change Protect Protect One Protect All Exit Lock OK Set...

Page 37: ...want to use as the startup screen If many images are stored in the internal memory or memory card using the Index Playback screen will make selection easy 2 Setting the Startup Screen My Camera You can set your favorite image on the startup screen The image selected for the startup screen is saved in a format different than the one in which captured images are normally saved in the camera Deleting...

Page 38: ... display the Playback Menu screen 2 Playback Menu Delete Protect Copy to card Display mode Default OK Set In the Playback Menu screen select Save as logo using M N and then press The Save as logo menu is displayed 4 Playback Menu Slide show Save as logo Setup Exit OK Set Save as logo Customize No Yes Select Customize using M N and then press 5 Save as logo Default Customize Exit OK Set Select Yes ...

Page 39: ...r and load the image files 77 78 79 81 83 85 87 1 2 3 4 5 1 2 3 4 5 76 75 Playback Menu Delete Protect Copy to card Display mode Default OK Set In the Playback Menu screen select Delete using M N and then press The Delete menu is displayed 3 Select Format using M N and then press A message appears prompting you to confirm formatting The data is not yet deleted 4 Delete This image Delete All Format...

Page 40: ... computer depending on the peripheral configuration Proceed to Installing the HDC 401EX Driver in the Computer Proceed to Connecting the HDC 401EX to the Computer Using the USB Cable Windows Me 2000 XP Windows 98 98SE 78 77 Flow of Copying Image Files to a Computer Check the operating environment of the computer Connect the HDC 401EX to the computer usingthe USB cable Open My Computer and click th...

Page 41: ...indows 98 98SE Restarting the Computer 2 2 P81 Start the computer and set the CD ROM supplied with your HDC 401EX in the computer s CD ROM drive The installation menu is displayed automatically If the installation menu is not displayed open My Computer and double click Setup exe under HDC 401EX 1 Click Install HDC 401EX Driver 2 When the Welcome wizard screen is displayed click Next 3 When the The...

Page 42: ... The power off time function is disabled Power won t be supplied to the HDC 401EX from the computer Do not disconnect the USB cable or touch the camera interface cover control panel shutter button etc while the HDC 401EX is communicating with the computer Doing so may damage the stored data When disconnecting the HDC 401EX be sure to operate in accordance with Removing the HDC 401EX P85 Notes on U...

Page 43: ...ouble click the DCIM folder 3 Double click the 100 IMAGE folder 4 In the folder select the image files you want to copy load to the computer and then drag and drop them to a desired location My Documents etc 5 P89 Similarly you can drag and drop the desired data in a desired location My Computer etc of the computer into the folder camera thereby copying the data to the folder This method of comput...

Page 44: ... want to remove and then click Stop Remove 2 Task bar WindowsMe Windows2000 WindowsXP When Stop Remove is clicked a warning screen may be displayed with the message Camera cannot be stopped In this case check to see if the camera is still communicating with the computer Remove the camera once communication has ended Before removing the camera be sure to confirm that the camera is not communicating...

Page 45: ...xt 3 When the Perform Uninstall screen is displayed click Finish Once Finish is clicked the computer will begin uninstalling the driver Confirm that you really want to uninstall the driver before clicking Finish 4 Uninstalling Deleting the HDC 401EX Driver The HDC 401EX Driver must be installed if your computer is running Windows 98 98SE Uninstall delete the HDC 401EX driver only when the driver i...

Page 46: ...ssed while another image was being recorded Wait until the recording of the current image finishes before capturing a new image The shutter button was pressed while the flash was charging Wait until the viewfinder lamp stops blinking before capturing an image Still images were taken while the camera was in Playback mode or Video Capture mode Press the MODE button to switch to Still Image Capture m...

Page 47: ...indows 98 98SE before the HDC 401EX driver was installed so the device was not properly recognized Open Device Manager and check to see if a corresponding entry is found under Other Devices Use the supplied USB cable Disconnect the cable from the computer and camera and then firmly reconnect it Connect to another USB port Remove all peripheral devices other than the keyboard and mouse Install the ...

Page 48: ...at the camera is not communicating with the computer before removing the camera Follow the operation under Removing the Camera Device Manager To open Device Manager right click on My Computer click Properties and then click Device Manager Alternatively open Control Panel double click System click System Properties and then click Device Manager Problem Cause Action The display is in Japanese The LC...

Page 49: ...e YYYY MM DD 24hr YYYY MM DD 12hr DD MM YYYY 24hr DD MM YYYY 12hr MM DD YYYY 24hr MM DD YYYY 12hr TV PAL NTSC Beeper On Off Language Japanese English Italian Spanish French German Chinese1 体中文 Chinese2 繁體中文 Power Off Time 1 min 3 min 5 min 10 min Off Menu Items and Default Settings 96 95 Problem Cause Action Card locked Card full No image Lens Cover Closed Low battery File Protect The write protec...

Page 50: ...n CD ROM dedicated video cable neck strap camera case cleaner AA alkaline dry batteries 2 1 The HDC 401EX doesn t come with an SD memory card 2 The internal flash memory has an effective storage area of approximately 14 MB since it already contains program files 3 The numbers of recordable images recording times and data sizes are reference values The actual figures will vary according to the subj...

Page 51: ...e heard 2 P27 P23 P20 Setting the Date and Time Use M N to select the part of Date you want to set and then press Set the year month and date using the control panel Once the setting is complete press Use M N to select the part of Time you want to set and then press Set the hours and minutes using the control panel Once the minutes are set press M N Increase and decrease O P Move through the items...

Page 52: ...102 101 Memo Memo Memo Appendix ...

Reviews: