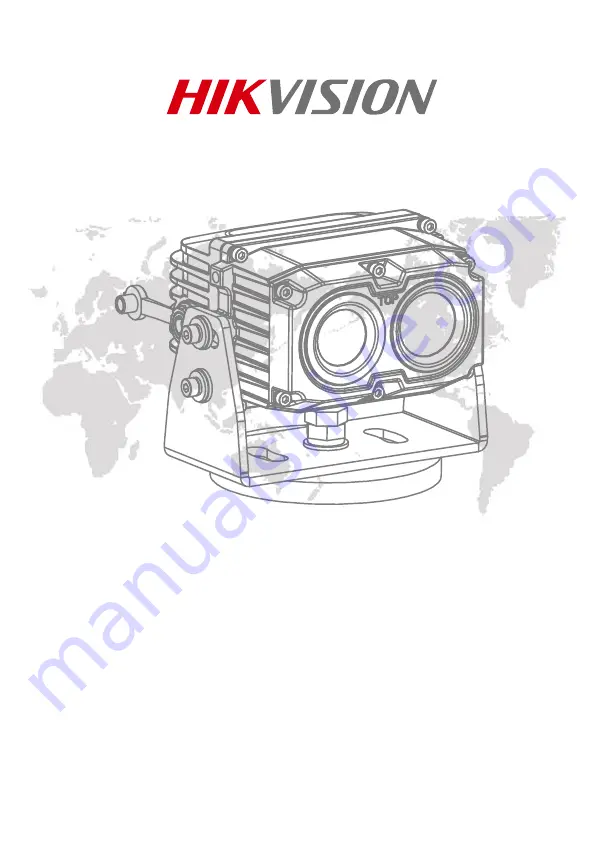
background image


Thermal Driving Assistance System 


User Manual


.

COPYRIGHT ©  2017 Hikvision. ALL RIGHTS RESERVED 

Summary of Contents for Thermal Driving Assistance System

Page 1: ...Thermal Driving Assistance System User Manual COPYRIGHT 2017 Hikvision ALL RIGHTS RESERVED...

Page 2: ...t to change without notice due to firmware updates or other reasons Please find the latest version in the company website http overseas hikvision com en Please use this user manual under the guidance...

Page 3: ...pursuant to part 15 of the FCC Rules These limits are designed to provide reasonable protection against harmful interference when the equipment is operated in a commercial environment This equipment g...

Page 4: ...ictly compliance with the electrical safety regulations fire prevention regulations and other related regulations in your local region Please use the power adapter which is provided by normal company...

Page 5: ...llation 8 2 2 3 Pendent Installation 9 2 3 Display Installation 10 2 3 1 Installation with Velcro 11 2 3 2 Installation with Screws 12 2 4 Cable Connection 13 3 Basic Operations 15 3 1 Power On Off 15...

Page 6: ...verview introduces the system including the main description major functions appearance and interface menu description Chapter 2 Installation shows you how to install the system onto your vehicle and...

Page 7: ...view and react to any potential risks It helps the driver to see the road clear with low illumination in fogs smokes and even in total darkness Therefore it ensures the driving security 1 2 Functions...

Page 8: ...3 1 3 1 Dimensions Refer to the figure below for thermal lens camera dimensions 9 99 mm 3 89 62 mm 2 44 4 4 2 mm 0 17 36 mm 1 42 89 3 mm 3 51 90 3 mm 3 56 25 4mm 1 25 4mm 1 Refer to the figure below f...

Page 9: ...88 3 mm 3 48 21mm 0 83 21mm 0 83 9 56 4 9 1 5 1 5 Refer to the figure below for the display dimensions 192 3mm 7 57 136 3 mm 5 37 156 6 mm 6 17 83 1 mm 3 27 224 8 82 23 6 0 93 35 mm 1 38 136 3 mm 5 3...

Page 10: ...or the description of the ports and interfaces of camera and display 1 2 3 1 Data Output Interface Connect to Data input interface Export the data from the camera and provide power for the camera 2 Po...

Page 11: ...the camera and the bracket 2 2 Camera Installation There are three types of installation magnetic installation pendent installation and base installation 2 2 1 Magnetic Installation Notes The system...

Page 12: ...non ferromagnetic vehicle secure the camera to the middle of the magnetic plate and make sure the lens faces the front Front End Rear End b For ferromagnetic vehicle secure the camera to the vehicle r...

Page 13: ...w on the bottom of the camera and take apart the nuts and washer 2 Take the camera body away from the bracket Note Keep the washer screws and other accessories 3 Loosen four screws to take apart the c...

Page 14: ...era onto the bracket with four screws and do not fix the screws 6 Adjust the tilting angle of the camera and then tighten the screws 2 2 3 Pendent Installation Steps 1 Follow the step 1 to step 3 of s...

Page 15: ...all the camera onto the bracket with four screws and do not fix the screws 4 Adjust the tilting angle of the camera and then tighten the screws 2 3 Display Installation Installation with Velcro and in...

Page 16: ...lace it in the right place at once Steps 1 Install the suction cup mount purchased separately to the display by screwing the mount to the end Suction Cup Mount Velcro Display Screw 2 Place the display...

Page 17: ...ew Suction Cap Switch Instrumental Panel Glass 4 Clear the display with the proper cloth 5 Tear up the Velcro film and secure the display on the vehicle with the screws Velcro Suction Cap Mount 2 3 2...

Page 18: ...ghter Male Interface Cigar Lighter Female Interface Data Cable Top View Front View Purpose Connect the cables to power on the driver s system with the vehicle Step 1 Connect the camera with display Co...

Page 19: ...power up the driver s system with the terminal box make sure you connect the red line to the positive terminal and the black line to the GND terminal 3 Use the cable clamps to secure the cables and pa...

Page 20: ...he live view of camera shows and the Activating view disappears the system is turned on successfully 3 1 2 Power Off When the system is powered on hold the Power button for three seconds to power off...

Page 21: ...powered off abnormally press the Power button to restart the system When there is mist or ice on the lens enable the heater The heater icon shows and the heater stops when the lens is warm enough Whe...

Page 22: ...splay Menu Restore Default Settings Widescreen Mounting Height The height of mounted camera from the horizon as the H value in the following figure Elevation Angle The angle between the lens optical a...

Page 23: ...screen mode the screen will be overspread and in Narrow Screen mode the live view shows in original scale Restore Default Settings Restore all settings to the default value H Horizon Purpose The opera...

Page 24: ...e proper working of Smart function you should correct the system first Step 1 Hold the Menu button to enter the menu 2 Set the Mounting Height Elevation Angle and the Distance from Vehicle Left and Ve...

Page 25: ...he Elevation Angle Short Lane 4 2 De Ice Heater Configuration The driver s system supports auto heating and manual heating Set the proper heating mode in concrete cold scene Auto Heating The system de...

Page 26: ...ite hot black hot and green hot are selectable 1 White Hot The hot part is light colored in view 2 Black Hot The hot part is black colored in view 3 Green Hot The hot part is green colored in view Res...

Page 27: ...y affects the image Image Contrast Adjust the contrast of the screen It only affects the image Backlight Brightness Adjust the brightness of the display backlight 5 Smart Detection When the smart dete...

Page 28: ...e the target is framed in different colors Red The target to vehicle distance is between 15 m to 40 m Green The target to vehicle distance is between 40 m to 100 m 6 Appendix 6 1 Content List Name Amo...

Page 29: ...tone 19 66 2 0 909 0 935 PVC Polyvinyl Chloride 70 158 0 93 Pitch 20 68 0 967 Paint 70 158 0 92 0 94 Wallpaper 20 68 0 85 0 90 Cloth 20 68 0 98 Concrete 20 68 0 92 Pavement 5 41 0 974 Smooth Porcelain...

Page 30: ...Thermal Driving Assistance System User Manual 25 UD09142B 0100001080226...

Reviews: