Thinkware DC-H1-FG, User Manual
The Thinkware DC-H1-FG is an innovative dash camera designed to capture crystal-clear footage on the road. For a hassle-free experience, we offer a comprehensive and easy-to-follow user manual for free download on our website. Ensure optimal usage and make the most of your device with our user-friendly manual at manualshive.com.
Share
Download


Reviews:
No comments
Related manuals for DC-H1-FG

J1456W
Brand: GE Pages: 86

J1456W
Brand: GE Pages: 86

J1456W
Brand: GE Pages: 86

H1055
Brand: GE Pages: 2

E1680W
Brand: GE Pages: 86

E1680W
Brand: GE Pages: 86

E1680W
Brand: GE Pages: 86

E1680W
Brand: GE Pages: 86

E1680W
Brand: GE Pages: 86

E1680W
Brand: GE Pages: 86

E1680W
Brand: GE Pages: 86

E1680W
Brand: GE Pages: 86

E1680W
Brand: GE Pages: 2

E1450W
Brand: GE Pages: 85

E1450W
Brand: GE Pages: 85

E1450W
Brand: GE Pages: 85
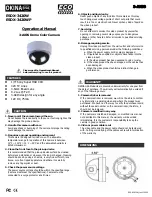
ECO Series
Brand: Okina USA Pages: 2

F3102
Brand: Zavio Pages: 31


