Motion Sensor Quartz
Security Light
Model SL-5309
The Motion Sensor Quartz Security Light turns on 300
watts of quartz-halogen lighting when motion is detected
and then, after a selectable period of time, automati-
cally turns the lighting off. The built-in photocell keeps
the lighting off during daylight hours.
Cover
Plate
Sensor
3 Wire
Connectors
4 Screws
(2 sizes)
Light Control
Cover Plate
Gasket
© 2007 HeathCo LLC
595-5496-07
Halogen
Bulb
OPERATION
* resets to Auto Mode at dawn.
Requirements
• The light control requires 120-volts AC.
• If you want to use Manual Mode, the control must
be wired through a switch – not a dimmer or other
electronic switch.
•
Some codes require installation by a qualified
electrician.
• This product is intended for use with the enclosed
gasket and with a junction box marked for use in wet
locations.
• The backplate has knockouts so the sensor can be
mounted on most junction boxes.
• In some applications a universal adaptor plate may
be needed. Adaptors are available at Home Centers
and Electrical Supply Stores.
Long Bolt
This package includes:
Move ON-TIME Switch
to 1, 5, or 10 minutes
Mode Switching Summary
Flip switch off for
one second then
back on*
TEST
AUTO
MANUAL MODE
ON-TIME
ON-TIME
* If you get confused while switching modes, turn the
power off for one minute, then back on. After the
calibration time (1
1
/
2
min.) the control will be in the
AUTO mode.
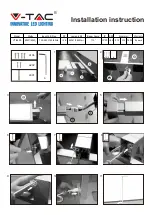
INSTALLATION
For easy installation, select an existing light with a wall
switch for replacement.
❒
Attach the lamp arm to
the backplate arm and
secure with the long
bolt.
Note:
When tightening the
arm screw, pull on the wires
to make sure the wires are not
pinched by the joint.
10 5 1
TEST
10 5 1
TEST
MANUAL MODE
AUTO
TEST
... back on.
1 Second OFF
then...
Manual mode only works at night
because daylight returns the sensor
to AUTO.
Flip the light switch off for one second
then back on to toggle between AUTO
and MANUAL MODE.
Manual mode works only with the
ON-TIME switch in the 1, 5, or 10
position.
Put the ON-TIME switch on the bottom
of the sensor in the TEST position.
Put the ON-TIME switch in the 1, 5, or
10 minute position.
Mode:
On-Time
Works:
Day Night
Test
5 Seconds
x
x
Auto
1, 5, or 10 Min
x
Manual
Until Dawn*
x