background image

HANSA NEW ZEALAND  

            +64 7 849 4749                [email protected] 

             www.hansachippers.com 

HANSA AUSTRALIA 

            1800 248 199                   [email protected] 

            www.hansachippers.com.au 

HANSA NEW ZEALAND  

            +64 7 849 4749                [email protected] 

             www.hansaproducts.co.nz 

HANSA AUSTRALIA 

            1800 426 722                   [email protected] 

            www.hansaproducts.com.au 
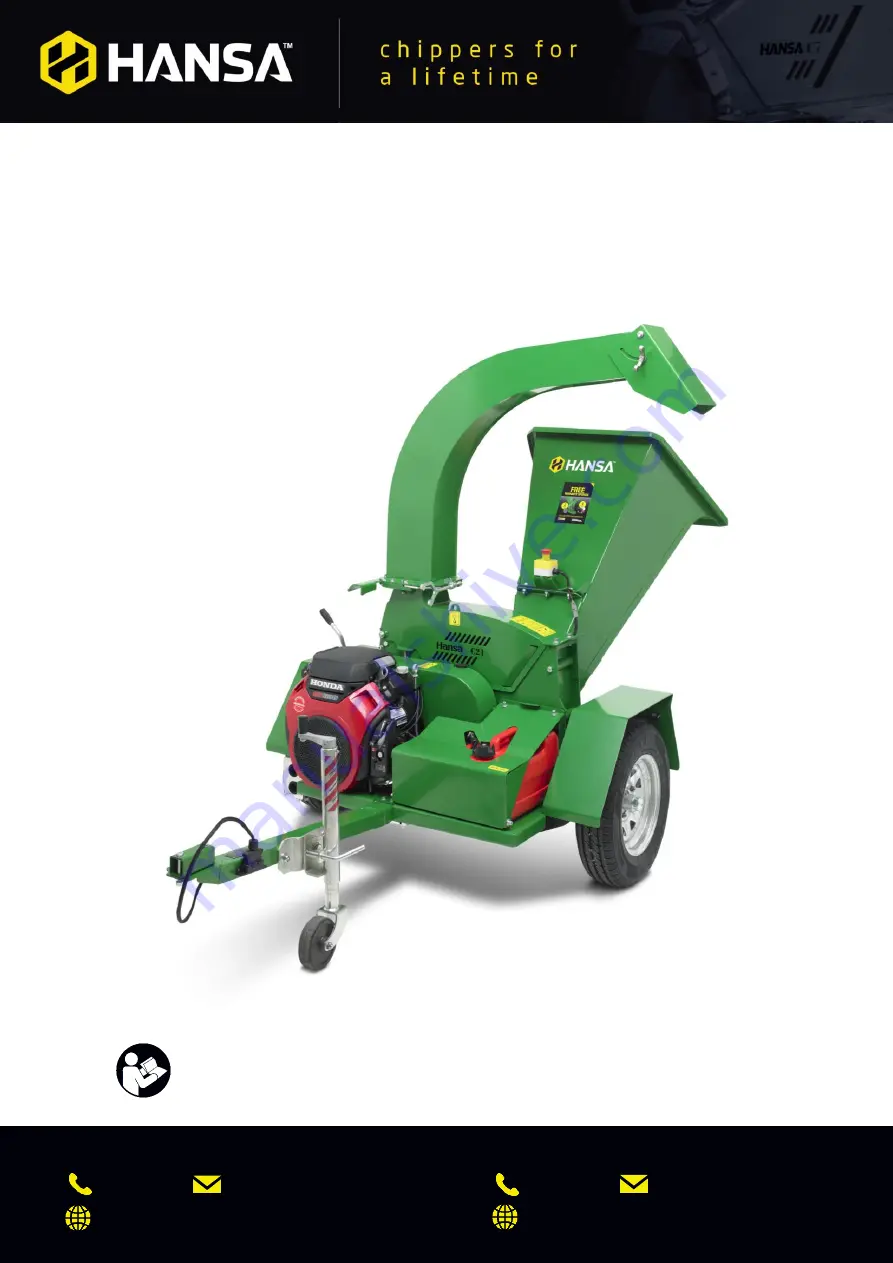


Hansa C21


Operation, maintenance and safety manual 


All operators must fully read and underst

and this operator’s manual

 before using the chipper. 

Summary of Contents for C21

Page 1: ... au www hansachippers com au HANSA NEW ZEALAND 64 7 849 4749 info hansaproducts co nz www hansaproducts co nz HANSA AUSTRALIA 1800 426 722 info hansaproducts com au www hansaproducts com au Hansa C21 Operation maintenance and safety manual All operators must fully read and understand this operator s manual before using the chipper ...

Page 2: ...R BOOKMARK NOT DEFINED TOWING SAFETY 6 IDENTIFYING HAZARDS AND RISKS 6 OPERATION 7 SAFE SETUP PROCEDURE 7 SAFE OPERATING PROCEDURE 8 STARTING PROCEDURE 9 SHUTDOWN PROCEDURE 10 PETROL 11 EMERGENCY STOP 11 STORAGE 11 TROUBLESHOOTING 11 WHAT TO DO IF 11 MAINTENANCE 12 KNIFE RE SHARPENING AND KNIFE REPLACEMENT 13 ANVIL ADJUSTMENT REPLACEMENT 15 ENGINE SERVICING 16 ENGINE OIL 16 BELT TENSION 16 BELT RE...

Page 3: ...ts vegetable matter hay grass bark Dry manure Branches Palm fronds Dead and hard timbers Note these will dull the knives faster Paper or cardboard Do NOT process Flax root balls Soil bones sand grit stones metal If you have any questions contact your authorised dealer Do NOT exceed 130 mm branch diameter Receiving your Hansa chipper You may receive your chipper assembled from your dealer or it may...

Page 4: ...he drawbar bracket followed by a heavy washer and nyloc nut Ensure that the light washer is touching the bolt head and the heavy washer is touching the nyloc nut Insert two bolts spring washers and heavy washers through the outer holes of the drawbar bracket Ensure that the spring washer is touching the bolt head and the heavy washer is touching the drawbar bracket Tighten the nuts and bolts to se...

Page 5: ...cator is closest to the outside edge of the mud guard Insert the bolts through the holes in the tail light and mud guard then secure the tail light by tightening the nuts and bolts Note Do NOT overtighten the nuts Lightly press the plastic caps into the inserts above the bolt head using a nylon hammer or suitable alternative Secure the wire loom Each mud guard requires seven cable ties to secure t...

Page 6: ...e trailer plug into place and screw the plastic nut on Attach the wheels Bolt the wheels on then screw the wheel nuts on ensuring the rounded side of the nuts taper into the steel rim Tighten the nuts using a 19 mm socket then torque them to 77 Nm Fit the outlet chute Lightly grease the flange on the chipper body Slide the outlet chute onto the greased flange of the chipper body ensuring that the ...

Page 7: ...d Line up the holes and insert the bolts washers and nuts ensuring that the heavy washer is touching the bolt head Attach the emergency stop to the bracket on the inlet chute Use a Phillip s head screwdriver to unfasten the screws from the emergency stop then use a 4 mm Allen key to fasten the provided M5 x 10 cap screws into the threaded bracket on the inlet Reattach and screw on the top of the e...

Page 8: ...heel nuts periodically to make sure they are secure Ensure the jockey wheel is in the up position and locked away during travel Ensure that the machine is towed in accordance with local trailer transport regulations Identifying hazards and risks Identify hazards and risks and take preventative steps to avoid accidents and minimise risk Possible hazards include but are not limited to moving parts t...

Page 9: ...ls Keeping the inlet chute clear Safe setup procedure Before you start Ensure the chipper is positioned in an open area and on firm level ground Ensure that the outlet chute is discharged onto soft ground e g grass Do NOT allow the outlet chute to discharge chip onto hard surfaces such as a paved or gravel surface Ejected material can rebound and cause injury Keep children pets and spectators clea...

Page 10: ... the chipper s capabilities Pre cut side branches Branches will self feed more efficiently Keep the engine clean of debris and other accumulations This prevents damage to the engine or possible fire Feed limbs and branches through butt end first leaving the foliage on This helps guide the limb down the inlet chute It reduces spinning and the occurrence of ejection of small pieces back up the inlet...

Page 11: ...e chipper The governor controls the maximum safe operating speed and protects the engine and all moving parts from damage caused by overspeed Operate the chipper with blunt knives This causes excessive vibration which may result in damage to the chipper Move or tilt the chipper while it is running Touch any guards or stick hands between guards while the chipper is running Touch any guards or stick...

Page 12: ... the lever in towards the engine To engage the belt drive slowly rotate the engagement handle clockwise until it comes to a stop This must be done slowly to allow the cutting rotor to pick up speed otherwise the engine may stall Move the throttle lever to the max position Shutdown procedure Turn the throttle lever to the min position and wait for the rotor to slow down Disengage the belt drive by ...

Page 13: ...e reach of children Store the chipper where fuel vapor will not reach an open flame or spark Switch the fuel lever to the off position For extended storage periods run the engine dry of fuel Store the chipper out of the rain Water can rust the steel body of the chipper Troubleshooting What to do if The chipper won t start The engine oil level might be too low The chipper is fitted with oil alert a...

Page 14: ...ge Replace or repair any damaged parts Check for and tighten any loose parts Do NOT attempt to repair the chipper unless you are competent to do so Maintenance Maintain the chipper with care and keep it clean at all times To service or inspect the equipment or to change an accessory you must Switch the engine off Allow the chipper to cool before any inspections or adjustments Wait until the cuttin...

Page 15: ...6 mm hexagonal Allen key A stick magnet optional Surface grinder Coolant Remove the knives for sharpening Open the rotor housing cover by removing the two housing cover locking bolts with a 16 mm spanner then lift the rotor housing cover to access the cutting rotor Rotate the cutting rotor to gain access to the knives then engage the belt drive to stop the cutting rotor from rotating Use an 18 mm ...

Page 16: ...inding to avoid softening of the steel knives Reinstall the knives Clean all mounting surfaces and remount the knives in the reverse procedure Note Be sure to replace the knives the correct way around as shown in the diagram Only tighten the clamping bolts enough to hold the knives in place during adjustment Do not tighten them fully until step 7 Adjust the knives initially using the adjustment bo...

Page 17: ...three M10 countersunk anvil bolts and torque to 44 Nm then make further adjustments with the knives as described above Turn the cutting rotor slowly by hand to check that it turns freely Close and secure the outlet chute Anvil adjustment replacement When cutting edge of the anvil is dull the anvil may be reversed can be reversed Each edge of the anvil will typically last for several hundred hours ...

Page 18: ...ne Remove oil filler cap dipstick and oil drain plug using a 19 mm spanner then let the oil drain into the container through the opening in the chassis Screw the oil outlet drain plug back in and fill the engine with 2 Litres of SAE 10W30 or SAE 10W40 through the oil filler cap located on the top of the engine Using the dipstick check the oil to make sure it is at the right level close to the uppe...

Page 19: ... direction This is the recommended tension for the belt drive when in the fully engaged position Note For new belts allow another half revolution as the tension will need to be increased after belt wear Using two 24 mm spanners screw the two M16 adjustment nuts downwards until they touch the adjustment block Then turn the top nut clockwise and the bottom nut anti clockwise simultaneously to lock t...

Page 20: ...sing a 16mm and 17 mm spanner unbolt and remove the engine 4xM10 nuts at the base of the engine Note loosen the belt tensioner to allow room for removal Remove the old belts and replace 2 x B46 vee belts Note The belts pass in between the idler wheel and belt guide on the tensioner arm Place engine back in place and ensure the pulleys are in line 1 2 3 4 Idler Wheel Tensioner arm Belt guide ...

Page 21: ...lt tension process on page 17 Fasten the guards back into place Note that after replacing a belt the tension of the new belt will quickly change as the belt initially wears into the pulley system Recheck the belt tension after two hours of operation after belt replacement Tyre pressure The maximum recommended tyre pressure is 65 Psi Bolt torque Relative Strength Bolt Marking 4 6 8 8 Recommended Ti...

Page 22: ...on initial check Initial Engine oil level check Air cleaner element clean Bearings grease Outlet swivel grease Knives check sharpen or replace Belt guarding remove and clean chip build up Drive belts tension check adjust Engine oil filter change Nuts bolts check torque Tires rims check Battery electrolyte level terminals check Outlet chute remove clean swivel Anvil check Air cleaner element replac...

Page 23: ...g System Disc speed 1800 RPM Disc dimensions 650 x 20 mm Shaft diameter 50 mm Knives Two Feed System Chipping capacity 130 mm 5 Feed type Gravity fed self feeding Inlet chute opening 200 x 285 mm Discharge System Discharge height 1850 mm Degree of rotation 270 Transmission System Belt drive 2x B46 Decals Decal Description Location General machine safety and inlet chute considerations Side of inlet...

Page 24: ...lt guard hazard Top right of pulley guard Rotor and housing safety Top face of outlet chute Outlet chute and deflector safety Outlet chute Shaft guard safety Next to shaft guard Lifting point Below lifting point on rotor cover Refuelling point Bottom right corner of fuel tank ...

Page 25: ...anty service To take advantage of the HANSA limited warranty Use only an authorised HANSA dealer for servicing to ensure the safe operation of this product The cost of routine or required maintenance and services is the responsibility of the purchaser Maintenance has to be performed according to the maintenance section contained in the relevant owner s manual supplied with this product by an autho...

Page 26: ...gs Any damage resulting from exposure of the product to soot and smoke medicines and chemical agents sea water sea breeze salt or other environmental phenomena Limitations HANSA reserves the right to modify alter and improve any product without incurring any obligation to replace any product previously sold with such modification In no event shall HANSA s liability exceed the purchase price of the...

Page 27: ... HONDA dealer HONDA will recognise your statutory rights under the Consumers Guarantee Act 1993 To ensure the safe operation of this product we strongly recommend that you only use an authorised HONDA dealer for servicing Only authorised HONDA Dealers have access to all of the special tools and training required to maintain your HONDA product in peak operating condition The HONDA engine may be rem...

Page 28: ... if the following conditions are fulfilled The problem is related to production quality or specifications of the engine The engine is within the warranty period outlined in schedule The issue does not fall within the warranty exclusions listed Procedures Take your Honda engine or Honda Power Product to an authorised Honda Dealer Present the Warranty Registration or invoice document providing proof...

Page 29: ...eration Instruct the owner operator on operating procedures and techniques Safety Instruct owner operator on safety procedures Maintenance Explain the maintenance requirements and the importance of following the maintenance schedule to the owner operator Manual Emphasise the importance of reading and understanding the manual in full before initial operation of the chipper It is the retailers respo...

Reviews: