background image

Page 1 

Version 1.1 January 2021
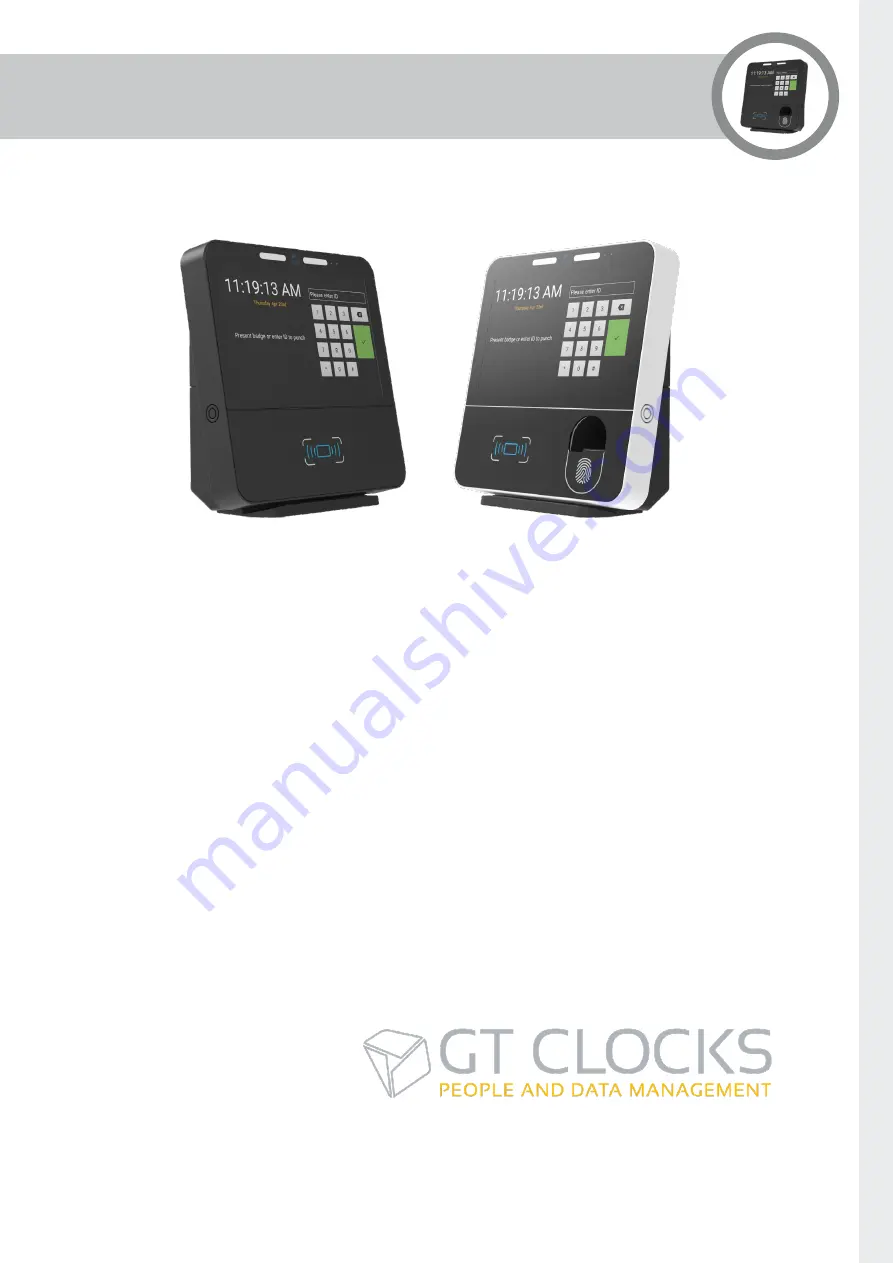
GT8 Terminal 

User Guide

Disclaimer

Copyright © 2021, Grosvenor Technology Ltd. All rights reserved.

All brands, names, or trademarks appearing in this document are acknowledged as the trademarks of their 

respective owners.

No part of this document may be reproduced in any form or by any means for any purpose without the 

written permission of Grosvenor Technology.

Whilst we make every effort to ensure the accuracy of our publications, Grosvenor Technology assumes no 

responsibility or liability for any errors or inaccuracies that may appear in this document.

www.gtclocks.com

Summary of Contents for GT8

Page 1: ...ed as the trademarks of their respective owners No part of this document may be reproduced in any form or by any means for any purpose without the written permission of Grosvenor Technology Whilst we make every effort to ensure the accuracy of our publications Grosvenor Technology assumes no responsibility or liability for any errors or inaccuracies that may appear in this document www gtclocks co...

Page 2: ...ide 7 Related Documents 7 Technical Support 7 Europe Middle East and Africa 7 North America 7 Hardware Specification 8 Display 8 Processor 8 Operating System 8 Input Output 8 Memory 8 Internal Persistent Storage 8 Host Connectivity 8 Power 8 Operating Temperature Humidity 9 Plug and Play Deployment 9 Integration 9 Sound 9 Camera 9 Physical Security 9 ...

Page 3: ...ware 12 Installation 13 Fitting the Terminal 13 Location 13 Power Options 14 AC 110 240V via Adapter 14 DC 12V 14 Power over Ethernet PoE 14 Battery Backup 15 Installing Optional Modules 16 Front Plate 16 Fitting Internal Fingerprint Reader Module 17 Fitting Proximity or Card Swipe Reader Modules 18 Fitting the Wi Fi Module 19 ...

Page 4: ...p 23 Configuring Network Settings 24 Enable and Configure Wi Fi 24 Configure Wired Networks 25 Configuring Readers 26 Wiegand Bitmask 27 Parity Mask 27 Testing Card Readers 28 Testing the Camera 28 Testing Biometric Reader 29 Terminal Health Information 30 Software Deployment 31 Deployment from USB memory device 31 Application Setup 32 Care and Maintenance 33 Maintenance Instructions 33 ...

Page 5: ...ce Important Note Menus and options will vary depending on the hardware options supplied and software version installed Please refer to additional instructions supplied with your terminal for additional information ...

Page 6: ...and the old battery should be disposed of in accordance with local regulations Care should be taken when recycling the terminal to ensure that the batteries are removed and recycled in accordance with local regulations legislation Maintenance The GT8 terminal does not require any regular maintenance during its service life It is however recommended that periodically once every 6 months the conditi...

Page 7: ...cation User Guide Relevant to your application Technical Support Technical Support can be obtained from Grosvenor Technology from the following points of contact Europe Middle East and Africa Phone 44 0 1202 627611 E mail HCM EMEAsupport grosvenortechnology com Website www grosvenortechnology com North America Phone 1 800 989 5197 E mail HCM USsupport grosvenortechnology com Website www gtclocks c...

Page 8: ...e available including Suprema SFM Slim Lumidigm M320 Expanded fingerprint database of 10 000 using fast matching on clock algorithm Contactless smart card readers Mifare iClass SE Feig and Multi tech readers Proximity card reader supports a range of readers including HID Prox 125kHz Magnetic stripe card reader Barcode reader or external scanner multi format Visible and IR I O relay modules Memory ...

Page 9: ... HTML 5 Apps Software Development Kit available Sound Integrated stereo speakers Integrated microphone Camera 5 Megapixel with front illumination supports photo and video Physical Security Metal wall mount bracket with optional security fixing Optical tamper detection Dimensions 216mm H x 206mm W x 78mm D 8 5 inches H x 8 1 inches W x 3 8 inches D Weight 1 5Kg 3 3Lbs Sustainability 7 year design l...

Page 10: ...dule Mag Barcode Visible IR The GT8 Terminal can be customised by fitting a range of optional modules Reader Modules 125KHz Reader Module RM HID B iClass SE Reader Module RM ICLSE B Elatec MultiTech Reader Module RM ELATEC B Feig HI Reader Module RM FEIG HI B Feig FC Reader Module RM FEIG FC B Barcode Visible Red Reader Module RM BARV B Barcode Infra Red Reader Module RM BAR B Magnetic Stripe Read...

Page 11: ...ecting internal modules Accessory Mounting Stereo Speakers One each side Bio Module Location SF Slim or Lumidigm Battery Location Dotted line Micro USB Connector Debug ADB port Reset Button Initiates hardware reset terminal will reboot Accessible via hole in back cover using straightened paper clip or similar Proximity Reader Card Swipe Mounting Position Camera Module JP4 Socket Supports WiFi exte...

Page 12: ...Page 12 Software Operating System Android 10 0 Supports native Android and HTML 5 Apps Remotely upgradeable configurable ...

Page 13: ...t with screws taking care to feed the cables through the bracket aperture 4 Offer the GT8 unit close to the wall bracket and connect Ethernet and or power cables 5 Position the GT8 unit slightly above the wall bracket with its back parallel with the wall and make sure all cables are free to move 6 Centralise the GT8 unit against the wall bracket and slowly lower the terminal by sliding it down the...

Page 14: ...ed voltage output of 12VDC 5 with minimum 2A capacity The power supply should incorporate suitable overload protection The GT8 power indicator will show blue when power is supplied via the 12V power jack either with direct DC connection or with an AC power adapter Power over Ethernet PoE The GT8 may be powered via the Ethernet cable with suitable upstream PoE switch or injector Supported standards...

Page 15: ... be extended in elevated ambient temperatures to protect the battery When the GT8 is running from battery the power indicator on the front of the Terminal will show red The EM BB 2HR A battery pack comprises a rechargeable li Ion battery along with protection circuitry to prevent safety hazards caused by overload over charging or over discharge WARNING ONLY FIT BATTERY PACK SPECIFIED FAILURE TO OB...

Page 16: ...irst ensuring no cables are trapped followed by the lower cover Tip You may find it easier to refit the lower cover with the battery removed and then fit the battery afterwards ensuring the battery retaining clip pops out to secure the battery in place Front Plate Depending on the option chosen the GT8 lower glass front plate may be either With fingerprint aperture Without fingerprint aperture Bot...

Page 17: ...Remove lower cover 2 Slide fingerprint reader module under the PCBA ensuring ribbon cable does not detach 3 Secure with screws provided do not over tighten 4 Connect USB cable to one of the left hand ports 5 Replace lower cover do not over tighten screws Note The fingerprint reader module is normally a factory fit option only ...

Page 18: ...he GT8 before fully securing using the screws supplied RM MAG B RM BAR B RM HID B Proximity Reader Card Swipe Mounting Position Fixing screws RM HID B in position with fingerprint reader fitted 1 Remove lower cover 2 Position proximity card swipe module and secure with screws provided do not over tighten 3 Connect ribbon cable to connector on PCBA circled right 4 Replace lower cover do not over ti...

Page 19: ... each antenna 1 Position Wi Fi module against the JP4 socket at a vertical angle of approximately 45 degrees observing key way and gently push in 2 Secure Wif Fi module with screw supplied do not over tighten Tip You may need to press down lightly on the module to make fitting the securing screw easier 3 Applying light pressure attach antennae to the fabric strips on the sides of the GT8 Terminal ...

Page 20: ...ote If an application is installed but not configured the terminal continues to switch between the initial screen and the application set up screen Terminal Setup Navigation Navigating using the touch screen Touch icon to open menu Touch label text to open a menu item e g This opens the item options menu e g To activate deactivate a toggle switch touch it To go back touch the back arrow displayed ...

Page 21: ... will be powered off at the end of the process Note The shut down utility allows the GT8 to be powered off without exhausting the battery To power down the unit run the utility until the unit has completed its shut down then remove the power If power is left connected the unit will re start after a delay To trigger the shut down process or perform a re boot 1 Enter terminal set up press admin icon...

Page 22: ...ttings and data erased Recovery Menu The recovery menu can be accessed by pressing and holding the button marked RECOVERY whilst the terminal is powering up When the Droid logo is displayed on the screen release the recovery button then press and release long press the button again to display the menu Once displayed the menu can be navigated by short and long presses on the recovery button Reboot ...

Page 23: ...seconds If this happens you will need to restart the terminal to access the admin section 1 Enter terminal set up press admin icon 2 Enter PIN the default is 1905 Note The default PIN is 1905 however it is recommended that this is changed since the default PIN appears in freely available documents To change the PIN select the Launcher item on the Setup menu 3 Select settings 4 Scroll down to Launc...

Page 24: ...nable and Configure Wi Fi 1 Enter terminal set up press admin icon 2 Enter PIN the default is 1905 3 Select settings 4 Select Terminal internet 5 Click Wi Fi option 6 Click Use Wi Fi to toggle Wi Fi on off 7 Toggle turns green and after a few moments displays available networks 8 Select chosen network enter details and click connect 9 If the network you require is not listed select Add network to ...

Page 25: ...er PIN the default is 1905 3 Select settings 4 Select Terminal internet 5 Click Wired network option 6 Select required option and enter details as required Note If using a VPN select the VPN option from the menu click the plus symbol at the top right of the next screen and enter your VPN details ...

Page 26: ... to the application which can then apply its own decode Both the reader type and the decoder can be auto detected and this is the default configuration In most instances this will give satisfactory results however these can be manually configured if required Readers are configured through the Settings menu 1 Enter terminal set up press admin icon 2 Enter PIN the default is 1905 3 Select settings 4...

Page 27: ...ask has to match the number of bits it is sometimes useful to be able to specify more than one bitmask Also Wiegand formats often contain parity information to validate the data The bitmask decoder supports the following syntax for configuring multiple bitmasks with parity checking Parity Mask The parity mask must have the same length as the bitmask If more than one parity mask is specified all ha...

Page 28: ... screen select Test Readers 2 Present swipe card as appropriate to view the information Testing the Camera Selecting the Camera icon will enable the GT8 s camera and a live picture will appear on the terminal display There is a camera active indicator to the right of the camera which is lit when the camera is operating 1 Select camera 2 Select option 3 Select option and click next 4 Camera options...

Page 29: ...s admin icon 2 Enter PIN the default is 1905 3 Select settings 4 Select Biometric 5 Click Test Reader top right Note Clicking the other menu items provides further information about the installed Biometric reader 6 Click Test Reader 7 Place finger on reader as shown 8 The test fingerprint is displayed 9 Press Test Reader to retest if required 10 Click anywhere outside of the test reader window to ...

Page 30: ... display their status accessed by selecting health from the Settings menu 1 Enter terminal set up press admin icon 2 Enter PIN the default is 1905 3 Select settings 4 Select health 5 Scroll down menu to review information Note Depending on the item further information may be displayed by clicking on it ...

Page 31: ...will only look for files in this folder Any files outside of this folder will be ignored 3 Copy the firmware and or application files to the GT Install folder Note The supplied file must be copied to the memory stick as is with file structure intact Do not unzip the contents of zip files 4 Properly eject the USB memory stick from your computer 5 Start the USB Install utility from the Apps screen o...

Page 32: ...en the Application not initialized and home screen the home screen will now also display the application icon To configure the application select Setup Application or click the application icon the application icon is also displayed on the terminal applications window GTEasyClock set up menu Note Please refer to the application user guide for specific instructions on how to configure your applicat...

Page 33: ...rial Pre impregnated micro fibre cloths or tissues are preferable If spray products are used take care to avoid run off and do not allow any liquid to enter the terminal case For a smear free finish polish with a dry clean lint free cloth DO NOT use any other janitorial products acids solvents polishes or abrasives As long as the care instructions for the GT8 are followed there is no need for regu...

Page 34: ...Email sales gtclocks com Telephone 44 0 1202 621711 1 800 989 5197 Web www gtclocks com Page 34 ...

Reviews: