H2682 & H2683
MASTER
MACHINIST'S
LEVEL
INSTRUCTIONS
© 2003 Grizzly Industrial, Inc.
These incredibly accurate levels
are used for setting up lathes,
milling machines and other fine
machinery. The H2682 has a
resolution of .0002" over a 10"
span. The H2683 has a resolution
of .0005" over a 10" span. If you
put a newspaper page under the
machine that you are leveling, the
bubble will move!
Checking the level's accuracy:
1.
Place the level on a clean
surface. Make sure the base
of the level is wiped clean. Dirt
and dust can affect the
accuracy of your readings.
2.
If the bubble in the large vial is
pegged to either side, rotate
the level until the bubble is
close to center. You can also
adjust by placing shims under
one end of the level.
3.
Take note of the bubble
reading in the large vial. Mark
where the level rests on the
surface before the next step.
4.
Rotate the level exactly 180°
and take note of the bubble in
the large vial. If the bubble
does not line up opposite the
first reading, within one half of
a line, it needs to be adjusted.
Adjusting your level:
1.
Unthread a screw from the
side plate, and insert it into the
end cap, on the end opposite
the small vial, if you have the
8" level. If you have the 12"
level, insert the screw in the
side cap. Use pliers to pull out
the end cap. Be careful to not
lose the spring.
2.
Loosen the top jam nut with
the included wrench. Move the
bottom nut to adjust the level.
Clockwise moves the nut
down, and counter-clockwise
moves it up. This level is so
sensitive that resting your
weight on the surface that you
are leveling can affect the
readings!
3.
Recheck the level for
accuracy. Repeat
Step 2
if it is
not accurate.
4.
When accurate, tighten the top
jam nut onto the bottom jam
nut to lock the adjustment in
place. Let the level sit for 2-4
hours and check for accuracy
again.
Machinist’s Level Usage
1.
Clean the surface to be
leveled and the base of the
machinist’s level. Grime and
metal shavings will affect the
accuracy of the readings.
2.
Place your level parallel with
the edge and in the center of
the surface to be leveled.
3.
Adjust the surface to be
leveled so that the bubble in
the small vial is centered. The
bubble should come to a
complete stop in the exact
center of the vial.
4.
Next, adjust the surface so
that the bubble in the large vial
is centered.
5.
Rotate the level 90° and
repeat
Step 4
.
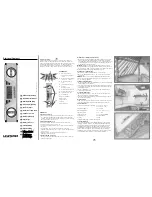
Small Vial
Large Vial
End Cap
Side Plate Screw
Large Level
Jamb Nut
Printed in China