background image

311365H

ENG

Ultra

®

Max II/Ultimate Mx II

- For Portable Airless Spraying of Architectural Coatings and Paints. For professional use only.
Not for use in explosive atmospheres.-

3300 psi (22.8 MPa, 227 bar) Maximum Working Pressure

See page 3 for model information, including maximum working pressure and approvals.

Korean patent 10-0579681

IMPORTANT SAFETY INSTRUCTIONS
Read all warnings and instructions in this
manual. Save these instructions.
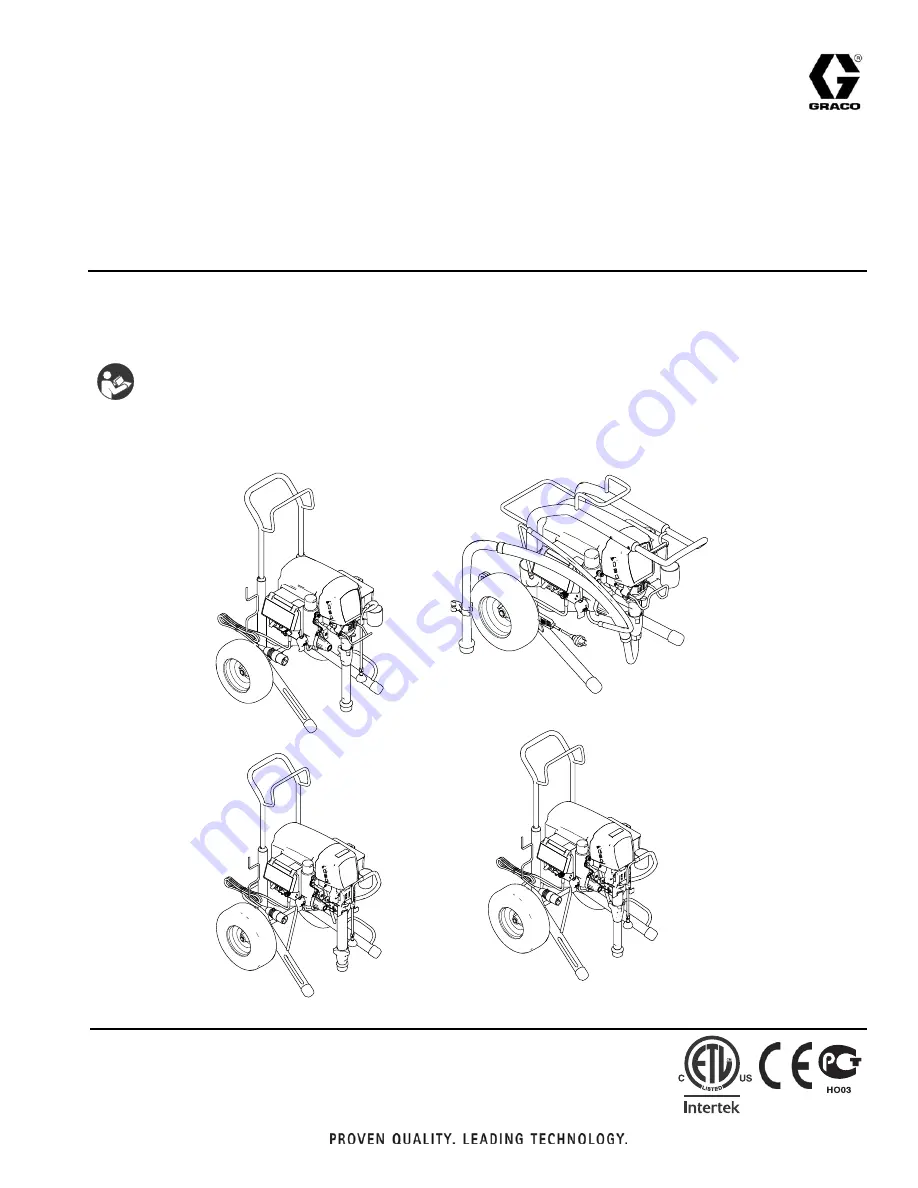
MARK V

ti13461a

ti13460a

1095/1595 HI

ti13459a

695/795 LOW

695/795 HI

ti13450a

Repair

Summary of Contents for ultimate mx ii

Page 1: ...atmospheres 3300 psi 22 8 MPa 227 bar Maximum Working Pressure See page 3 for model information including maximum working pressure and approvals Korean patent 10 0579681 IMPORTANT SAFETY INSTRUCTIONS Read all warnings and instructions in this manual Save these instructions MARK V ti13461a ti13460a 1095 1595 HI ti13459a 695 795 LOW 695 795 HI ti13450a Repair ...

Page 2: ... Motor Control Board 23 240 Vac Filter Board 25 110 Vac U K Motor Control Board 26 110 Vac U K Filter Board 28 Pressure Adjust Potentiometer 30 Pressure Control Transducer 31 Notes 33 Drive and Bearing Housing Replacement 34 Disassembly 34 Assembly 34 Motor Replacement 36 Removal 36 Installation 36 Displacement Pump Replacement for 695 795 38 Removal 38 Installation 39 Displacement Pump Replacemen...

Page 3: ...dard 826093 826067 Premium 826094 826069 795 Standard 826071 Premium 826072 1095 Standard 826073 Premium 826074 1595 Standard 826082 Premium 826081 Ultimate Mx II 1595 Standard 826075 Premium 826076 240 Europe 695 255134 249663 795 249666 256165 1095 249667 Mark V 249905 256166 240 Europe Multi cord 695 255135 249668 795 249671 1095 249672 Mark V 249907 110 UK 695 249673 795 249674 1095 249675 Mar...

Page 4: ...Models 4 311365H 240 Australia 695 255139 249685 795 255140 249687 1095 249688 100 Japan Taiwan 695 255136 249676 795 255137 249678 1095 249680 Vac Model Type Lo Boy Hi Boy ...

Page 5: ... is required do not connect the grounding wire to either flat blade terminal The wire with insulation having an outer surface that is green with or without yellow stripes is the grounding wire Check with a qualified electrician or serviceman when the grounding instructions are not completely understood or when in doubt as to whether the product is properly grounded Do not modify the plug provided ...

Page 6: ...and container labels provided with the paints and solvents Follow the paint and solvents manufacturer s safety instructions Fire extinguisher equipment shall be present and working Sprayer generates sparks When flammable liquid is used in or near the sprayer or for flushing or cleaning keep sprayer at least 20 feet 6 m away from explosive vapors SKIN INJECTION HAZARD Do not aim the gun at or spray...

Page 7: ...ion cords Do not expose to rain Store indoors PRESSURIZED ALUMINUM PARTS HAZARD Do not use 1 1 1 trichloroethane methylene chloride other halogenated hydrocarbon solvents or fluids containing such solvents in pressurized aluminum equipment Such use can cause serious chemical reaction and equipment rupture and result in death serious injury and property damage MOVING PARTS HAZARD Moving parts can p...

Page 8: ...sh 1 Premium Digital Display 2 ON OFF switch 3 Pressure control 4 Prime Spray valve 5 Filter 6 AutoClean2 7 Siphon tube 8 Pump 9 Bearing Housing ProConnect 10 Fluid Outlet 11 Drain tube 12 Trigger Lock 13 Model serial tag 14 WatchDog Switch not Mark V 1 2 3 4 5 6 7 8 9 10 11 12 13 14 ti13451a ...

Page 9: ...done correctly If necessary see Troubleshooting page 11 for other possible solutions System pressure must be manually relieved to pre vent system from starting or spraying accidentally Fluid under high pressure can be injected through skin and cause serious injury To reduce risk of in jury from injection splashing fluid or moving parts follow Pressure Relief Procedure whenever you are instructed t...

Page 10: ...ire a 50 60 Hz 10A circuit with a grounding receptacle 2 Do not alter ground prong or use adapter 3 120 Vac A 12 AWG 3 wires with grounding prong 300 ft 90 m extension cord may be used 220 240 Vac You may use a 3 wire 1 0 mm 12 AWG minimum extension cord up to 90 m long Long lengths reduce sprayer performance Improper installation or alteration of grounding plug results in risk of electric shock f...

Page 11: ...valve and clean Check balls and seats for nicks replace if neces sary see pump manual 310643 or 310894 Strain paint before using to remove particles that could clog pump 6 Suction hose connections 6 Tighten any loose connections Check for missing or damaged seals 7 Fluid filter tip filter or tip is clogged or dirty 7 Clean filter see operation manual 8 Prime valve leaking 8 Relieve pressure Repair...

Page 12: ...g nut 1 Throat packing nut is loose 1 Remove throat packing nut spacer Tighten throat packing nut just enough to stop leakage 2 Throat packings are worn or damaged 2 Replace packings see pump manual 310643 or 310894 3 Displacement rod is worn or damaged 3 Replace rod see pump manual 310643 or 310894 Fluid is spitting from gun 1 Air in pump or hose 1 Check and tighten all fluid connections Reduce e...

Page 13: ...K Sprayer does not run at all See flow chart page 19 Digital display is blank Control board status light never lights Sprayer does not run at all Check transducer or transducer connections 1 Make sure there is no pressure in the system see Pressure Relief page 9 Check fluid path for clogs such as clogged filter 2 Use airless paint spray hose with no metal braid 1 4 in x 50 ft minimum Smaller hose ...

Page 14: ...rol board socket Connect power set sprayer ON and control knob to 1 2 turn clockwise If sprayer does not run set sprayer to OFF and go to next step 5 Connect a confirmed working transducer to control board socket 6 Set sprayer ON and control knob to 1 2 turn clockwise If sprayer runs install new transducer Replace control board if sprayer does not run 7 Check transducer resistance with ohmmeter le...

Page 15: ... clean and secure continue to step 4 4 Set sprayer to OFF and spin motor fan 1 2 turn Restart sprayer If sprayer runs replace control board If sprayer does not run continue to step 5 5 Perform Spin Test Test at large 4 pin motor field connector Disconnect fluid pump from sprayer Test motor by placing a jumper across pins 1 2 Rotate motor fan at about 2 revolutions per second A cogging resistance t...

Page 16: ...rge 4 pin motor field connector There should not be continuity from pin 4 the ground wire and any of the remaining 3 pins If motor field connector tests fail replace motor 7 Check Motor Thermal Switch Unplug thermal wires Set meter to ohms Meter should read the proper resistance for each model see table below Digital display shows E 05 Control board status light blinks 5 times repeatedly TYPE OF P...

Page 17: ... 2 turn clockwise If sprayer does not run replace control board Digital display shows E 06 Control board status light blinks 6 times repeatedly Sprayer does not run at all Check the connections Control is not receiving a motor position sensor signal 1 Turn power OFF 2 Disconnect motor position sensor and inspect for damage at connectors 3 Reconnect sensor 4 Turn power ON If error continues replace...

Page 18: ...roubleshooting Procedure Plumb pressure gauge into paint hose plug sprayer in and turn power switch ON Does sprayer reach or ex ceed its maximum pressure Unplug the transducer from control board Does motor stop running Bad transducer Replace and test with a new one Replace the control board Mechanical problem See the proper fluid pump manual for the sprayer for further trouble shooting procedures ...

Page 19: ...st transducer to the board Does the motor run Replace potentiometer Pressure switch See Step 3 Is the proper reading pres ent through the ther mal switch wires Replace the ON OFF switch See step 4 Does the motor run See Step 1 Do you have over 100 AC volts See Step 2 Do you have over 100 AC volts Repair or replace power cord If motor is hot let cool and re test If Step 4 still shows incor rect res...

Page 20: ... ground wire 87 Disconnect coil connector Y Remove coil 81 12 Remove top two screws 39 and control box 61 13 Remove six screws 27 two screws 102 and control board Installation 1 Use Acetone or equivalent solvent to thoroughly remove thermal paste from the pockets of the Powerbar 2 Apply thermal compound a For 2 capacitor boards and 6 capacitor boards with the Powerbar shown in Figure 1 below apply...

Page 21: ...tall control box 61 with top two screws 39 8 Install coil 81 and tighten screw and nut 88 Tighten ground wire screw 87 and coil connector Y 9 Connect transducer connector E to motor control board 10 Connect 15 20A switch 178 1595 model only 11 Connect motor control board power lead s D to ON OFF switch 33 12 Connect WatchDog 49 switch connector X to motor control board 13 Connect potentiometer con...

Page 22: ...rol Board 22 311365H 100 120 Vac North American and Japan Taiwan Tighten 2 screws to 14 17 in lb 40 E A C F E 20 86 52 B 27 67 C 82 68 82 115 34 39 39 38 96 A 61 33 D 178 49 49 X Y 88 88 87 81 ti12994b 102 69 F H G ...

Page 23: ...t and remove wiring from baffle 10 Remove six screws 27 two screws 102 and control board Installation 1 Use Acetone or equivalent solvent to thoroughly remove thermal paste from the pockets of the Powerbar 2 Apply thermal compound a For 2 capacitor boards and 6 capacitor boards with the Powerbar shown in Figure 1 below apply a small amount of thermal compound 15U114 or 110009 5 to shaded component...

Page 24: ...baffle Install motor shroud 7 Connect transducer connector E to motor control board 8 Connect motor control board power connectors K to filter board 146 9 Install control box 61 with top two screws 39 10 Connect filter board power connectors J and power cord connectors D to ON OFF switch 33 11 Connect potentiometer connector C to motor control board 12 Connect WatchDog switch X to motor control bo...

Page 25: ...63 from filter board 146 Installation 1 Install filter board 146 with four screws 163 2 Connect motor control board power connectors K to filter board 146 3 Connect filter board power connectors J to top two terminals of ON OFF switch 33 and power cord connectors D to bottom two terminals of ON OFF switch 4 Connect potentiometer connector C to motor control board 52 5 Connect WatchDog switch X to ...

Page 26: ... coil connector Y Remove coil 81 12 Remove top two screws 39 and control box 61 13 Remove six screws 27 two screws 102 and control board Installation 1 Use Acetone or equivalent solvent to thoroughly remove thermal paste from the pockets of the Powerbar 2 Apply thermal compound a For 2 capacitor boards and 6 capacitor boards with the Powerbar shown in Figure 1 below apply a small amount of thermal...

Page 27: ...l control box 61 with top two screws 39 8 Install coil 81 and tighten screw and nut 88 Tighten ground wire screw 87 and coil connector Y 9 Connect transducer connector E to motor control board 10 Connect 15 20A switch 178 1595 model only 11 Connect motor control board power lead s D to ON OFF switch 33 12 Connect WatchDog 49 switch connector X to motor control board 13 Connect potentiometer connec...

Page 28: ... 146 Disconnect filter connector L from power cord connector L 5 Remove four screws 163 from filter board 146 Installation 1 Connect motor control board power connectors K to filter board 146 Connect filter connector L to power cord connector L 2 Install filter board 146 with four screws 163 3 Connect filter board power connector J and power cord connector D to ON OFF switch 33 4 Connect potentiom...

Page 29: ...Pressure Control Board 311365H 29 110 Vac U K 61 A 96 38 39 68 34 115 82 82 163 E 20 80 67 E 102 C 52 27 D Tighten 2 screws to 14 17 in lb 1 58 1 92 N Ä 33 146 X J 39 ti12996b 69 F G H ...

Page 30: ...and potentiometer 82 on control panel 68 Torque nut to 30 35 in lb 3 38 3 95 N m 2 Install pressure control knob 34 Check pressure control knob alignment to potentiometer shaft Turn shaft fully clockwise and attach knob in full ON position with a hex wrench 3 Connect potentiometer connector C to motor control board 4 Install cover 96 with four screws 38 Relieve pressure page 9 Wait 5 minutes befor...

Page 31: ...tor control board 4 Remove four screws 39 and control box 61 Allow control panel 68 to hang down freely 5 Remove grommet 40 from control box then remove transducer 86 and o ring 20 from filter base 67 6 Remove grommet 40 from transducer and save for reuse Relieve pressure page 9 Wait 5 minutes before servicing 38 96 ti13493a E 95 ti12999a C ti12997a ti7458a 39 61 68 ti13494a 67 86 20 ti7260a 40 ti...

Page 32: ...nsducer 86 and transducer into control box 2 Connect transducer connector E to motor control board 95 3 Install control box 61 and control panel 68 with four screws 39 4 Connect potentiometer connector C to motor control board 5 Install cover 96 with four screws 38 ti7447a 40 67 20 86 ti13496a E 95 ti12999a ti7458a 39 61 68 ti13494a C ti12997a 38 96 ti13493a ...

Page 33: ...Notes 311365H 33 Notes ...

Page 34: ...e gear 89 and thrust washers 28 30 90a 36 see page 29 are in place Brush grease onto gear teeth 1 Push drive housing 90 onto motor 84 and install with five screws 6 Torque to 190 210 in lb 21 23 N m 2 Install bearing housing 83 with four screws 14 and washers 12 Torque to 25 30 ft lb 34 40 N m 3 Install front cover 51 with four screws 31 4 Install shroud 72 with two screws 158 5 Install pump 91 se...

Page 35: ...Drive and Bearing Housing Replacement 311365H 35 158 55 24 31 72 91 108 51 14 12 83 85 6 90 84 31 ti13000a ...

Page 36: ...emove motor 84 from cart frame 62 Installation 1 Slide new motor 84 under two screws 23 in cart frame 62 near control 2 Install two screws 23 and nuts 19 on motor side opposite control 3 Install baffle and connect motor wires 4 Tighten all four screws 23 and nuts 19 torque nuts to 115 135 in lb 13 15 N m 5 Install strain relief 29 onto motor wires and into power bar plate 69 6 Install control hous...

Page 37: ...Motor Replacement 311365H 37 158 58 84 19 36 90a 28 89 30 90 6 51 158 12 14 31 23 19 68 39 96 61 91 90 6 12 14 62 ti13001a ...

Page 38: ...emoval 1 Flush pump 2 Remove screw 31 and slide pump rod shield 108 forward 3 Cycle pump in JOG mode until pump pin 44 is in position to be removed Turn power switch OFF and unplug power cord Push up retaining ring 43 and push pump pin out 4 Remove suction tube 76 hose 94 and any washers and o rings 5 Loosen pump jam nut 56 Unscrew pump Relieve pressure page 9 Wait 5 minutes before servicing ti717...

Page 39: ...rings and suction tube 76 and hose 94 6 Screw jam nut 56 up onto pump until nut stops Tighten jam nut by hand then tap 1 8 to 1 4 turn with a 20 oz maximum hammer to approximately 75 5 ft lb 102 N m 7 Install pump rod shield 108 with screw 31 8 Fill packing nut with Graco TSL until fluid flows onto top of seal If pump pin works loose parts could break off due to force of pumping action Parts could...

Page 40: ...connect paint hose from pump 6 Raise latch lock Push latch open 7 Ratchet open pump door a Ratchet pump door forward b Twist latch u bolt out of pump door recess c Place u bolt on pump door outer edge d If pump door is stuck do steps e f and 8 otherwise go to step 9 e Twist latch u bolt back from pump door outer edge f Place u bolt on pump door protrusion See Skin Injection Hazard page 6 ti7326a t...

Page 41: ...on 1 Adjust piston rod with pin holder to pull out piston rod Tap piston rod on hard surface to push in piston rod 2 Push pump collar flush with bearing housing ledge to be able to close pump door 3 Slide pump into connecting rod Push pump pin until it is fully retained Note Pin will snap into position ti6377a ti7331a ti7327a ti6325a ti5492a ti7328a ti6378a ...

Page 42: ...not tighten latch 5 Rotate pump to align with paint hose Connect paint hose and hand tighten to 70 in lb 6 Tighten latch and rotate latch lock into locked position 7 Attach drain hose to sprayer 8 Fill pump with Graco TSL until fluid flows onto top of seal ti7329a ti6313a ti6299a ti6204a TI6312a ti7330a ti5493a ...

Page 43: ...Lo Boy Series B 695 Hi Boy Series D 795 Hi Boy Series C 1095 1595 Mark V Series B Potentiometer Black ON OFF Switch Power Plug Pressure Transducer Motor Black white green ground green ground Digital Display Watchdog Switch 14A 10A 1595 MARK V ti7346a ...

Page 44: ...Series B 695 Hi Boy Series D 795 Hi Boy Series C 1095 1595 Mark V Series B Black Pressure Transducer Digital Display ON OFF Switch Power Plug Black white green ground Motor green ground Potentiometer 1595 Switch 20A 15A Watchdog Black ON Dip Switch ti12980a ...

Page 45: ...TWO large capacitors on control board Potentiometer ON OFF Switch Power Plug Pressure Transducer Motor Black white green ground green ground Digital Display Watchdog ti7523a Digital Display Black ON OFF Switch Power Plug Pressure Transducer Motor Brown green ground green ground Black Blue Blue Brown Blue 175 Watchdog ti7347a Japan Taiwan UK Models Models ...

Page 46: ...FF Switch Power Plug Black white green ground Motor green ground Potentiometer AutoClean Black Watchdog Black Motor Leads Motor Sensor Leads Thermal Switch ON Dip Switch Black Pressure Transducer Digital Display ON OFF Switch Power Plug Motor green ground Potentiometer AutoClean Watchdog Motor Leads Motor Sensor Leads Thermal Switch Black Blue Blue Brown Brown Blue ON Dip Switch Japan Taiwan Model...

Page 47: ...Notes 311365H 47 Notes ...

Page 48: ...lose any defect in material or workmanship repairs will be made at a reasonable charge which charges may include the costs of parts labor and transportation THIS WARRANTY IS EXCLUSIVE AND IS IN LIEU OF ANY OTHER WARRANTIES EXPRESS OR IMPLIED INCLUDING BUT NOT LIMITED TO WARRANTY OF MERCHANTABILITY OR WARRANTY OF FITNESS FOR A PARTICULAR PURPOSE Graco s sole obligation and buyer s sole remedy for a...

Reviews: