

English
1
Getting Started:
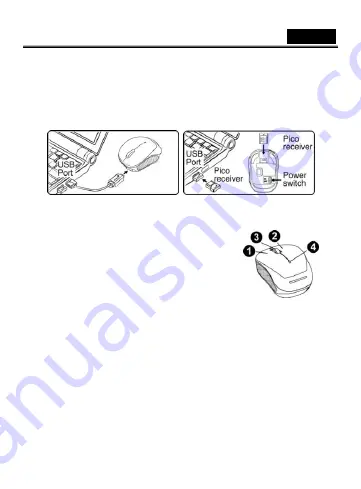
1.
Before you can use this device, it needs to be charged, so connect the micro USB
cable to Micro Traveler 9000R and any USB port on your PC. It takes
approximately two until three hours to fully charge.
2.
In charging mode, the LED light will be on and will turn off when charged.
3.
Connect the USB receiver to any USB port on your PC.
4.
Make sure that you have switched on the power switch underneath the mouse.
Note:
If the LED is flashing, you need to recharge the mouse immediately.
Mouse Button Assignments
1.
Left Button:
Provides traditional mouse functions
like click, double click and drag.
2.
Magic-Roller:
Press the “Magic-Roller” to surf the
Internet and Windows documents.
3.
Right Button:
Provides traditional mouse click
functions.
4.
LED indicator:
Indicates device
Starting/Charging/Battery low
-
Starting: LED lights up for three seconds to
initiate.
-
Charging: LED light is ON.
-
Fully charged: LED light is OFF.
-
Battery low: LED will flash at a slow speed to indicate low battery power.
Note:
Download the programmable driver from our website: www.geniusnet.com
Warning: (Troubleshooting)
1.
Do not use the wireless optical/laser mouse on a desk which is made of glass or
mirror.
2.
The connection of the wireless device is
factory preset
, so when you plug the
USB receiver into any USB port, the connection between the micro receiver and
the mouse
will be established automatically
.
3.
In case your PC did not install the hardware successfully, remove the micro
receiver from the USB port and go
Human Interface Devices
under
Device
Manager
to remove the mouse then plug in the micro receiver to a USB port
again.
4.
If you feel the mouse does not move smooth as usual, you need to recharge the
mouse immediately.


